In Infince there are two types of notifications – System Notifications and Custom Notifications. The System Notifications are the system-generated notifications whereas the manually created or customised notifications are the Custom Notifications.
System Notifications
System Notifications are alert messages you receive when an activity occurs in your account. They are indicated by the red dot on the ‘Bell’ icon on the top right side of the dashboard. The count of unread/new notifications is also displayed.
Notifications
Click on the ‘Bell’ icon to open the ‘Notifications’ panel to view all your notifications. The notifications are displayed with the most recent one on top You can scroll through each notification and mark them as read/unread. Also, you can clear each notification from the ‘Notifications’ pop-up.
Notifications List
Click on the three dots on the top of the ‘Notifications’ panel to mark all the notifications as read/unread and clear them.
Click on the Refresh icon to refresh the ‘Notifications’ panel and display the new notifications, if any.
Types of Notifications
Meeting – Meeting Recordings
You will receive a workplace notification and email when your meeting has been successfully recorded. The meeting title and date will be provided in the email. Click on the URL to view the recording.
File Storage
You will receive a workplace notification when your file storage reaches the maximum limit or exceeds the limit provided and when it has been upgraded.
Custom Notifications
Custom or Manual Notifications enable you to notify users/groups about important updates or events. You have control over what’s in the message, when it’s sent, and who gets it.
For the recipients, the custom notifications are displayed along with and in the same way as the System notifications described above.
Creating a Custom/Manual Notification
You can create a notification by clicking the + icon on the top right corner of the Notifications panel or by choosing “Custom Notification” option from the “Quick Actions” menu.
On clicking, the ‘Create Notification’ pop-up appears.
Enter the notification title, text description.
Choose the priority of the notification as Normal, High or Critical as per the need. High and critical notification stays on top of the notification panel.
In the “Send” option choose whether you wish to send the notification ‘Now’ or ‘Schedule’ for later.For scheduled notifications, select the date and time for the notification to be sent out.
In case you want to provide navigation to a dashboard while clicking the View link in the notification, then enable the navigation by choosing the ‘Yes’ option. Select the navigation destination as Dashboard and page as any dashboard configured in your system.
Click on the Next button.
Select the entire organization, organizational unit, department, team, or user to which the notification has to be sent.
Note:The organization will be displayed based on the user’s roles and permissions.
Select the organization if you want to send the notification to all users of the organization.
In case you want to send the notification to the Organizational units, team(s) or users, check the checkbox and select the respective organizational units, teams or users.
Click on the Next button to preview the notification. You can view the notification name, description, scheduled date & time, navigation to organizational unit/department/team/user and navigation destination.
Click on the Send button to send the notification on the scheduled date & time to the respective organizational unit/department/team/user.
View the notifications
The ‘Your Notifications’ pop-up shows the notifications that have already been sent or are in pending status. You can view, edit, or delete the notifications.
Notification Settings
You may enable or disable the Notifications that are sent to the users.
Click on the ‘Gear’ icon on the Notification pop-up to configure the notification settings.
Configure your preferred notifications in the In-App and Email Applications.
Click ‘Reset to default settings’ to change the notification settings to default settings.
A regular hybrid workday consists of workers navigating between dispersed messages, video meetings, and multiple document drives. Alignment is challenging…Read More
Enter the Account ID sent to your email during registration
Enter your login credentials
You will now be signed in to your Infince account
Accessing Cloud Console
If you have administrative privileges, you can also access the Cloud Console from Cloud Home – click on the Go to Cloud Console button on the top right.
You’ll be navigated to the Overview page (or Getting Started while you are on Trial), where you can view details such as:
Cloud URL
Number of employees and guests
Billing details
Subscribed apps
Activity log
Click on the App Store to view the installed Apps and explore available apps. From here, you can subscribe to Apps or try them if you are on a trial plan.
The Administration menu allows you to add users, view server usage, allocate storage, and more, depending on the permissions for your role.
The Infince Cloud Console serves as the central hub for managing your workplace. The Overview page offers a snapshot of key information, enabling Administrators to monitor and manage the platform with ease.
Infince allows users to create and share external contacts, such as business partners or consultants. You can add multiple external contacts to your Infince application. To create a new contact, click on the ‘My Contacts’ tab in the ‘People’ menu and click on the ‘+ New Contact’ button.
Adding Contact
The ‘New Contact’ pop-up appears, where you can add the first name, last name, email id, profile picture, company name, phone number, notes (if any) and click on the Submit button.
Add Contact
The contact added will be displayed in the ‘My Contacts’ tab and will be displayed in the ‘Contacts’ tab of Infince Business Phone System (provided the user has access to IBPS).
My Contacts tab
View the contact
To view the contact details. click on the ‘View’ icon.
View Contact
You can view the contact details in the ‘Contact Details’ pop-up.
Contact Details
Call History
To view the call history details of your contacts, click on the ‘Call History’ icon.
Call History
You can view the call history details of your contact in the ‘Call History’ pop-up.
Call History details
Edit Contact
To edit your contact, click on the ‘Edit’ icon.
Editing Contact
The ‘Edit Contact’ pop-up appears, where you can edit your contact details.
Edit Contact
Favorite
You can make the contact as favorite so that it will be listed on the top in your Contacts tab. Click on the ‘Favorite’ icon to make your contact as favorite.
Favorite
Share your contacts
To share your contacts with other users, click on the ‘Share’ icon.
Sharing contacts
The ‘Share Contact’ pop-up appears, where you can share contacts to a department, team or to a user.
Share Contact
Click on the Submit button in the ‘Share Contact’ pop-up. All the contacts shared with any user will be displayed in their ‘Shared Contacts’ tab.
Shared Contacts
You can view the contact details, call history and add the shared contact to my contact list.
Become a Data-driven Business with Infince Communication Boards Business dashboard software has become an essential tool for enterprises looking to…Read More
When you sign up for Infince, the Get Started page displays all essential information in an organized and accessible format. During the 14-day trial, you can explore the Infince Apps – Intranet, Drive, Task, Calendar & Meetings – separately or together, as the “Workplace Bundle”. You also have access to Skill Lake. You may also have access to Skill Lake. Refer to the video for more information.
Explore Apps from the App Store
To try Infince Cloud apps, install the trial version of the Infince Workplace Bundle or the specific App from the App Store. On the Get Started page or App Store, locate the desired App.
Click the Try Now link to view the details of the App.
Click Try Now button to install the App & experience its features.
Upgrade Your Account
When your 14-day trial ends, you can upgrade to a paid account to continue using Infince Apps. Refer to this article for more details.
Review key usage data and access shortcuts to frequently used modules.
Note: Upgrading ensures uninterrupted access to Infince Enterprise Application Cloud and all apps you’ve selected from the Marketplace. Monitor your billing regularly to manage costs and usage efficiently.
Business continuity planning has been a crucial aspect of business success considering how unprecedented disruptions can have a significant impact…Read More
Welcome to Infince Enterprise Application Cloud! Follow these steps to start your free trial and set up your Infince account. The trial provides 14 days of access to explore apps on the Infince Marketplace, add users, and collaborate.
Step 1: Start Your Free Trial
To sign up for the free trial of the Infince Cloud platform:
Enter your Account ID sent to your email during registration
Enter your credentials.
Click the Continue button.
Explore Infince
After signing in, you will be in the Infince Cloud Console. During the 14-day trial, you can:
Explore apps available on the Infince Marketplace.
Add users to collaborate and test apps.
Note: The trial version provides access to the Marketplace for 14 days. Ensure you add users and explore apps within this period to evaluate Infince’s features.
How Infince's Online Collaboration Software Facilitates Effective Business Communication Effective communication plays a significant role in business success. Having proper…Read More
Dashboards are great tools for collaboration. A Dashboard is an information management tool that can visually track and analyze what is happening in the business. Dashboards can be set up for the Organization, Organizational Units, and Teams. Users can also keep Private dashboards for individual purposes. It is also a great tool for organizational communication and information sharing.
Tiles are the individual information snippets/cards that are the building blocks of the Dashboard. Users can often customize and arrange dashboard tiles based on their preferences, focusing on the most crucial information for their needs.
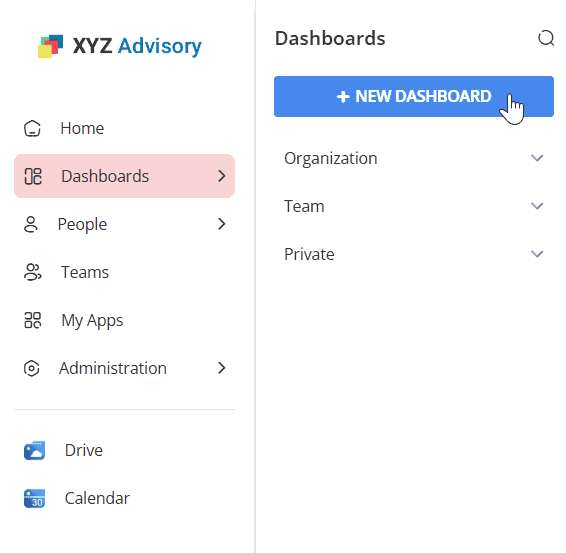
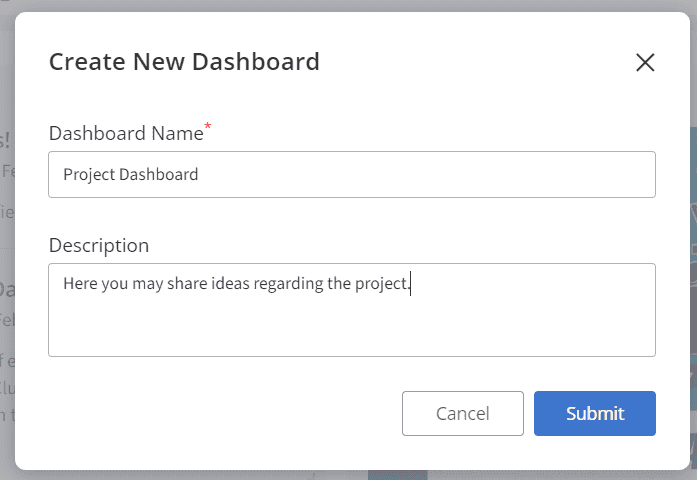
Creating a new Dashboard
Click the Dashboards menu and the + New Dashboard button to create a new dashboard.
Dashboards menu
In the Create New Dashboard pop-up, enter the name and description of the dashboard and click the Submit button.
Creating a new Dashboard
Creating a new Tile
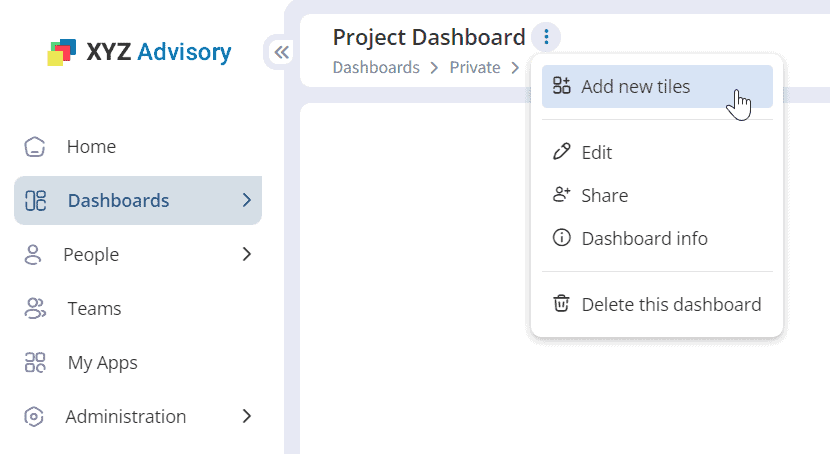
Click on the +Add Tiles button to add tiles to the created dashboard.
Adding tiles to Dashboard
You may add tiles by clicking the three dots (kebab) icon and the Add new tiles option.
Adding tiles from Dashboard Settings
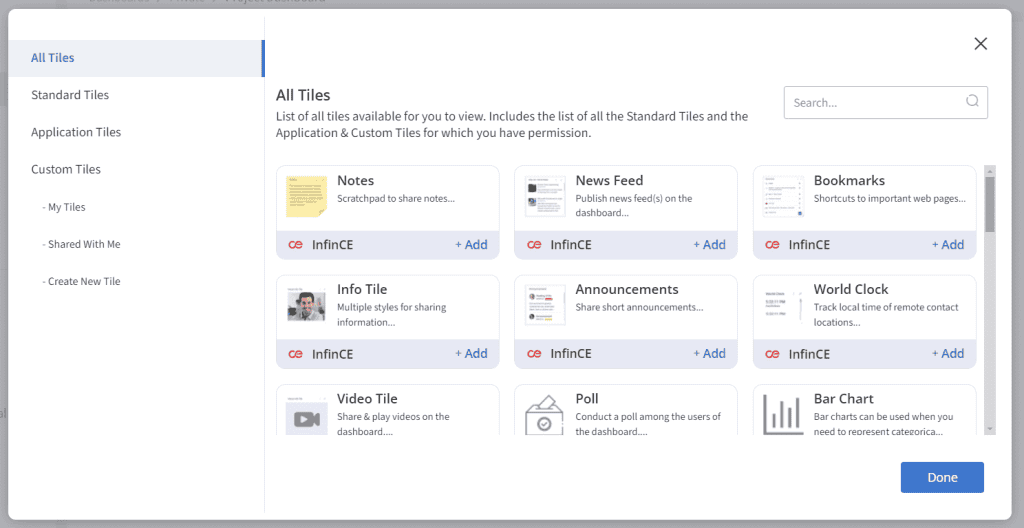
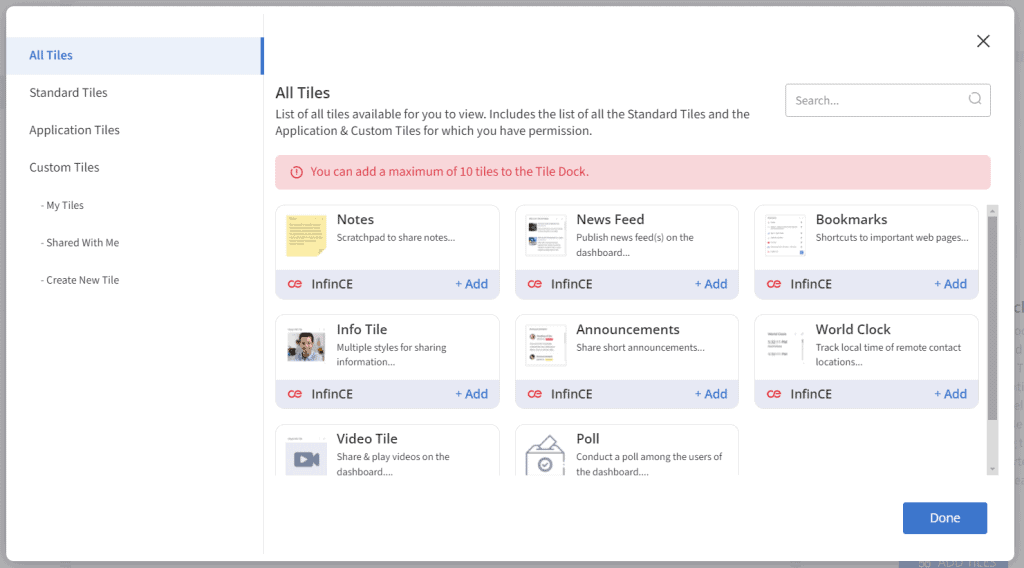
The All Tiles pop-up appears, where you may click on the +Add button on the required tiles to add the tile to the Dashboard. Click on the Done button to close the All Tiles pop-up.
Adding tiles to Dashboard
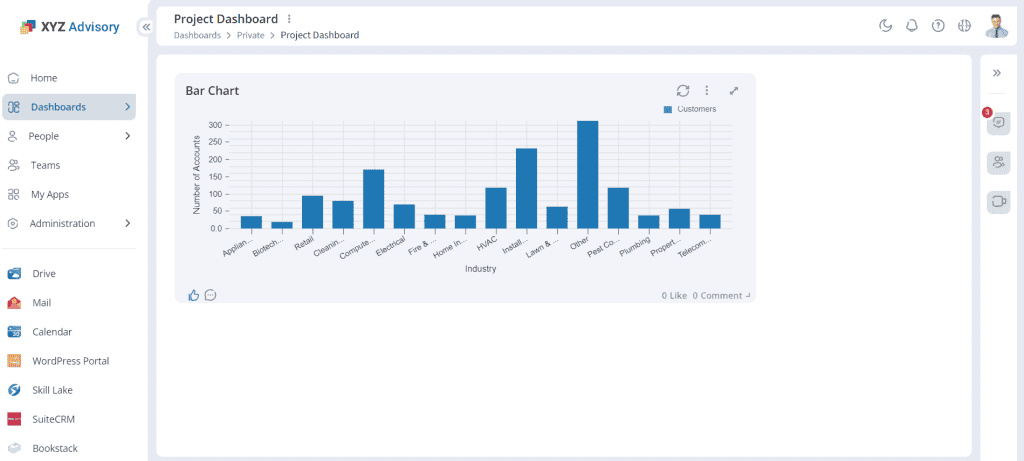
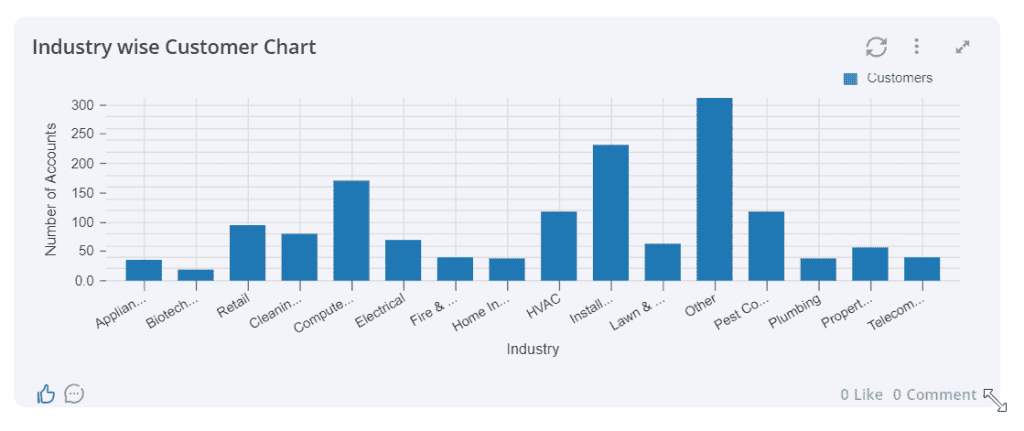
The added tile will be displayed on the Dashboard.
Tile added to the Dashboard
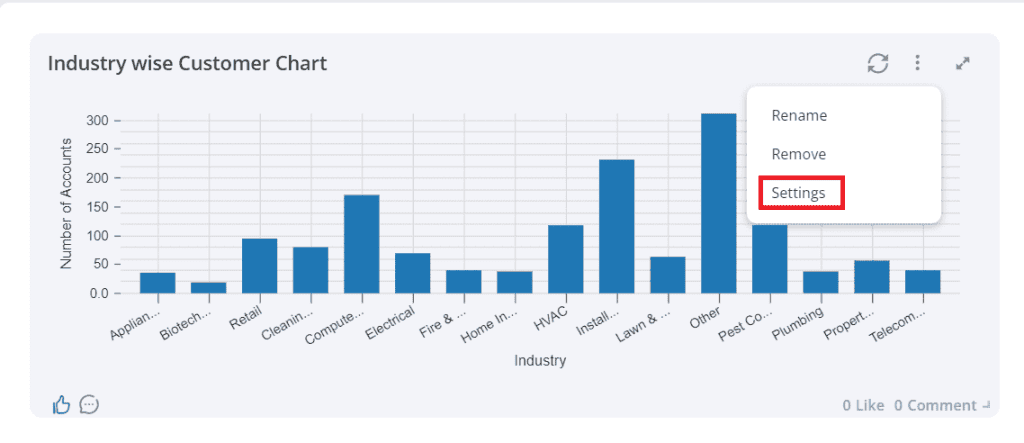
Renaming the tile
Click the three dots/Manage icon and the Rename option to rename the tile name. Click on the Submit button to save the changes made.
Renaming the tile
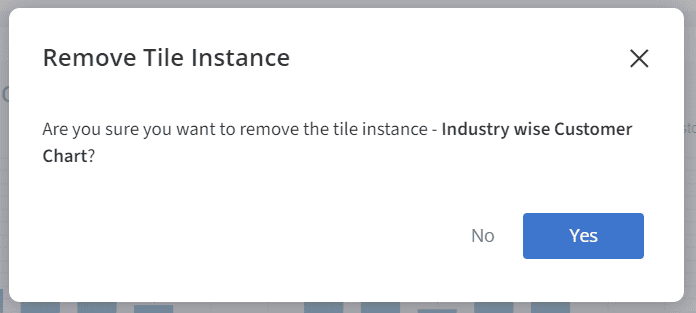
Removing the tile
Click the three dots/Manage icon and the Remove option to remove the tile. A confirmation message will appear, and you may click the ‘Yes’ button.
Removing tile instance
Tile Settings
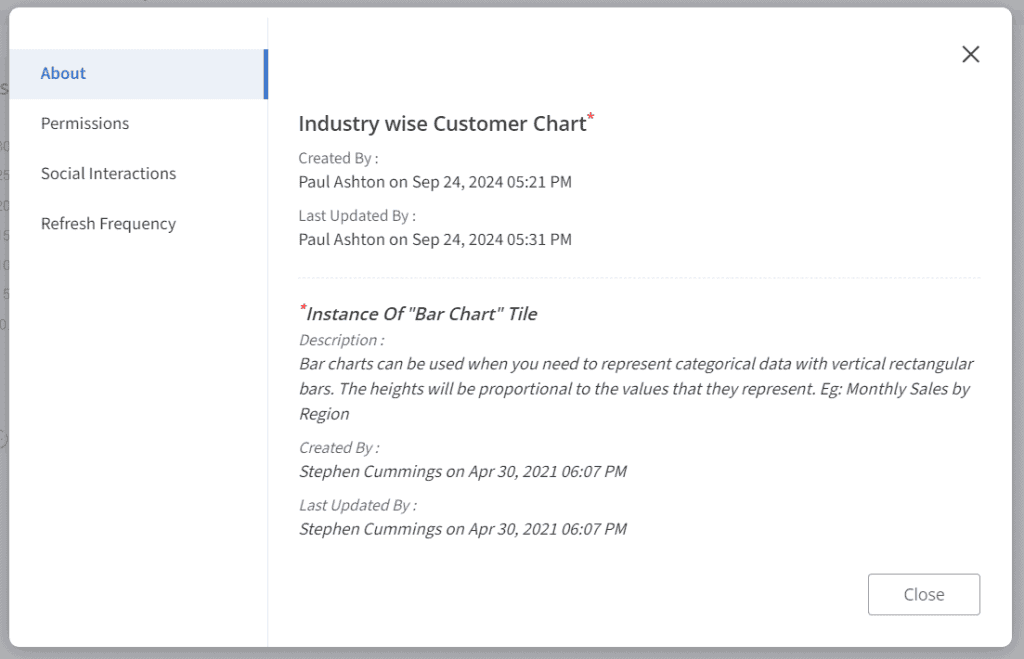
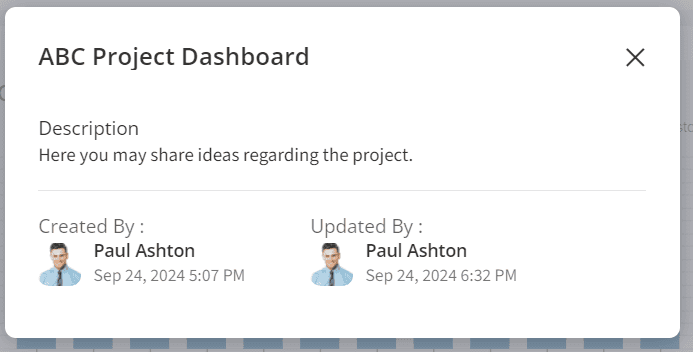
Click the three dots/Manage icon and the Settings option to view the tile settings.
The About tab displays the basic information of the tile, such as created by, updated by, etc.
Tile Settings
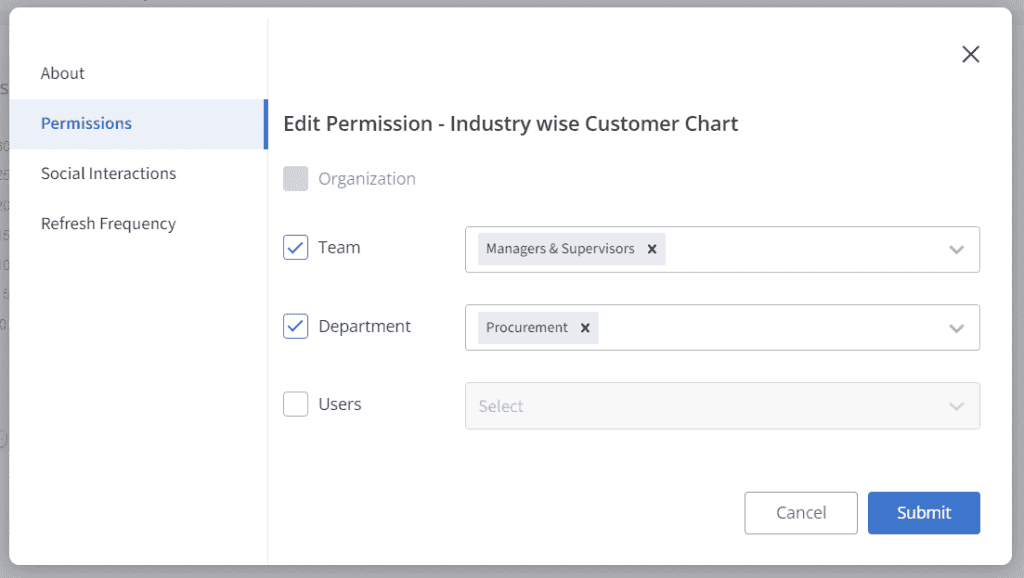
In the Permissions tab, you may provide Edit permissions for the tile to individual users or groups with access to this dashboard.
Setting permissions for the tile
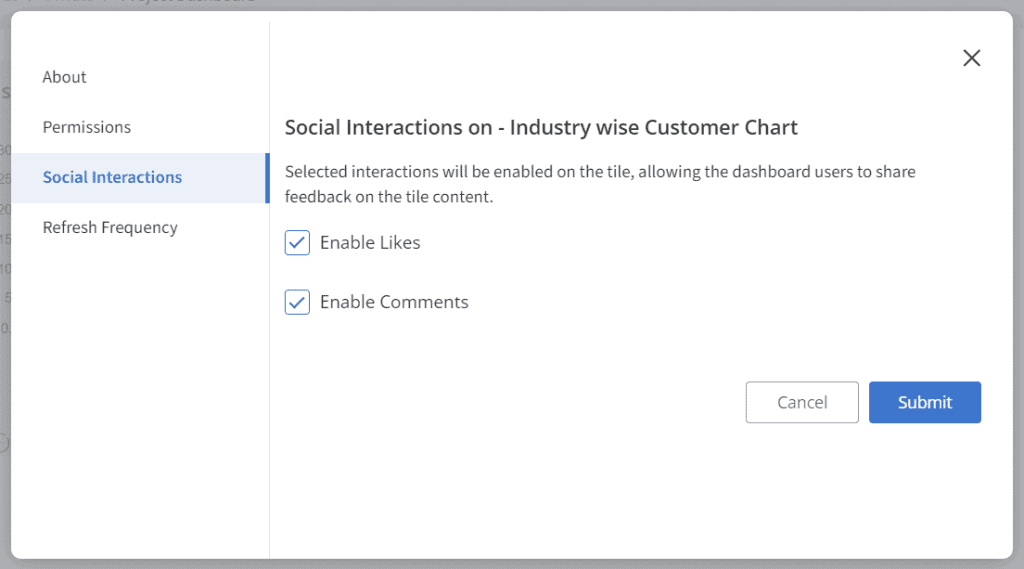
In the Social Interactions tab, enabling the Like and Comments feature for the tile is possible so the dashboard users can react to the tile content.
Social Interactions
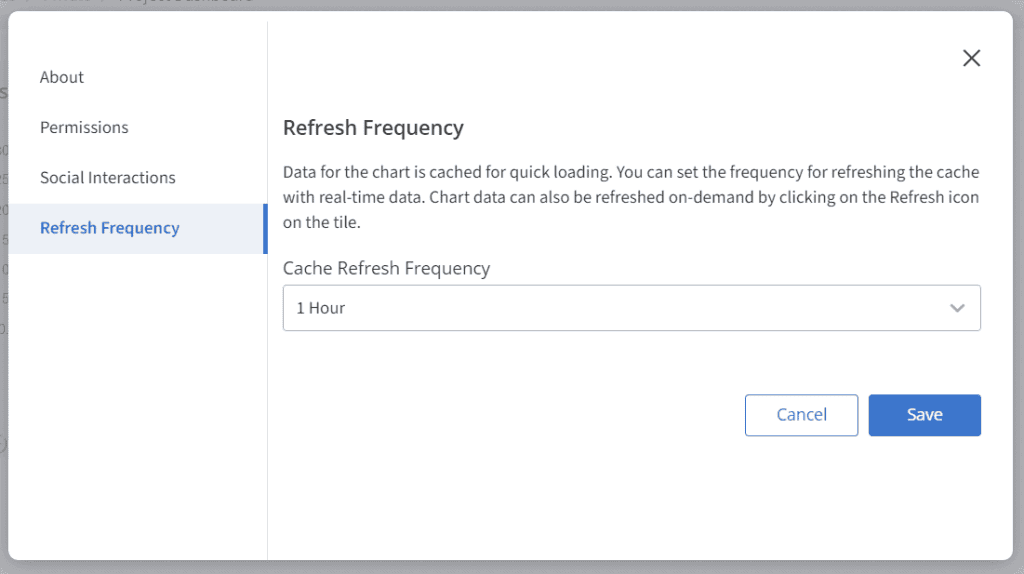
Refresh Frequency
This option is available only for Custom Tiles and lets you set the frequency for refreshing the cache with real-time data.
Refresh frequency
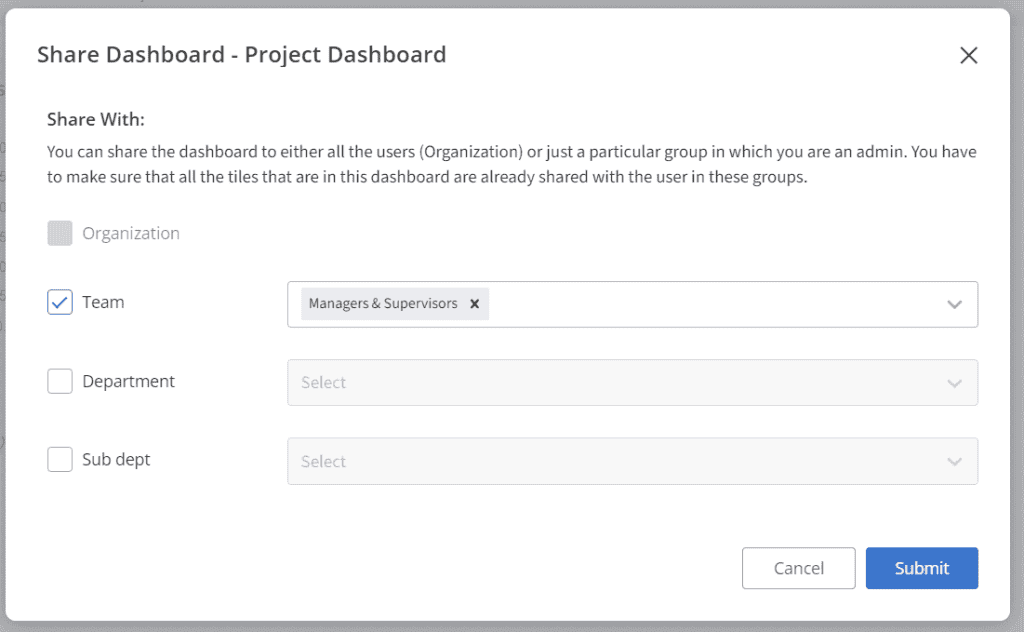
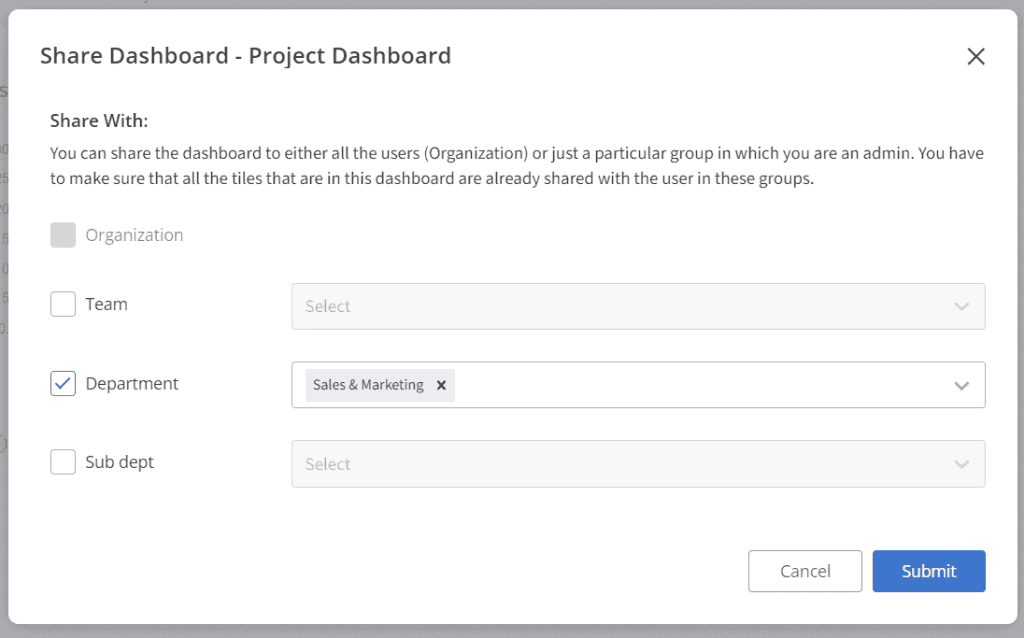
Sharing Dashboard
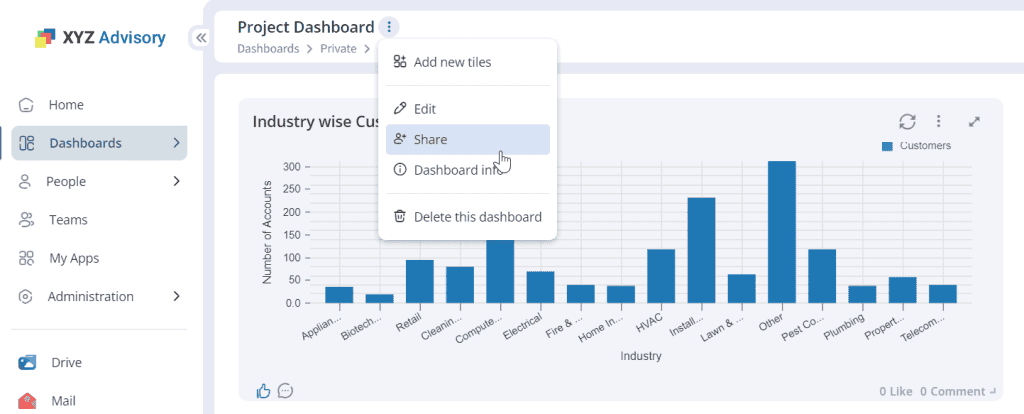
Click the DashboardSettings icon (three dots icon) and the Share option to share the dashboard with the entire organization/selected groups.
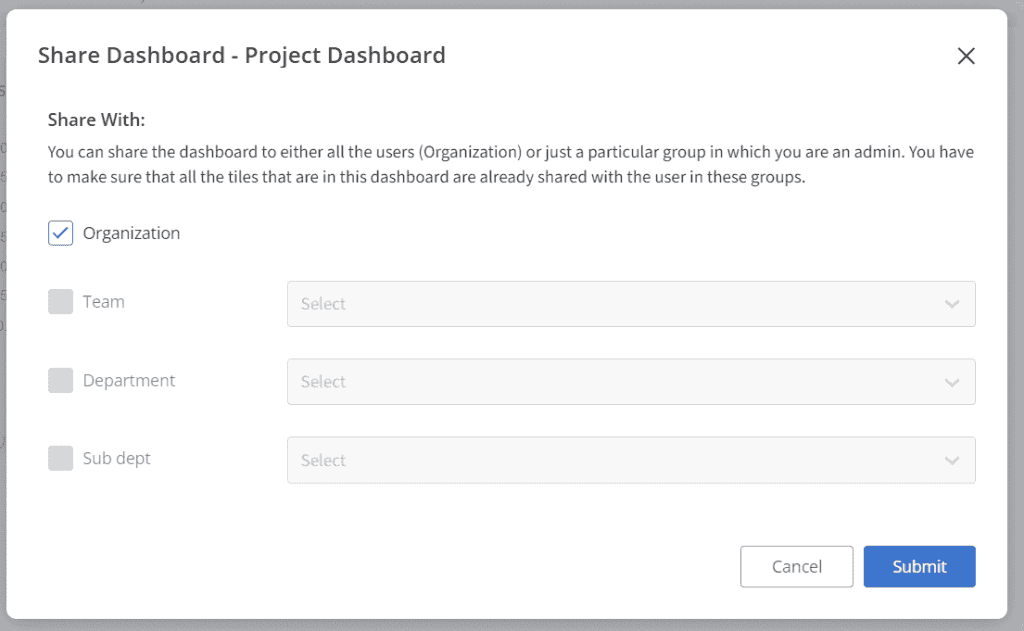
If the user is an Organizational Unit Member, they can share it with his OU. Tick the ‘Organization’ option and click on the Submit button to share the dashboard within the organization.
Sharing Dashboard with the organization
If the user is a Team Admin, they can share it with his team. Tick the ‘Teams’ option, select the team from the drop-down, and click the Submit button to share the dashboard within a team.
Sharing Dashboard with a team
If the user is a Department Admin, they can share it with his department. Tick the ‘Department’ option, select the department from the drop-down menu and click the Submit button to share the dashboard with a department.
Sharing Dashboard with the selected departments
If dashboard sharing is removed, then this dashboard will become a private dashboard and will not be accessible to anyone else except the user who created it.
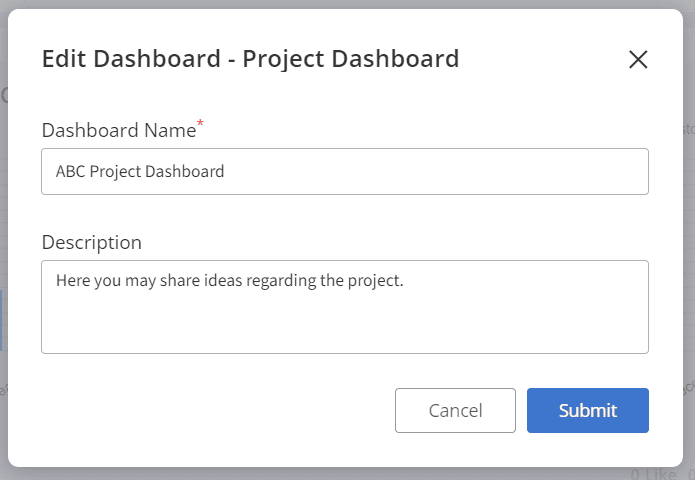
Editing the Dashboard
To edit the dashboard name or description, click the DashboardSettings icon (three dots icon) and click the Edit option.
In the Edit Dashboard pop-up, edit the name and description of the dashboard.
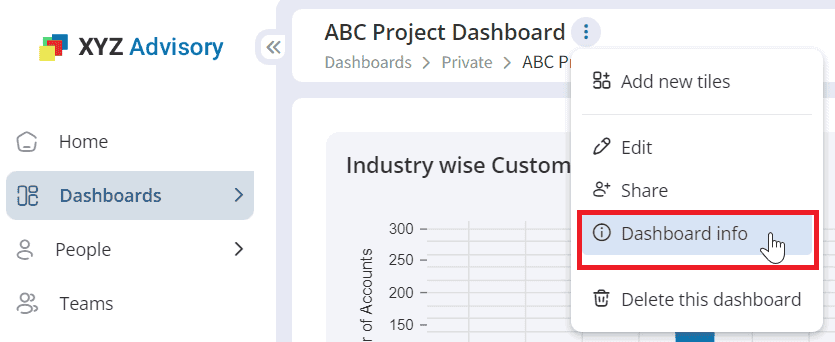
Dashboard Info
To view the Dashboard Info, click the DashboardSettings icon (three dots icon) and the Dashboard Info option.
You may view the user who has created and shared the Dashboard.
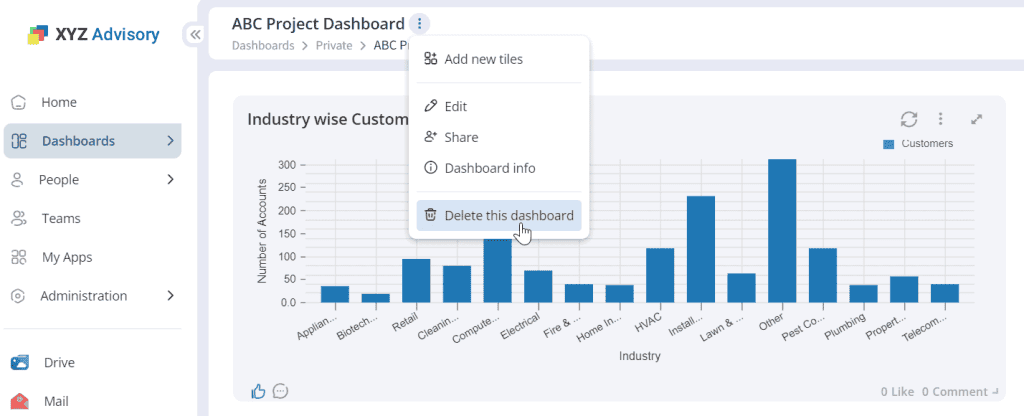
Deleting the Dashboard
To delete the Dashboard, click the DashboardSettings icon (three dots icon) and then the Delete this Dashboard option.
A confirmation message appears, where you may click on the Yes button to delete the Dashboard.
Resizing and rearranging the tiles
You can resize the tiles by clicking the arrow at the bottom of the tile.
You can rearrange the tiles by holding on to the tile header area and dragging them to the required space.
Cloud computing has emerged as a game-changing business management solution over the past decade. Globally, enterprise cloud suite revenue has…Read More
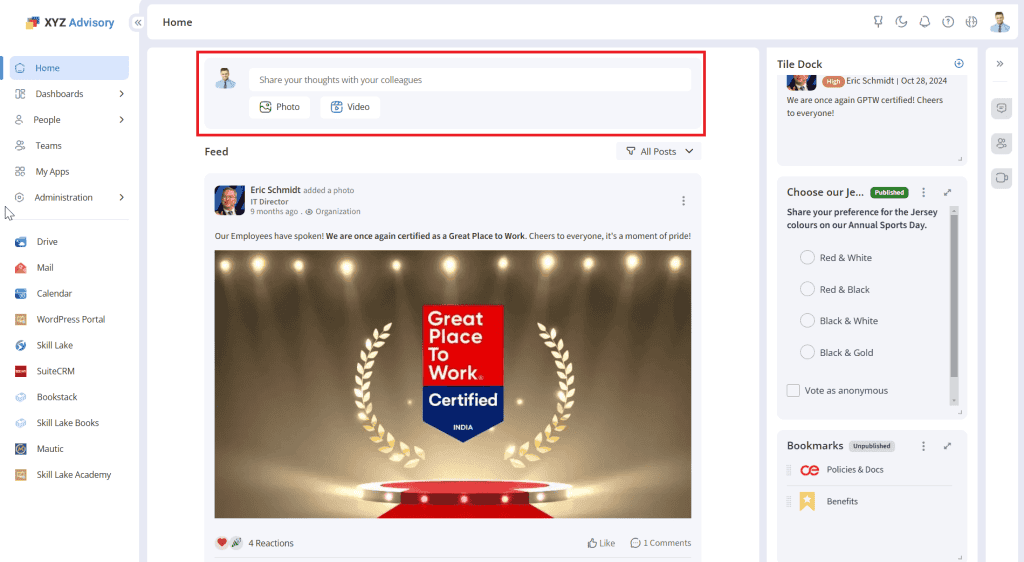
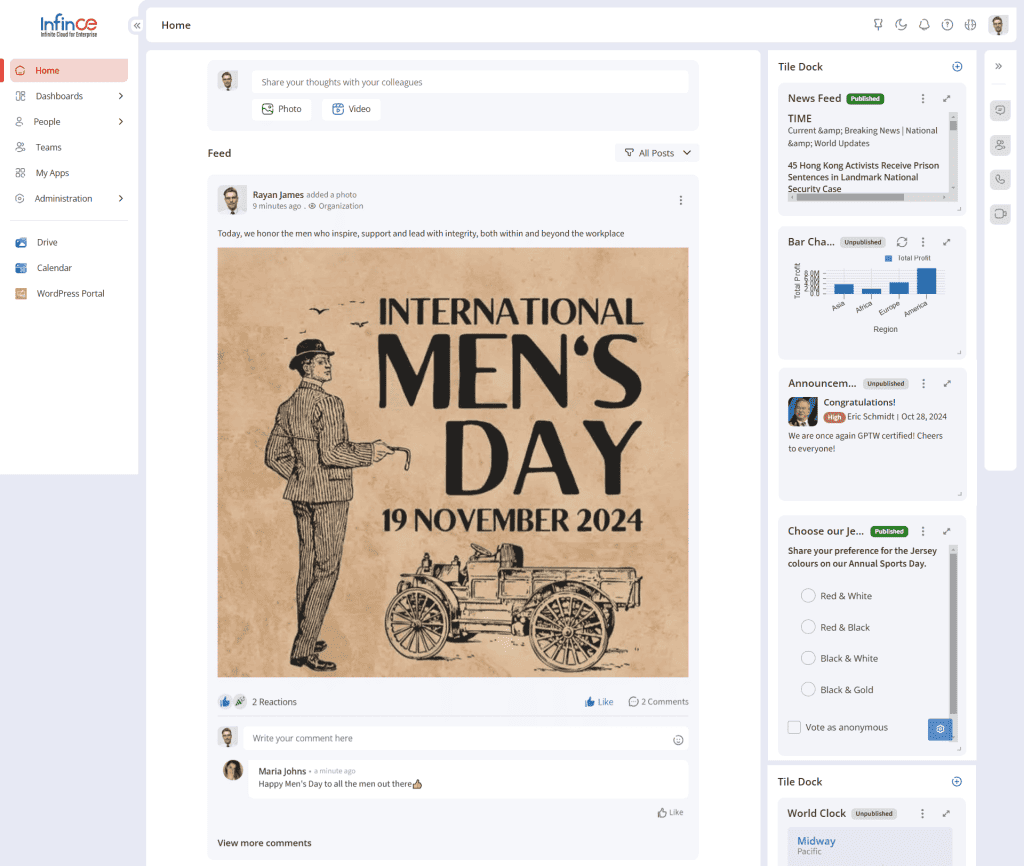
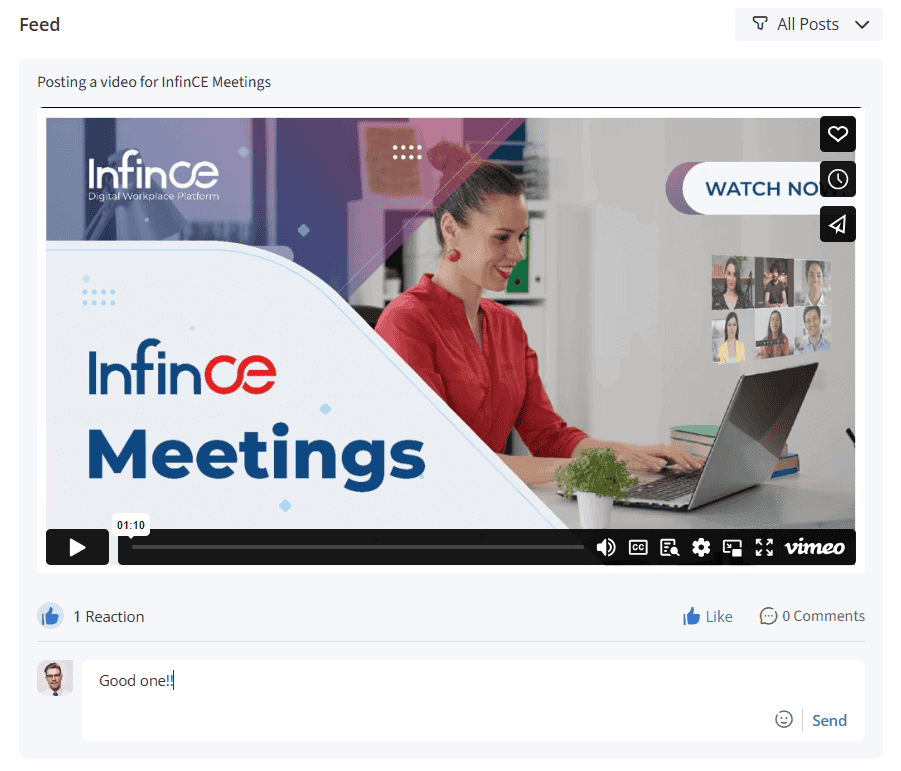
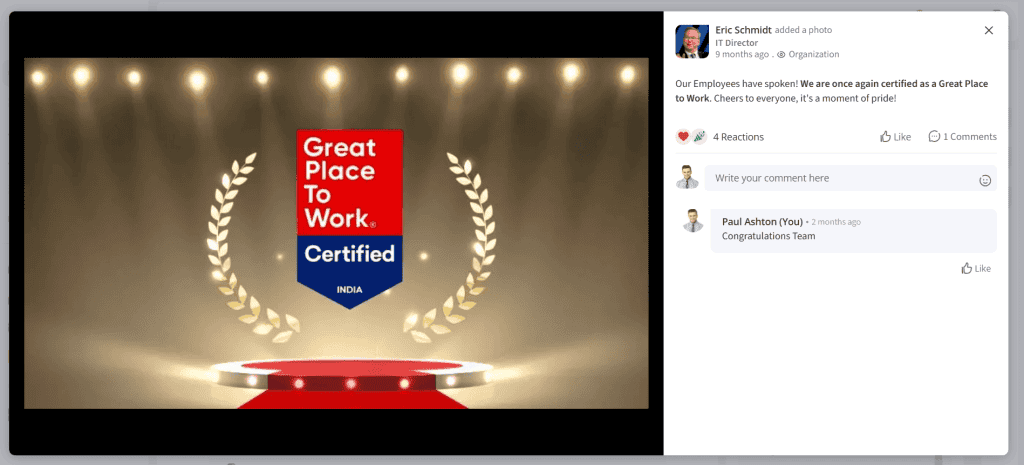
Infince Feeds helps you share your ideas and thoughts with your colleagues, engaging collaboration and boosting productivity. Feeds allow you to post messages and share photos and videos with a group or entire organization. You may like and comment on it.
Creating new posts
Click on ‘Share your thoughts with your colleagues’ to add a new post, or click directly on the photo or video icon to add the same.
Click on the ‘Who can view this post’ to select the target audience for this post.
If you select Organization, the post can be viewed by all organization users.
Select the ‘Groups & Users’ option and select the groups, with whom you want to share the post.
Enter the message you want to share with your colleagues in the text box.
You may mention particular users for the feed post. The users mentioned in the post and those who posted the feed will receive a notification email.
Click the ‘Photo’ icon to upload the photo to the feed.
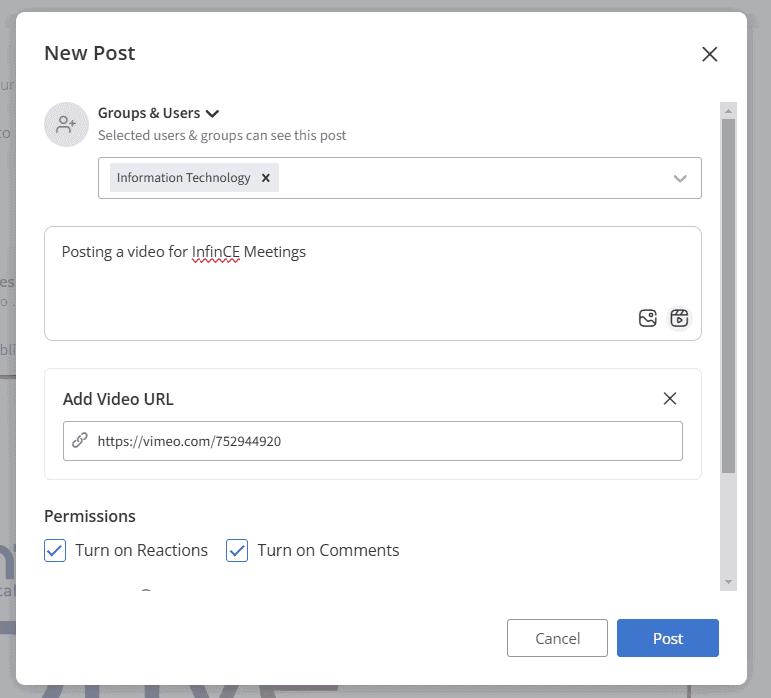
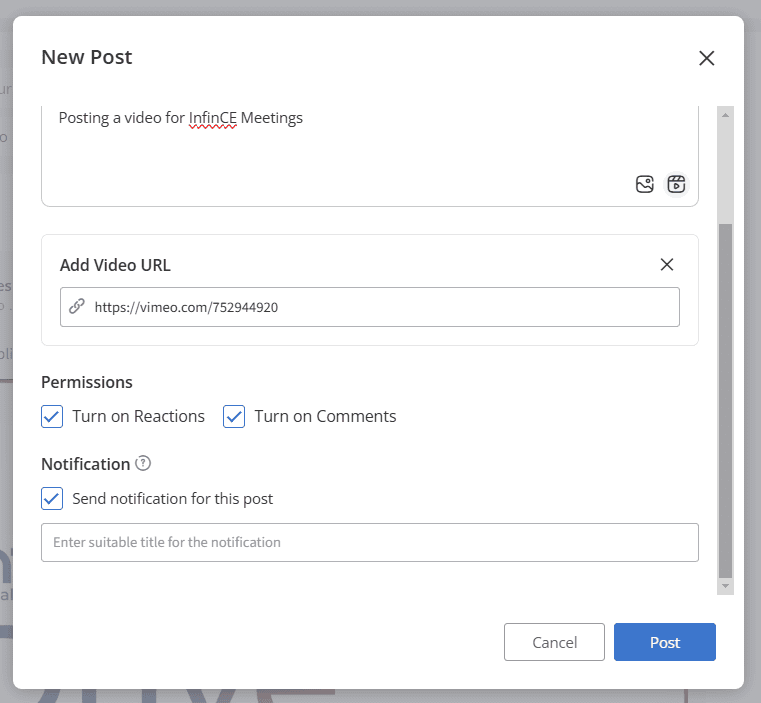
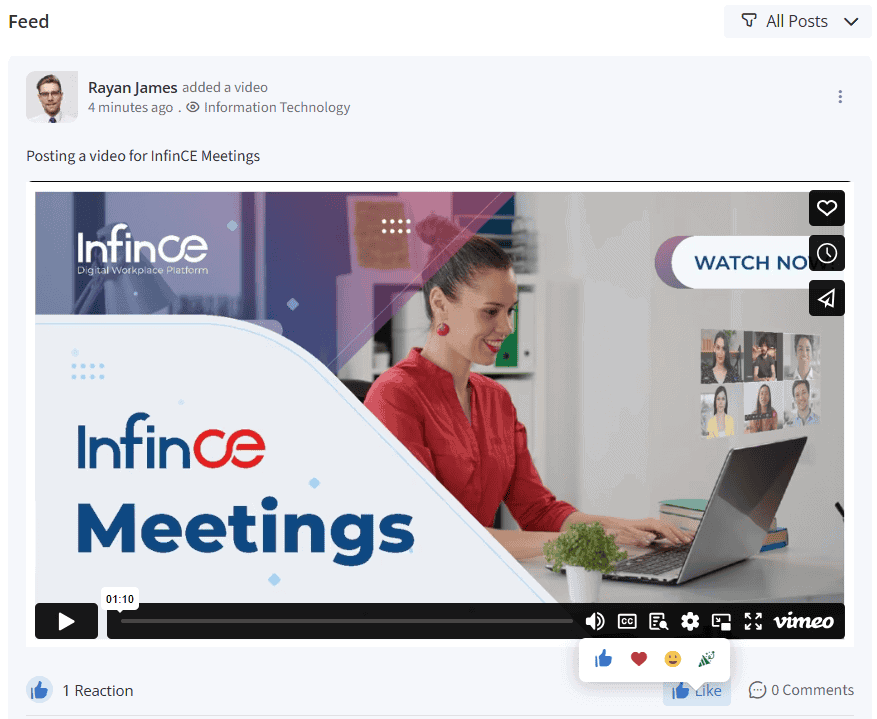
To upload the video or add the video URL, click on the ‘Video’ icon.
In the Permissions section, you can set whether the Like/Comment feature is available for the users of this post,
To enable the ‘Like’ option for the post, click the ‘Turn on Reactions’ option.
To enable the comments, click the ‘Turn on Comments’ option.
Check the ‘Send notification for this post’ option if the target audience of this post needs to be notified.
Enter a custom title for the feed post if required.
Click on the Post button to share the post.
Viewing Feed Posts
The feeds posted will be displayed in the Infince Feeds section of the selected audience.
You may also view the post based on the filters available – All posts, My posts, or My favorite posts.
By default, ‘All Posts’ will be selected.
Select ‘My Posts’ to view only the posts you have created.
To view the posts marked as favorite, select ‘My Favorite Posts’.
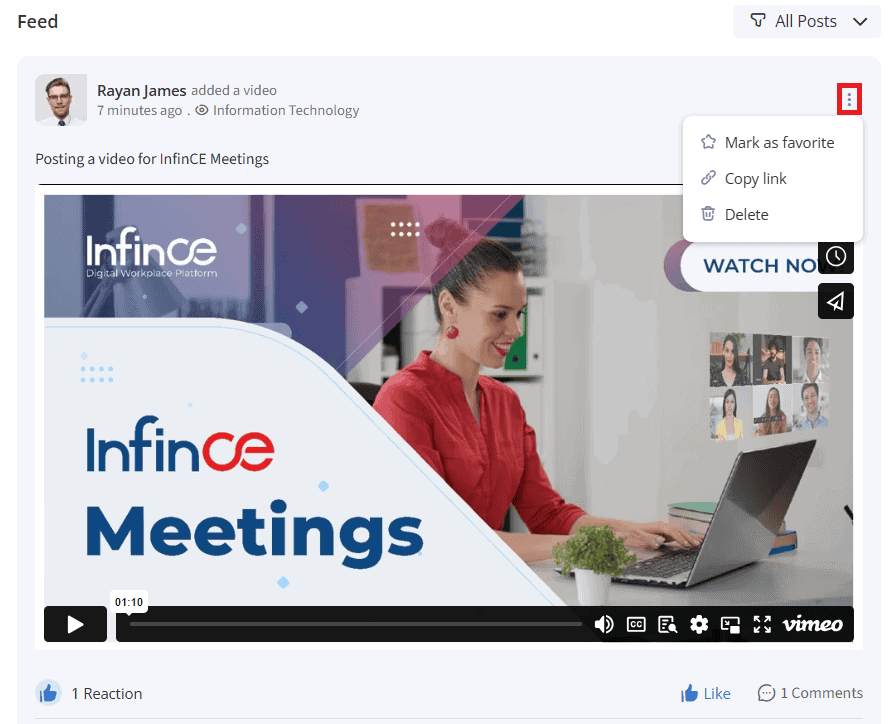
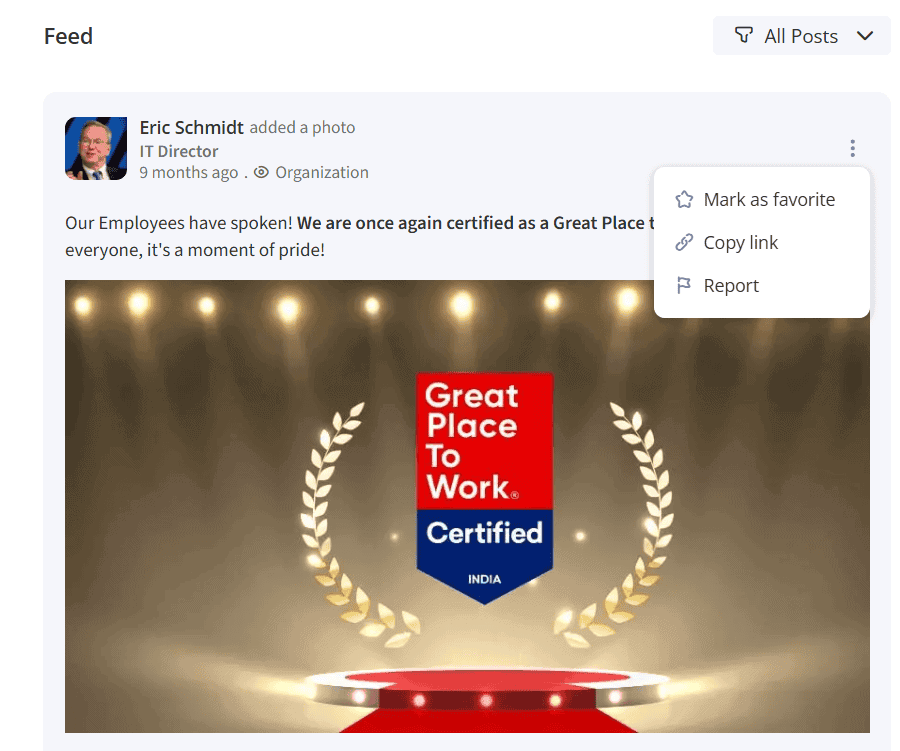
Feed Post Actions
If you like the post, you may Like it or add comments to it.
To add comments for the post, enter your comments in the Comments section.
To mark this post as a favorite, click the ‘Mark as favorite’ option.
Click on the ‘Copy link’ option to copy the feed post link to the clipboard.
The users who created the post can delete their post from the Feeds page by clicking the ‘Delete’ option. The deleted posts will no longer be listed in the Feeds section. The ‘Delete’ option will be displayed only for your feed posts.
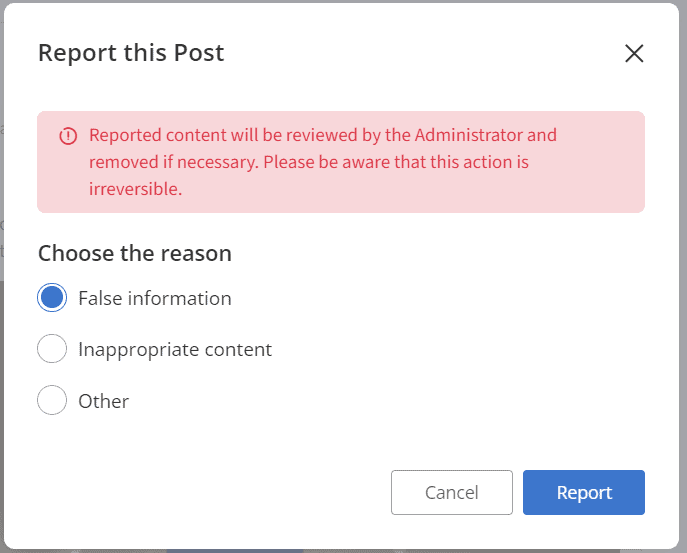
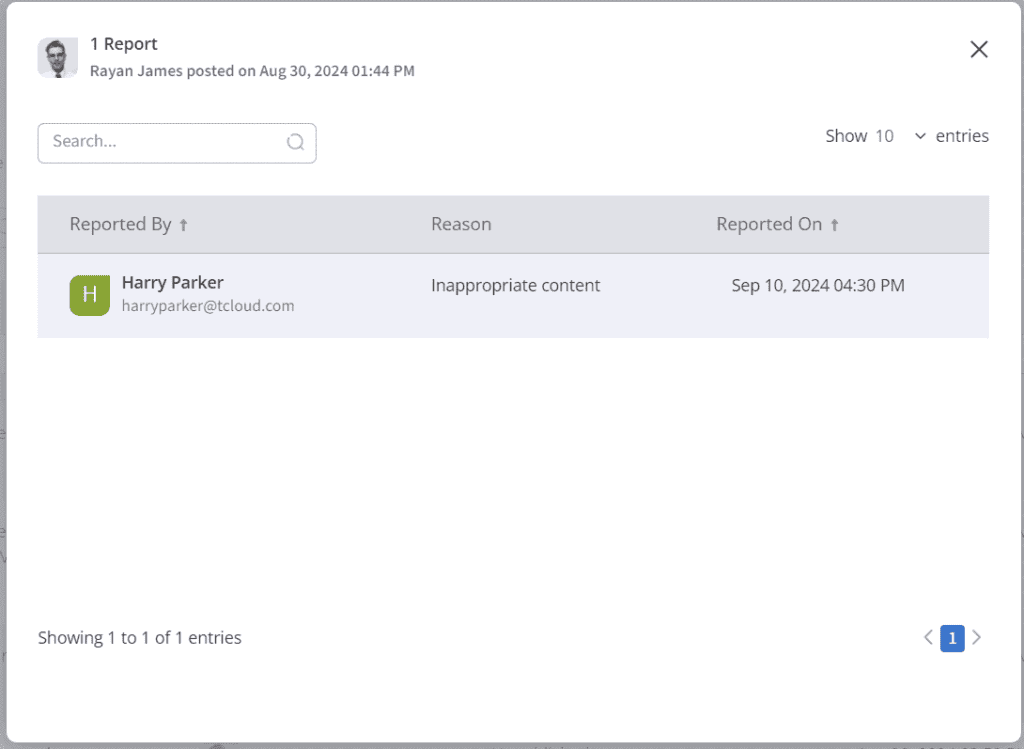
If the post has irrelevant content, you may report the post by clicking on the ‘Report’ option. On clicking, a pop-up will appear, where you may choose the reason and click on the Report button. The ‘Report’ option will be displayed for feeds posted by other users.
The feed post with their interaction view is shown below.
Managing Feeds
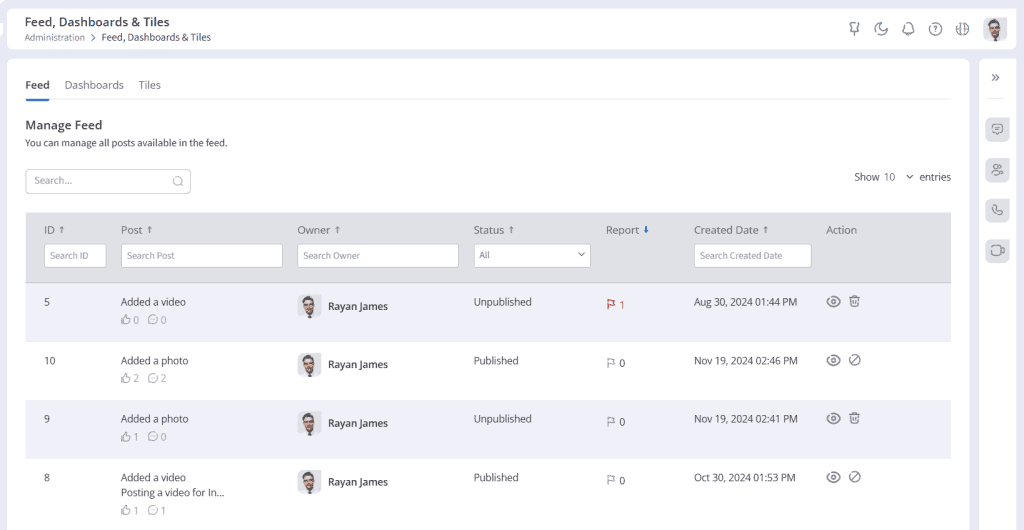
Users with feed administrative privileges can view, block or delete the feed post. Deletion can be done only for the unpublished posts.
Go to Administration > Feed, Dashboards & Tiles section to view all the feed posts. You can view the feed ID, post name, owner, status, report, and created date.
You can view the number of users who reported the feed post. Click on the count to view the reported user name, reason, and reported date.
In the Actions column, click on the View icon to view the feed post and its comments.
If you find that any published post to be irrelevant, you may click on the Unpublish icon to unpublish the post. A confirmation message appears, where you may click Yes to unpublish the post.
To delete the feed post, click on the Delete icon. A confirmation message appears, where you may confirm the deletion.
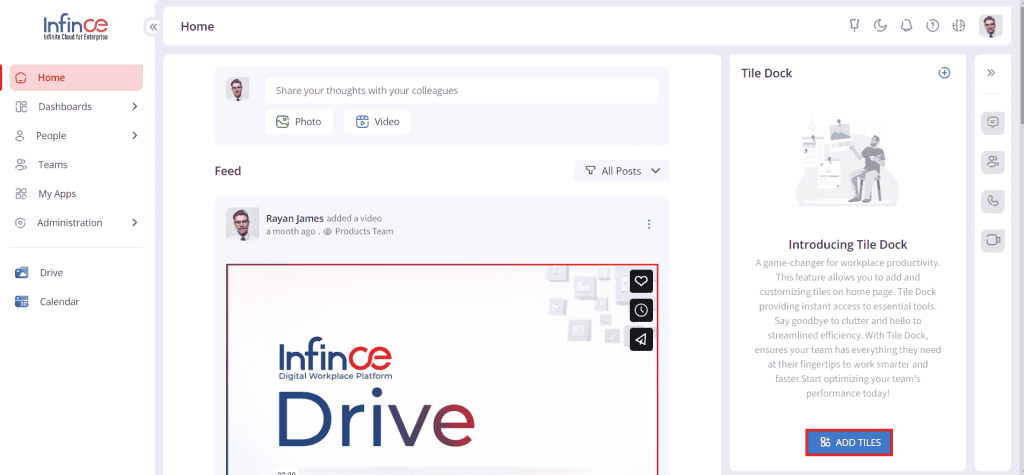
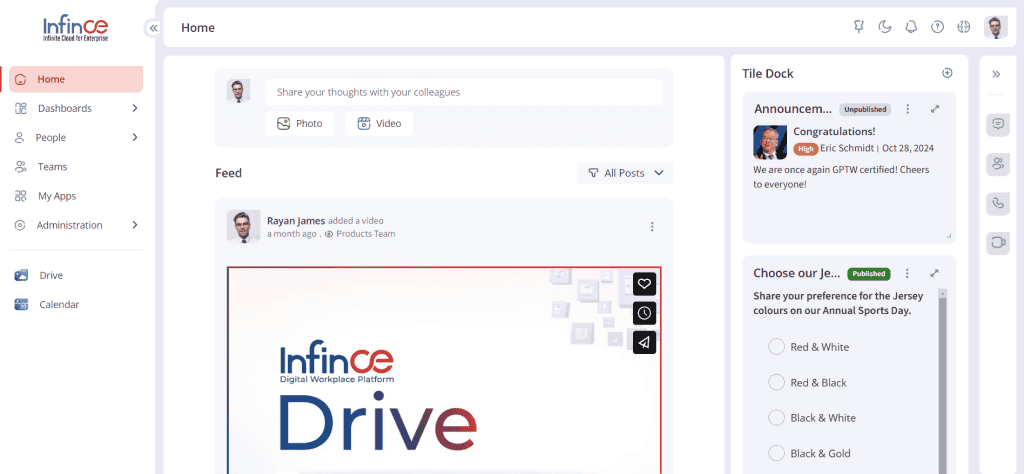
Tile Dock
The Tile Dock section helps you add dashboard tiles for ease of use and increased productivity. The Administrators with organization Dashboard edit permissions may add and edit the tile dock tiles.
Click on the Add Tiles button to add a new dashboard tile.
You may add and edit the tile data.
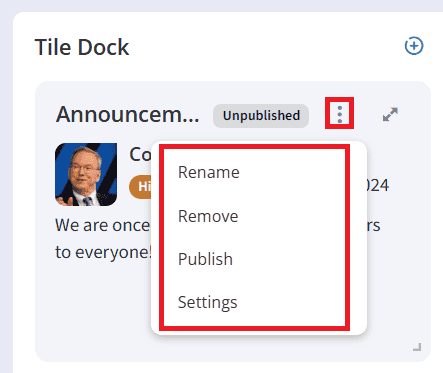
Only the tiles published by the Admins will be visible to other users. You may publish the tile by clicking on the three dots and the publish option.
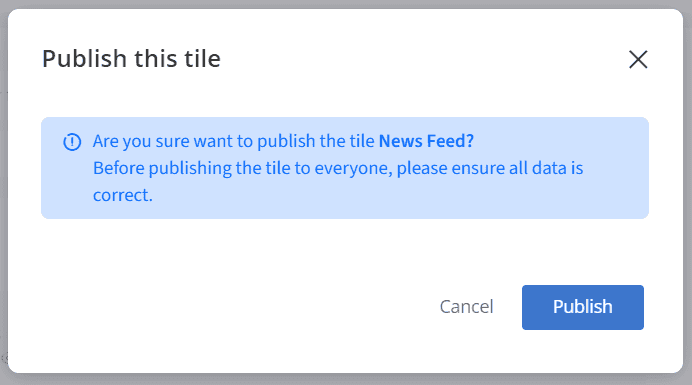
A confirmation message appears, and you may click on the Publish button.
Now, the published tile can be viewed by users with view permissions.
The COVID-19 outbreak caused a variety of instabilities across the globe, especially for businesses. Enterprises rushed to think of alternative…Read More
Can centralized dashboards improve workplace productivity? Dashboards are often an intrinsic part of today’s business world. From helping executives and…Read More
Infince Calendar is a workplace tool for efficiently collaborating with others, planning, and allocating time. It helps you schedule meetings and holidays. You may create events, add calendars, and subscribe to any user’s calendar. Email notifications will be sent while creating, editing, or deleting an event.
Calendar Menu
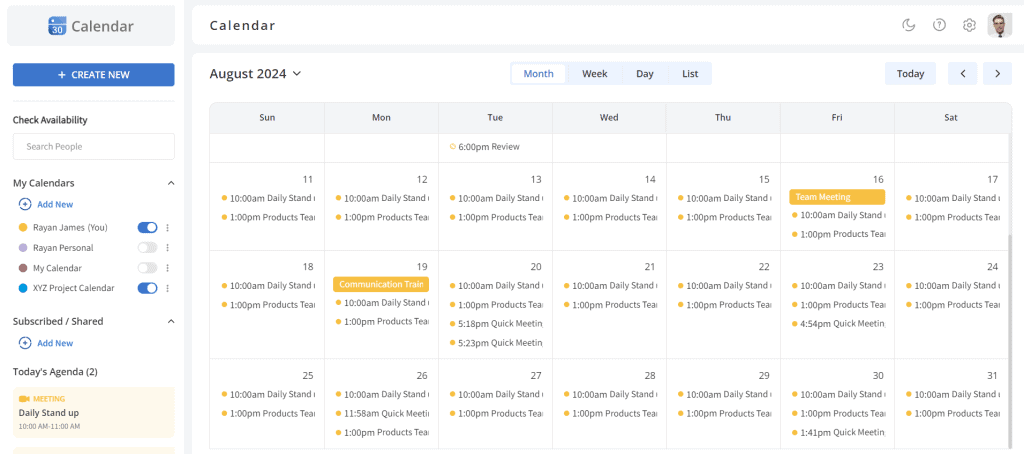
Click on the Calendar menu from the Infince Workplace to open the Infince Calendar in a new tab.
Calendar
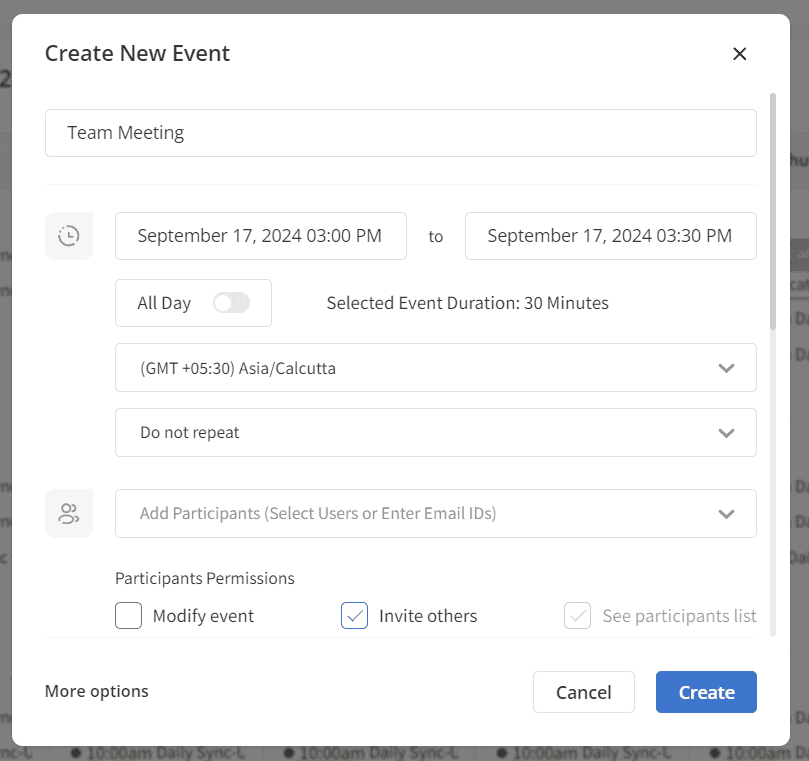
Create a new event
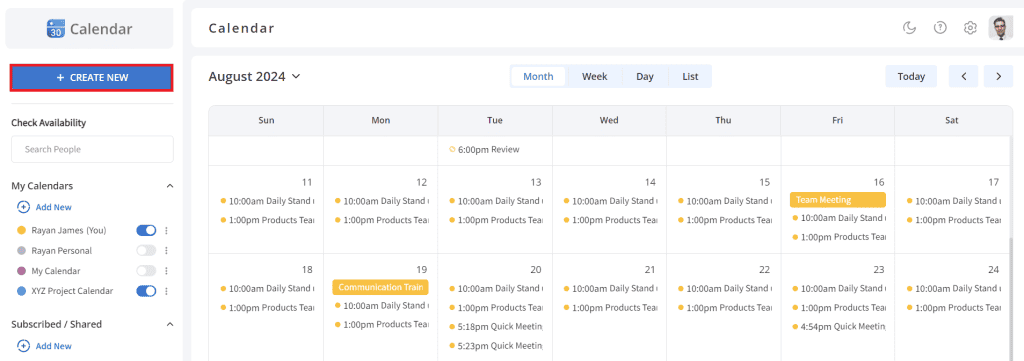
To create a new event, click on the cells of the calendar or Create New button.
Create New Event
The Create New Event pop-up will appear when clicking the Create New button.
Provide the event details,
Enter a title for the event.
The event date will be displayed as the current/selected date. You can set the date and time or make it an all-day event. You can also select the preferred time zone and event recurrence.
Note:
The duration of the event will be displayed based on the default duration set in General Settings.
If an event lasts an entire day, you can create an All-day event in the Infince Calendar and update your free/busy status.
When creating an event in the ‘Month’ view, the default duration is All Day.
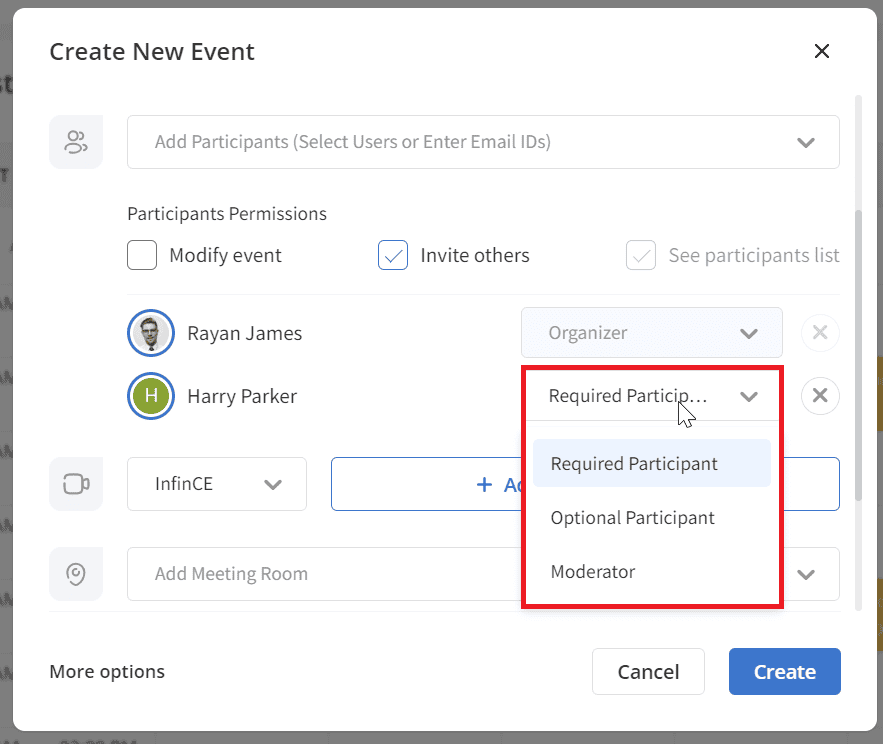
Add participants for the event. You can add the Infince workplace users, guest users or external users. You can make the users required/optional participants or moderators. The moderator role is applicable only if the event is an Infince (online) meeting.
Note:For added convenience, the platform allows you to quickly copy and paste the participants, making the process of adding them to the event even easier.
Participant Permissions
In the Participant Permissions, select:
‘Modify event’ if you want to provide edit permissions for the events for the participants.
‘Invite others’ if you want to let the participant invite other participants to the event.
‘See participants list’ if the participants need to view the event members.
Creating new event
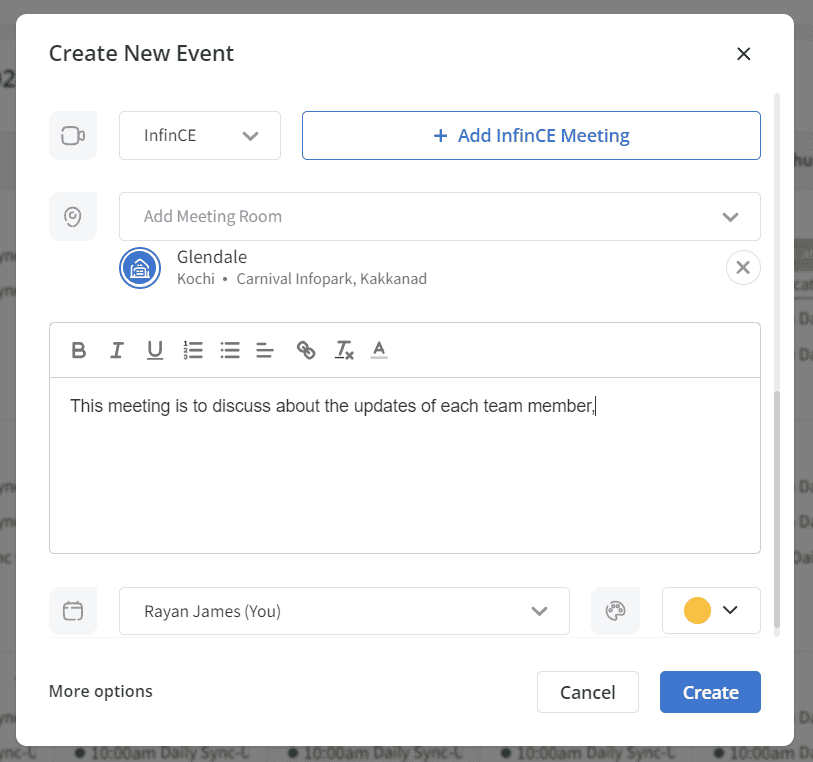
Add an Infince meeting link or external link for the meeting.
Select the name of the physical meeting room where you plan to conduct the event.
Note: You can book various conference/meeting rooms at your office.
Add a description for the event.
You may set a color for the event to organize and differentiate your events.
Click on the Create button to create the event. An invitation email will be sent to all the event participants.
The Calendar displays all the events created.
Calendar events in week view
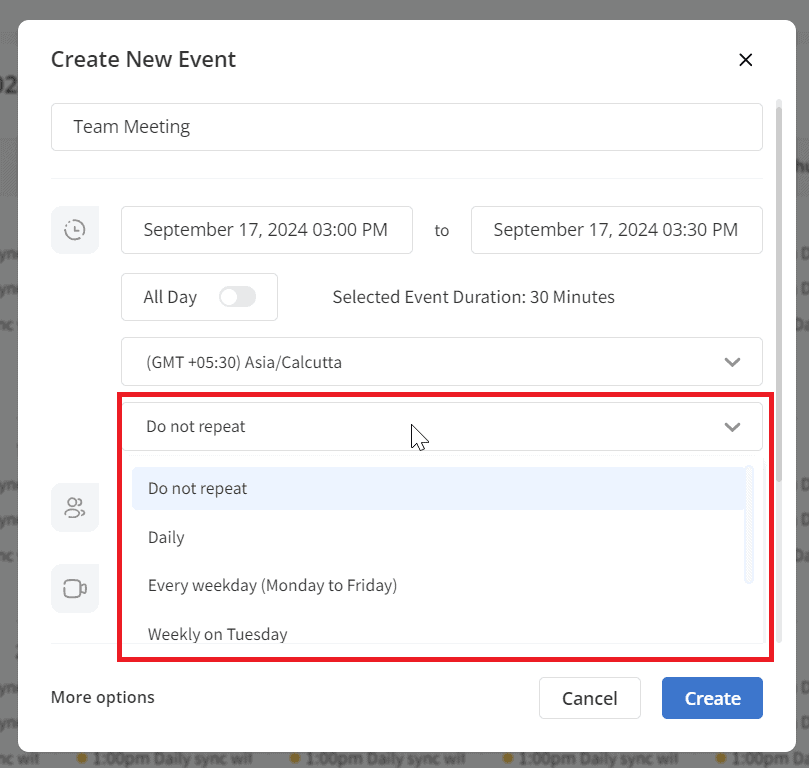
Recurring events
Infince Calendar gives the provision to create recurring events. You can set the recurrence for the event by selecting from the default options available, such as daily, weekly, weekdays, monthly, or yearly for that specific day, or by creating a custom recurrence as per your need. The organizer and the participants will receive a notification email with the event details.
Setting event recurrence
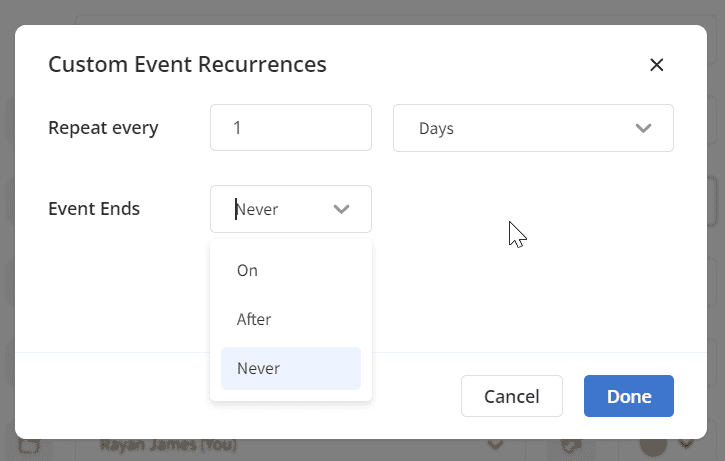
Click on the ‘Custom’ option to set an event recurrence not included in the default choices.
Customizing event recurrence
You may repeat the event for specific days, weeks, months, or even years.
Customizing event recurrence
You may limit the recurrence by setting the event end date, specifying the number of recurrences, or setting it as a never-ending event.
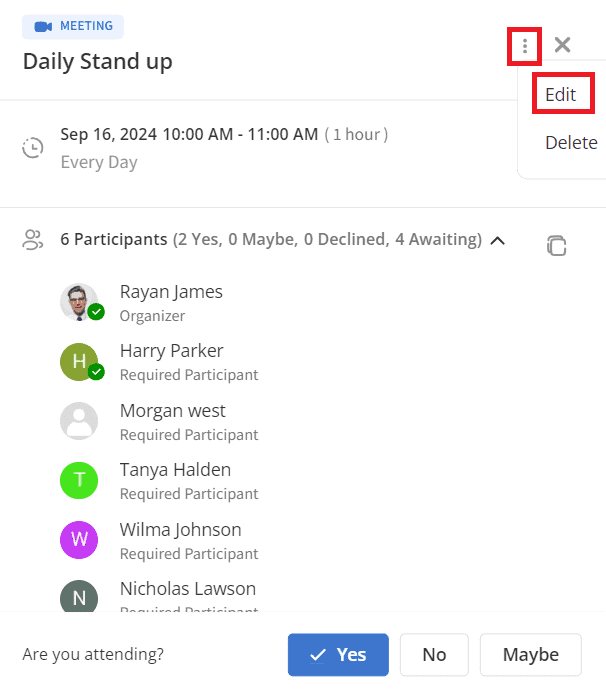
Editing an event
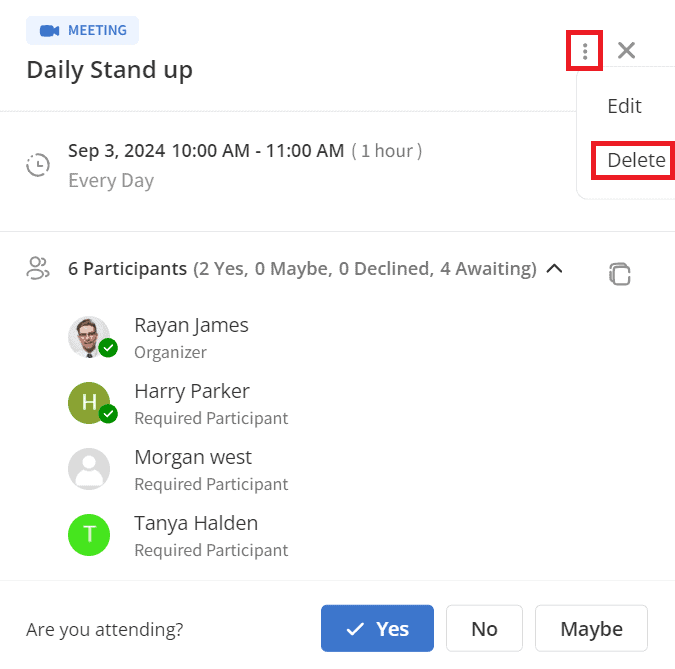
As an organizer or user with event edit permissions, you may edit existing calendar events. To do so, open the calendar event, click the three-dot icon, and select the Edit option.
Editing an event
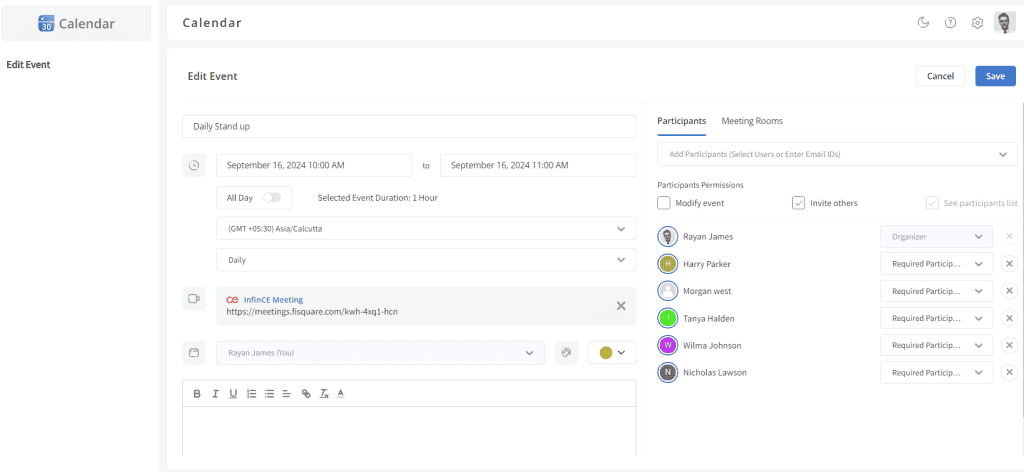
You may edit the event details as required.
Editing event details
Click on the Save button to save the changes made. On saving, a confirmation message appears. By default, update emails will be sent to the participants. If you do not want to notify them, you may uncheck the option.
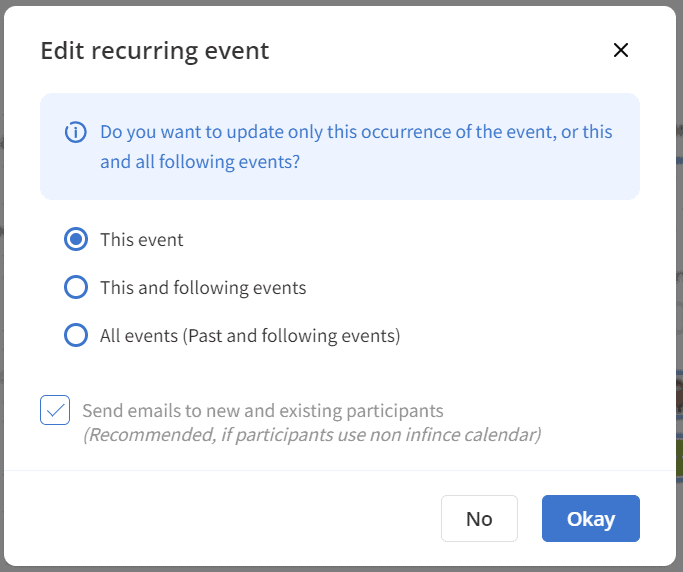
Editing recurring event
You may choose the required option and click the Okay button.
Note:
Choose the ‘This event’ option to update the changes for the selected date of the event.
Choose the ‘This and following events’ option to update this and upcoming events.
Choose the ‘All events (Past and following events)’ option to update the changes for the selected date of the event, past, and upcoming events.
Delete an event
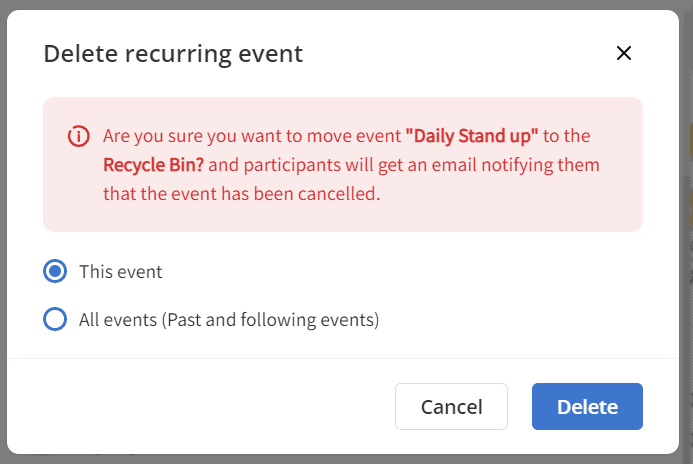
You can delete the events. Open the calendar event, click the three-dot icon, and select the Delete option.
Deleting an event
On clicking the ‘Delete’ option, a confirmation message appears. Choose the required option and click the Delete button. The event will be deleted from your calendar. The deleted event will be moved to the recycle bin. You can retrieve the event within 30 days, if needed. The event participants will receive an event cancellation email, which will delete the event from their calendar.
Note:
Choose the ‘This event’ option to delete the selected event from the calendar.
Choose the ‘All events (Past and following events)’ option to delete all the events including past and upcoming events.
Deleting recurring event
Calendar View
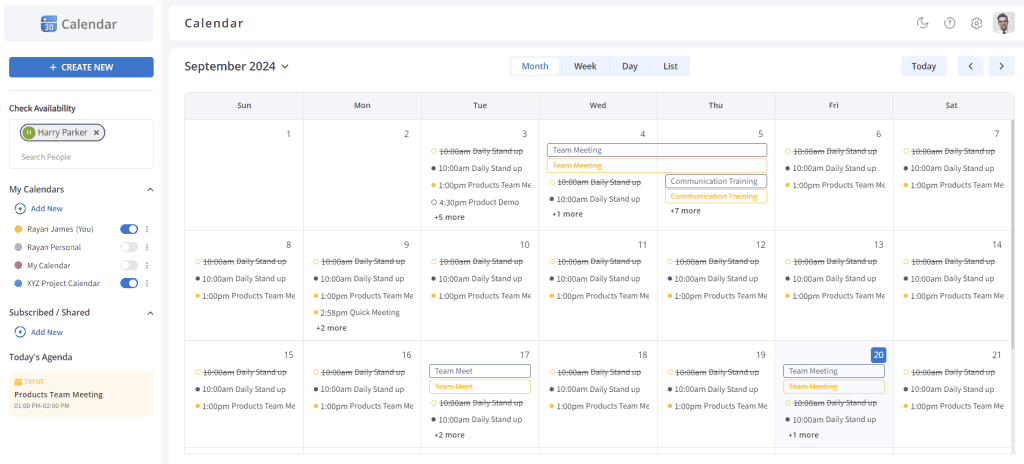
The default view of the calendar is month view while you access the calendar for the first time; switch to week, day or list view as per you need. The last accessed view will be the default one next time.
Month view
The Month view displays the events of all days of the month.
Month view
In the Month view, the events will be displayed as:
Solid circle for the events you have marked your response as ‘Yes’.
Striked circle for the events you have marked your response as ‘No’.
Slanted lines in the circle for the events for which you have marked your response as ‘Maybe.’
All Day events will be displayed as a rectangular box.
Outlined circles for the events you have not marked your response yet.
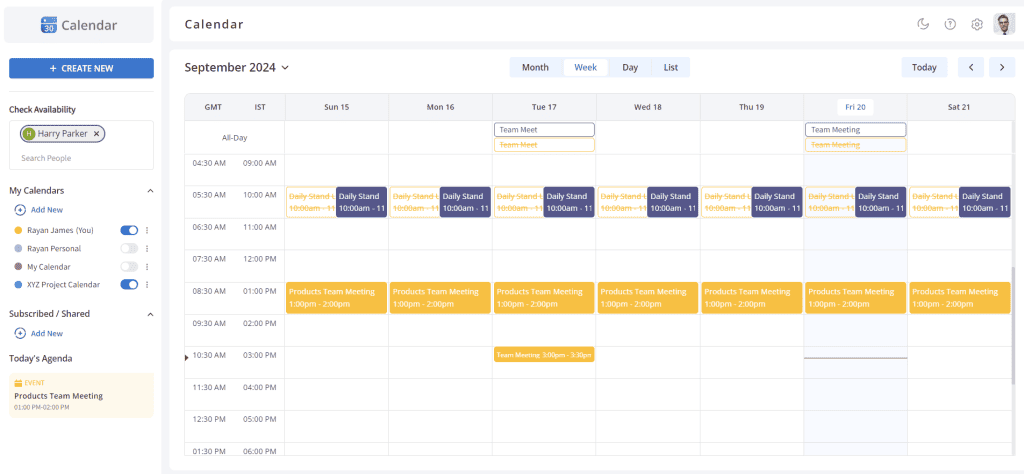
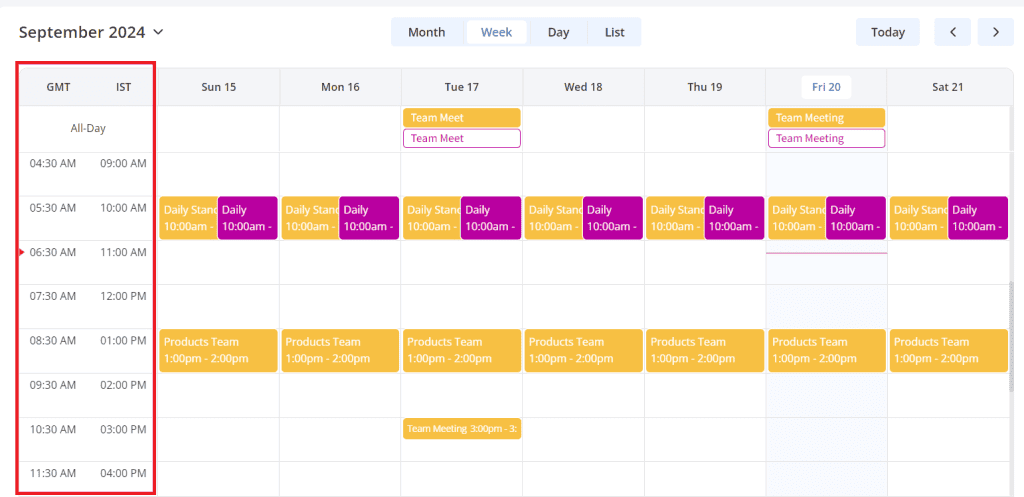
Week view
The Week view displays the events for 24 hours on all days of the week. The events that occur at the same time will be displayed in a stacked format.
Week view
In the Week view, the events will be displayed as:
Solid rectangle for the events you have marked your response as ‘Yes’.
Rectangle with strikethrough for the events for which you have marked your response as ‘No’.
Slanted lines in the rectangle for the events for which you have marked your response as ‘Maybe.’
All Day events will be displayed as a rectangle in the solid color band on the top row of the respective date.
Note: The secondary and primary time zones will be displayed on the left side of the calendar according to the user’s General Settings.
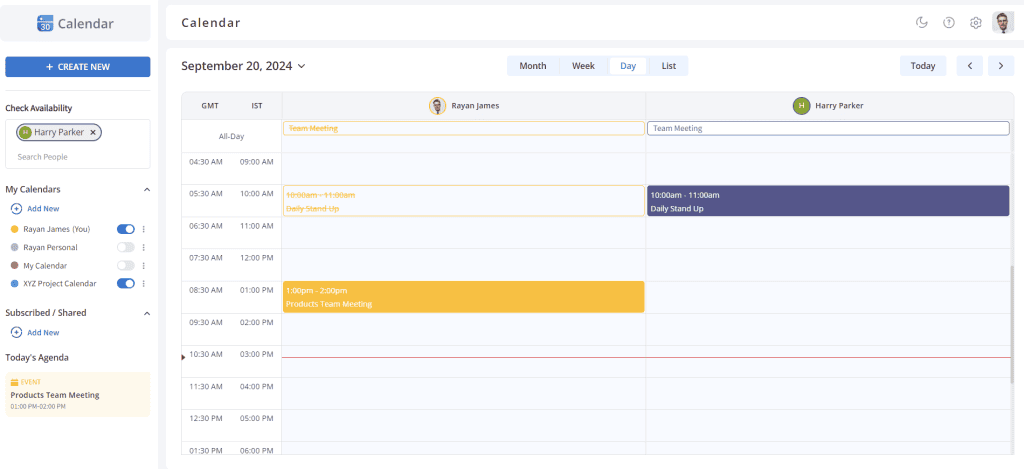
Day view
The Day view displays the events for the participants within 24 hours of the selected date. In this view, you can view the calendars side by side. The Week and Day views have the same event representation format.
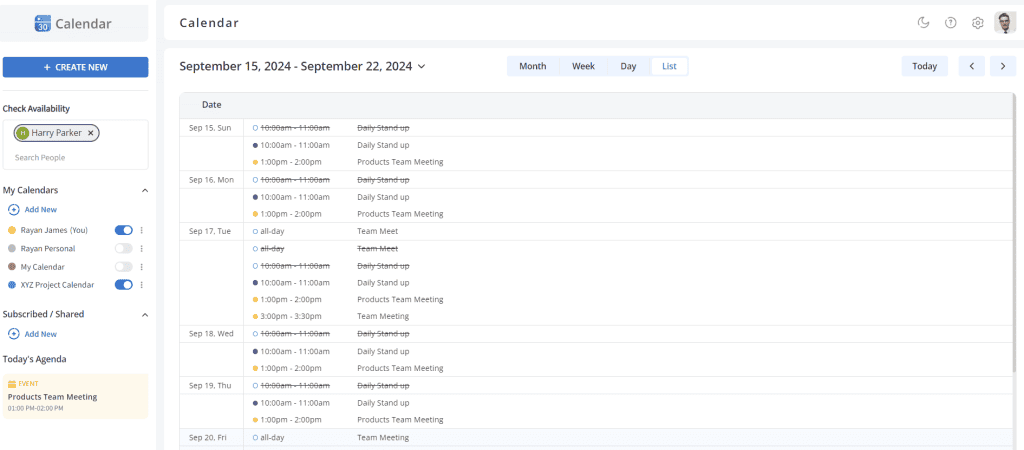
List view
The List view displays all the events in a compact format.
List view
In the List view, the events will be displayed as:
Solid circle for the events you have marked the response as ‘Yes’.
Circle with strikethrough for the events marked response as ‘No’.
All Day events will be displayed on top of that particular day.
Outlined circles for the events for which you have not marked your response.
Note: Events will be shown according to the primary time zone in the list view.
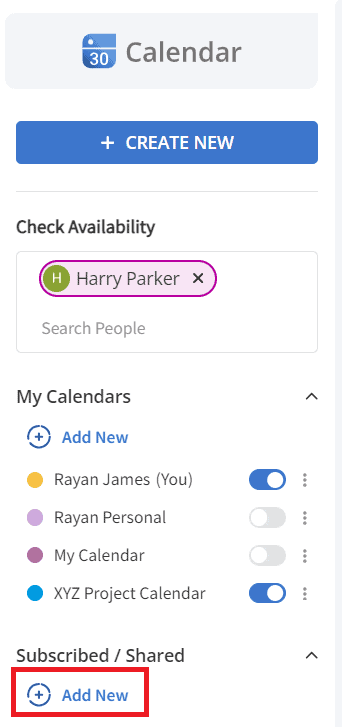
Check Availability of users
Before creating an event, you can check whether the participants are available for your chosen time. You may enter the participant’s name in the check availability text box. All the events scheduled for the participant will be displayed in the calendar. You will be able to see their calendar with all events.
Note:
The event visibility will be based on that user’s calendar settings.
You will be able to view the calendars side by side in day view.
In the Month and List view, the events of the user whose availability has been checked will be displayed as circles in the user’s color.
In the Week and Day view, the events will be displayed as rectangles in the user’s color.
Check Participant Availability
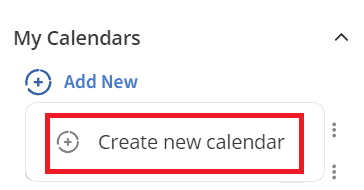
Add new calendar
A default Infince calendar will be available for the users mentioned as (you), but it is also possible to create a new calendar. Click the +Add New button and select the ‘Create new calendar’ option.
Create new calendar
In the ‘Create new calendar’ pop-up,
Enter the name and description for the Calendar
Select the Primary Time Zone
Click on the Create button.
Creating new calendar
The Calendar created will be displayed in the My Calendars list.
My calendars
Calendar
Toggle this option to view/hide the calendar events. The events of the enabled calendar will be displayed in the Calendar.
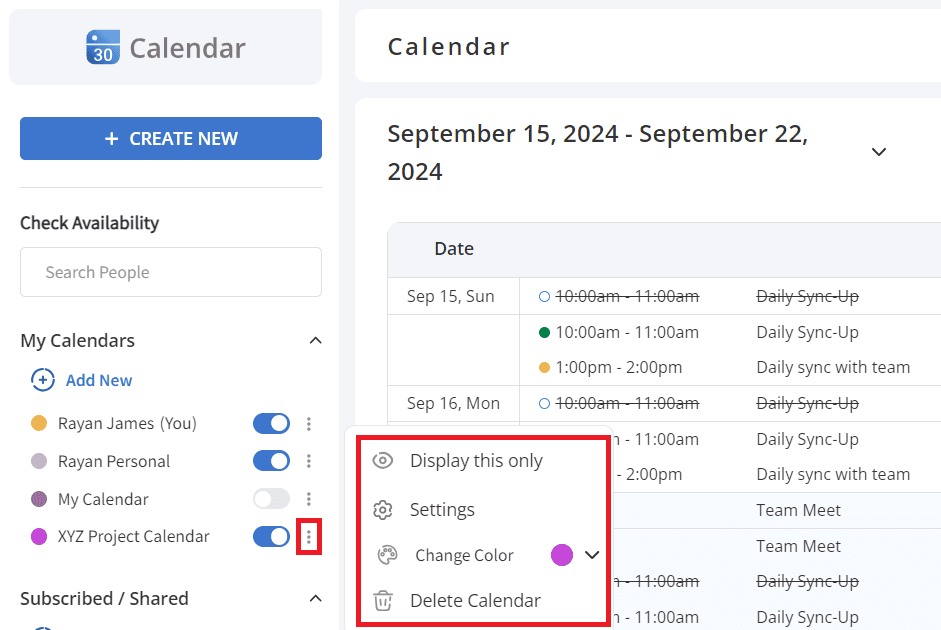
Calendar Configurations
The Calendars created will be displayed in the My Calendar section.
Calendar Configuration
Click on the three dots to see the various configuration options available:
Display this only to display only the selected calendar events.
Change color to change the calendar color. This color will be displayed for the events in the calendar and help you track your events.
Note: If the user has manually changed an event color, then it color will not get affected even if you change the calendar color.
Delete calendar to permanently delete the calendar from this account. Once you have deleted the calendar, you will no longer be able to view/attend the events in that calendar.
Note: You will not be able to delete the primary calendar.
Settings to update your calendar settings.
Calendar Settings
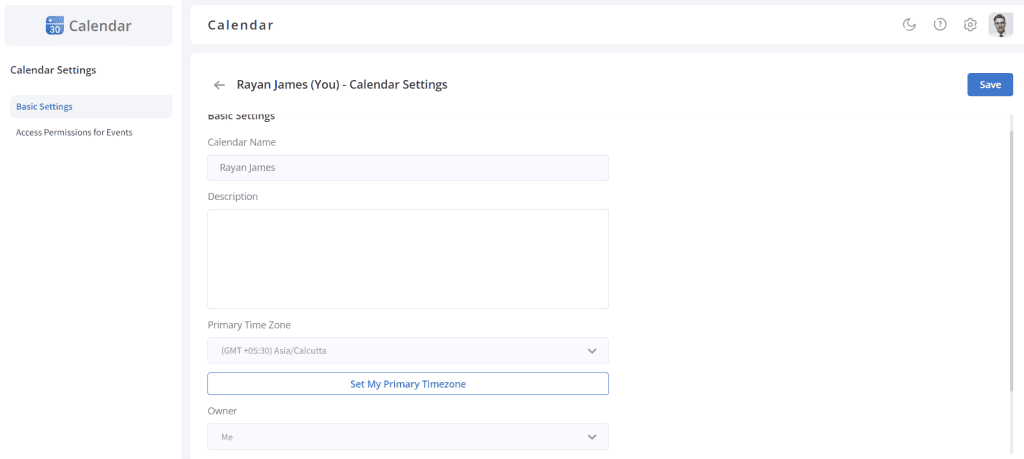
Basic Settings
The Basic Settings of the Calendar display the Calendar Name, Primary Time Zone, and Owner. You can also enter the calendar’s description.
To change the primary time zone of your calendar, click on the Set Primary Time Zone button. You will be navigated to the General Settings, where you may change the primary time zone.
Calendar settings
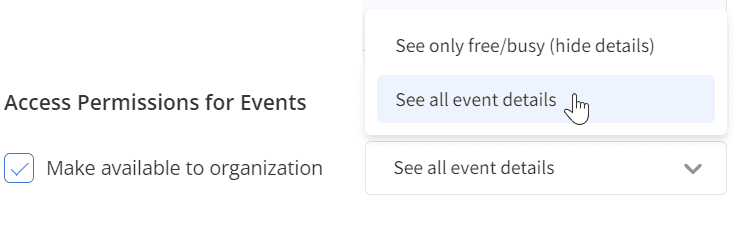
Access Permissions for Events
You may provide permissions for other users to view your calendar and configure them to view all event details or only free/busy events. This configuration will be reflected while others check your availability or subscribe to your calendar.
Access permissions for events
Tick the ‘Make available for organization’ option to allow all employees in the organization to view your calendar events.
Select ‘See all event details’ to enable your colleagues to view your event details. Select ‘See only free/busy (hide details)’ to view only free/busy status and not disclose the event details.
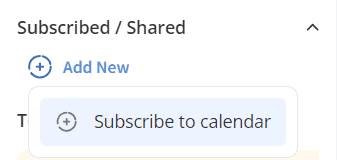
Subscribe to a Calendar
Users can subscribe to other users’ Infince Calendars; the events of that calendar can be viewed from their Infince Calendar.
Subscribe to a calendar
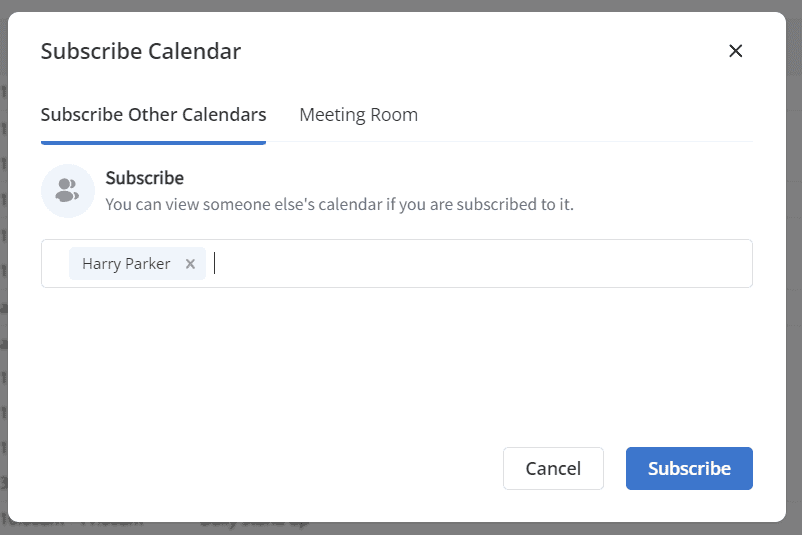
To subscribe to an employee’s calendar, click the Add New button and select the ‘Subscribe to calendar’ option.
Subscribe to a calendar
The Subscribe Calendar pop-up appears, where you may select the employee name whose calendar you want to subscribe to and click on the Subscribe button.
Subscribing to a calendar
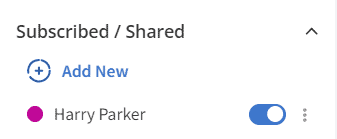
The subscribed calendars will be displayed in the Subscribed/Shared section.
Subscribed calendar
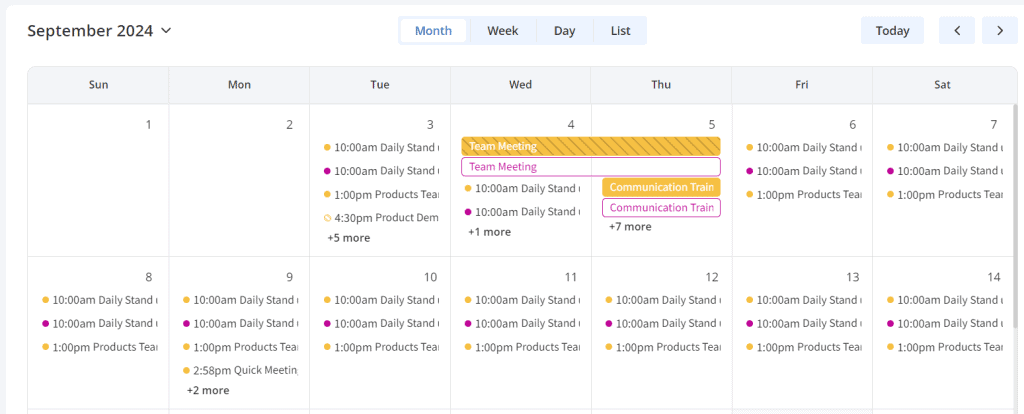
The events of the subscribed employee will be displayed in your calendar in a particular color. This way, you can differentiate your events and the subscribed user’s events.
Calendar showing subscribed user’s events
General Settings
Infince Calendar can be customized in ways you want it to be by configuring the preferred settings. You can set your language, region, time zone, event settings and view options.
General Settings
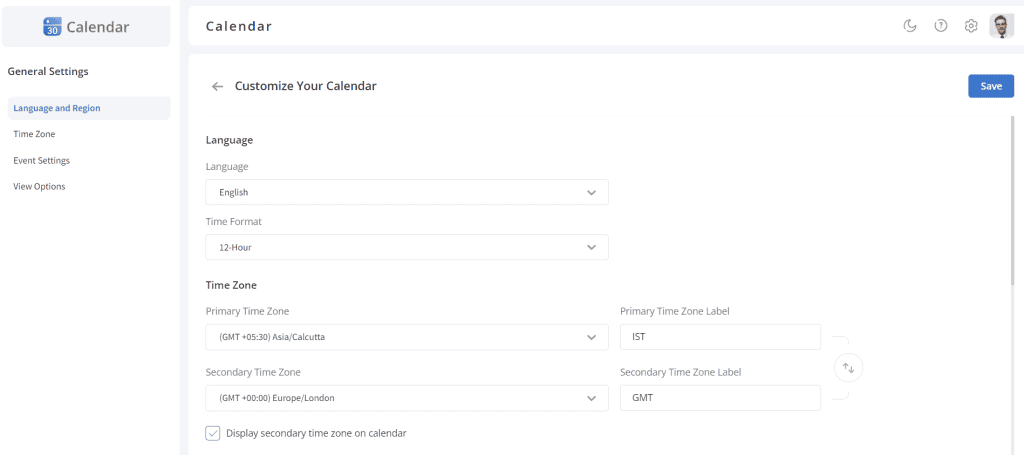
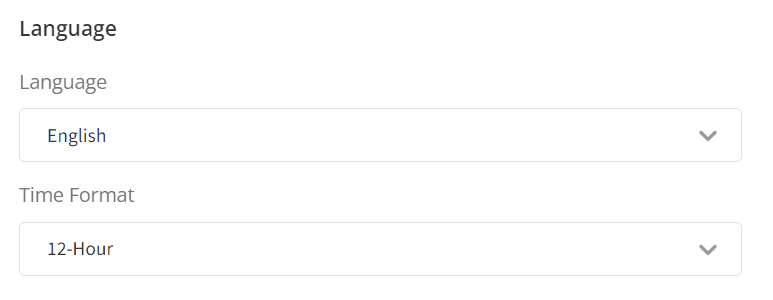
Languages
Infince Calendar supports various languages to display events. You may select the display language of your choice. It is possible to configure the time format as 12 hr or 24 hr for your events.
Language and Time Format Settings
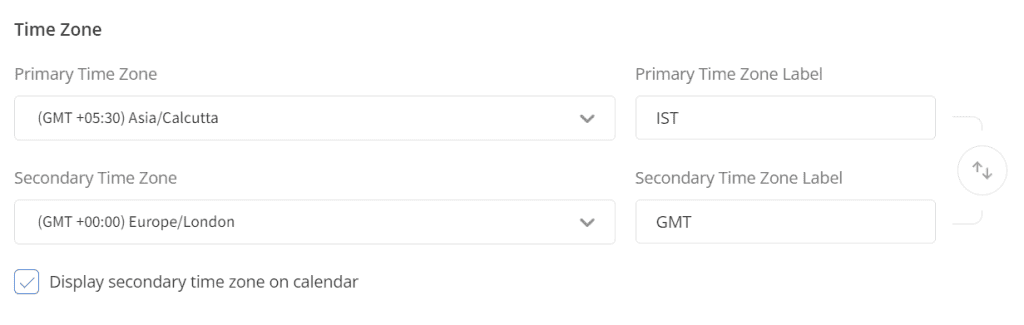
Time Zone
The Infince Calendar provides you the provision to set your primary and secondary time zones. You can configure your primary time zone and secondary time zone on the calendar. The events are created based on the time zone set. You may change the time zone while creating events for the participants in different time zones. Select your preferred primary time zone, secondary time zone and its labels. Click on the Swap icon to switch between the primary and secondary time zones if needed.
Time Zone Settings
To display the secondary time zone in the calendar, tick the ‘Display secondary time zone on calendar’ option. Then the primary and secondary time zones will be displayed in the Calendar. Week and day view.
Displaying secondary time zone on calendar
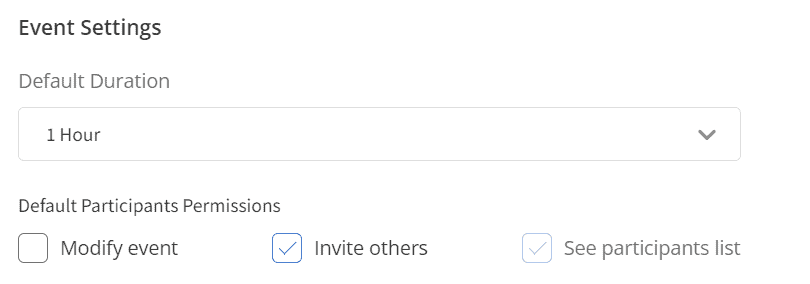
Event Settings
Default Duration: It is possible to set the default duration for the event as per your choice. It may be 15 minutes, 30 minutes or 1 hr. By default, the duration displayed while creating an event will be based on the default duration value.
Default Participants Permissions: It is possible to set the default participant permissions for the events. It may be to modify events, invite others or see participants’ lists. While creating an event, the participants will have the event permissions based on the default participant permissions.
Event Settings
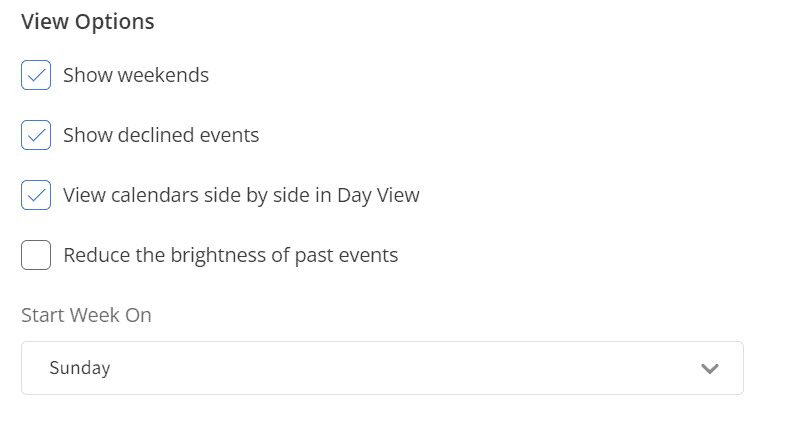
View Options
Event View Options
Show weekends: Displays weekends(Saturday and Sunday) on the calendar.
Show declined events: Displays the events you have responded as ‘No’ on your calendar.
View calendars side by side in Day View: Displays the calendars side by side in the day view, while checking the user availability / for subscribed user calendars.
Reduce the brightness of past events: Reduces the brightness of past events.
Start Week On: Select the day from which your calendar needs to start.
Click on the Save button to save the changes made to the General Settings of the calendar.
Admin Settings
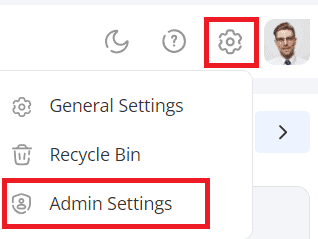
Users with Calendar Administrative Privileges can configure the physical meeting rooms to the Infince Calendar. To do so, click the Settings icon at the top right corner and select the ‘Admin Settings’ option.
Admin Settings
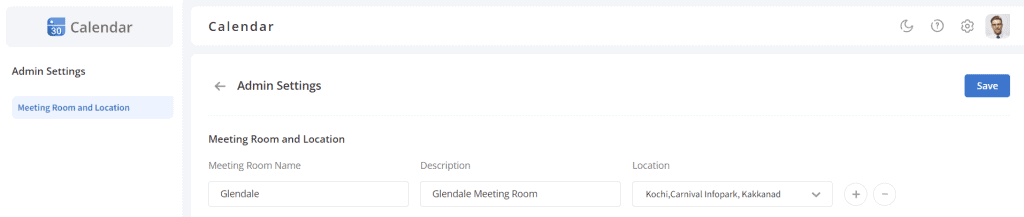
In the Admin Settings pop-up,
Enter the meeting room name and description.
Select the meeting room location. (locations are specified in Infince Workplace through Administration > Settings > Office Locations menu).
Click on the Save button.
Note: Click the ‘+’ button to add another meeting room to the Calendar.
Configuring Admin Settings
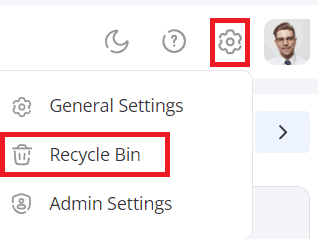
Recycle Bin
The deleted calendar events can be managed from the Recycle bin. These events are moved to the Recycle Bin, where they will be available for 30 days.
Recycle Bin
For that, click on the Settings icon in the top right corner and select the ‘Recycle Bin’ option.
Recycle Bin Settings
To restore the events, select the required events and click the Restore button.
To delete the events, select the events and click the Delete button.
Click the Empty Recycle Bin button to permanently delete all the calendar events from the recycle bin.