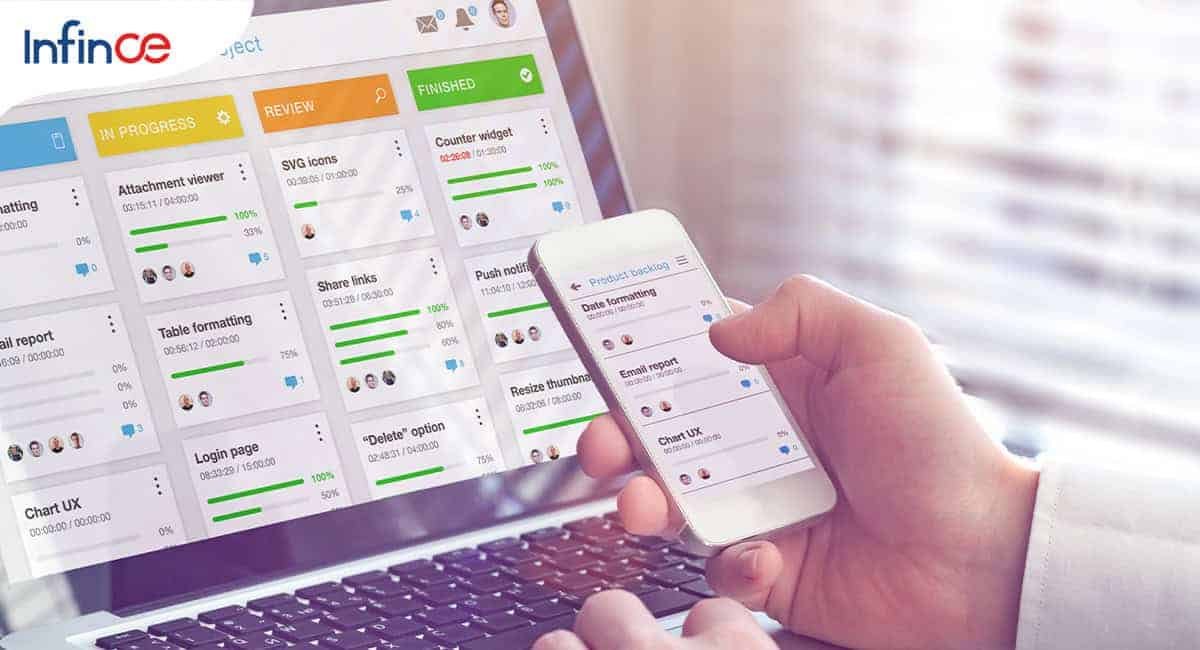
Infince Phone System has a built-in dialer that allows you to make or receive calls, right from the dashboard. Similar to the keypad dialers you have in your smartphone, the Infince Phone System dialer also comes with basic call management features like accepting or rejecting incoming calls via simple actions.
To use the dialer, navigate the right section of the dashboard and click on the telephone icon.
Select the country/region that you wish to call, from the drop-down button to the left of the number field.
Enter the phone number on the keypad.
If your extension is mapped to multiple phone numbers, you can click on the Dial From drop-down to select the number that you would like to call from. Click the Call icon to initiate the call.
Besides, Infince Phone System dialer also features call logs that give details about all inbound and outbound calls that you have made from the system.
You can also access the call logs by clicking on the clock icon on top of the dialer.
Clicking on the Info tab shows details of your assigned extension and mapped phone numbers.
Social intranet platforms have become indispensable for businesses, facilitating communication, collaboration, and knowledge sharing among employees. Picture this: a dynamic…Read More
Goals of increased employee productivity and cost savings are a no-brainer in today’s digitally transformed business landscape. As Rodney Zimmel…Read More
You can subscribe to Infince Business Phone System and get one or more dedicated phone numbers for your business. This provides you with the ability to make and receive business calls from anywhere via Infince on your computer or smartphone.
To start, log in to your Infince account as administrator and navigate to Administration > Phone System. Click Subscribe Now.
Purchasing a phone number
After subscribing to Infince Phone System with a plan that suits you best, you can then get started by purchasing one or more phone numbers for your business.
For that, click the Buy a Number button on the Get Started page. (If you have logged out after subscribing, go to Administration > Phone System and click on + Buy Number)
Now, select your region from the Country drop-down and choose the number type – Toll-free or Local.
Enter any prefix or number that you prefer at the Number field and click Search. (For local numbers, you can refine the search to your city or state by entering the details in the location field).
In the section below, pick your desired number from the selection of toll-free and local phone numbers displayed. Review the costs per month and inbound call rates and click Buy.
Subscribed phone numbers will be displayed in the My Numbers tab on the Phone System homepage.
Lately, businesses have been rapidly adopting cloud productivity apps as the pandemic and other digital transformation efforts have fostered their…Read More
Infince Phone System gives you the ability to configure and manage your purchased phone numbers in three different ways:
As a Direct Call
As a Distribution
As a Directory
To configure a phone number in any of the above three ways, you should first assign extensions to your users and then link them to the purchased phone number.
Extensions are basically short internal numbers assigned to an employee or organizational unit within the organization. Connected to the main business number, extensions allow a caller to reach out to a specific employee or organizational unit in your organization by routing the call to its intended recipient.
In Infince Phone System, extensions can be assigned at just $1/user/month. This enables the selected user to receive and place calls on specific phone numbers.
Start by assigning an extension number by going to the Phone Users tab and click on + Add Phone User.
Now, click + Add button and select your desired user from the drop-down. Enter the extension number in the field and confirm. Click Submit.
As a Direct Call
If you need the phone number to serve as a direct number to a specific user, you can use this option. This way, you set this as a direct number for one of your phone users.
By configuring a direct number, the selected user will be able to receive and initiate calls using this phone number.
Know more about configuring a direct number for your users here.
As a Distribution
Call distributions allow you to route an incoming call programmatically to specific business functions at the shortest time possible. You can set the rules to connect inbound callers to their intended destinations based on availability, priority and business hours.
By creating a distribution, you can easily group users in a certain team or business functions such as Sales or HR and set the order in which the call would be directed within the group users. Map the distribution to any of the purchased phone numbers. In addition, distribution also allows you to forward calls to external phone numbers.
Know more about setting up call distributions here.
As a Directory
Call Directories enable you to greet incoming callers with personalized messages and instantly direct their calls to users or organizational units within your organization.
Directory setup is a great option for your main number. You can map users and/or distributions to a directory. Users get mapped to a Directory via their extension numbers. A Distribution will get included in a Directory via an IVR option.
You can get a detailed walkthrough of how to set up call directories here.
Traditional communication, collaboration, and knowledge management approaches are becoming increasingly obsolete in today’s digitally-driven workplace. Overlooking workplace challenges jeopardizes productivity…Read More
Set up a call directory to reach specific or all employees in your organization.
Start by navigating to the Directories tab in the phone system menu and click + Add Directory.
Provide a suitable name for the directory. Provide a message to greet your callers and direct them to their preferred destination. You can achieve this by choosing either of the two options – Text to Speech or Upload Audio File/URL.
Opting for Text to Speech requires you to input the greeting message in the text box, complete with all instructions to guide the caller precisely to their intended recipient.
Once that’s done, choose your preferred Language and Voice from the drop-down button below and click Save.
If you have an audio recording of the message or a URL that contains the same, select the Upload Audio File/URL option and upload your audio files or enter your URL in the field below.
You can map users and/or distributions to a Directory.
To map users to the newly created directory, go to the Directories tab and click on Map Users from the “Action” column in directory listing.
Here, select Limited Users if you wish to selectively include a set of “phone users” into the directory. Select the desired user from the dropdown and confirm.
Going with the All Phone Users option spares your effort as the system will automatically add all users that are assigned extensions to the directory. This option helps you to easily set up the main number for your business. Click Submit.
If you only wish to tag this directory to distributions via IVR (Interactive Voice Response) options, click on the Map Distribution option and choose the desired distribution(s). Learn more about configuring call distributions here.
The created directory will be listed under the Directories tab in the phone system menu. Now, you need to configure the directory with the purchased phone number.
For that, go to the My Numbers tab and click on the Settings icon.
In the configure window, select Directory and in the drop-down, select the directory you have just created to pair it with the phone number. Click Save.
Business continuity planning has been a crucial aspect of business success considering how unprecedented disruptions can have a significant impact…Read More
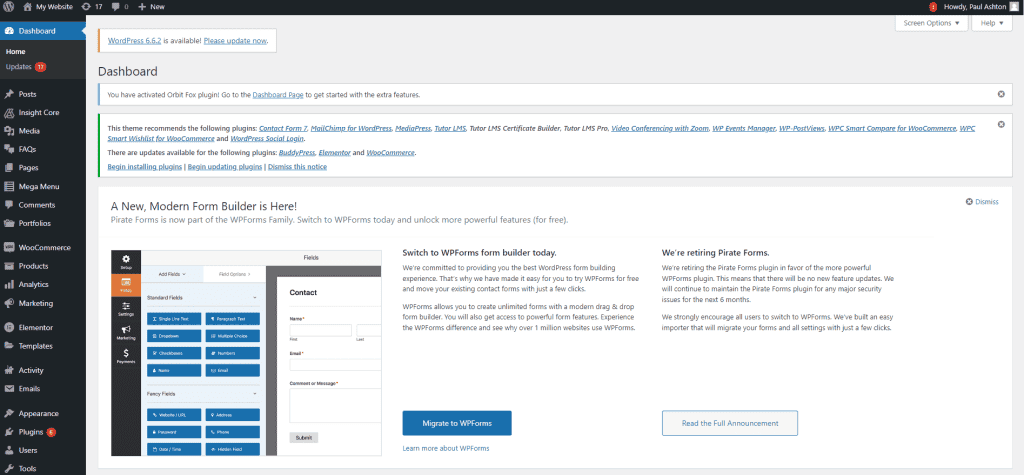
WordPress is a great tool for designing, setting up and maintaining business websites. Infince App Marketplace offers WordPress Portal, a private installation of WordPress, for you to securely manage your website. Let’s take a look at the steps involved:
Purchase WordPress Portal
Go to Cloud Console and click on the App Store > All Applications. Click on the Subscribe button for “Wordpress Portal” to know more about the features and benefits of WordPress.
WordPress portal listed in App Store > All Applications. Click on Subscribe to view features & details.
In the ‘WordPress Portal Parameters’ pop-up:
Application name and application URL will be displayed & can be modified if required.
Click on the Next button to view the plans and pricing for the application.
In the Pricing page, choose a plan that meets your requirements.
Once the installation is complete, you can see the WordPress Server up and running under Administration> Servers tab.
You can also see “Wordpress Portal” under App Store > Installed Apps.
Provision your Content Management team
Next, you need to provision access to your Content Management and Design teams to enable them to set up the website content and design. To do this, click on the “MANAGE” link on “Wordpress Portal” under App Store > Installed Apps. (If you do not have an in house team for the website creation,contact us and our creative team can help you out).
Click on the Add User button to select desired users, choose their roles, and grant access.
Set up your Website
The Design/Content Management team members who have access to WordPress Portal can now start working on the website. They can click on the WordPress Portal icon on the left menu bar and choose “Admin” to access the WordPress Administration Dashboard.
WordPress Portal Admin Dashboard for setting up the website
A default theme and content would be available for you to start with. To view this default page or review the page while under construction, click on the WordPress Portal icon on App Store > Installed Apps.
Access to Website preview
Your team is now set to do all the content and design work for getting your website ready! Use the Help articles within WordPress for any help along the way.
Map your business domain to your WordPress website
Once your website is ready to be published, you can map your WordPress site to your business domain. To do this, go to App Store > Installed Apps and click on Manage icon within the WordPress Portal card. Then click on the ‘Map to your domain’ to link your site to your domain.
Click on the “Map to your domain” button to map the website to your domain
If you had registered or bought your business domain via Infince, choose the “Use domain purchased through Infince” option, and select the domain below.
Configuring when your website was purchased through Infince
On the other hand, if you had registered or bought your domain outside Infince, provide the domain name and choose the “Use domain purchased through other registrars” option. In the DNS Settings section, you would see 2 DNS entry details which need to be added in your DNS Registrar’s DNS Settings page. Once those entries are added, click on “Verify Domain” to successfully map your WordPress website to your business domain.
You are now all set to showcase your brand new website to the world! If you face any challenges at any of these steps above, please feel free to contact us. Our technical team would be happy to guide you through.
Digital transformation is essential to your businesses primarily because it enables effective and efficient management of all your resources, be…Read More
Your Infince Workplace includes 5 different kinds of storage – OS Storage, System Storage, File Storage (User Storage and Group Folder Storage), Mail Storage, and Application Storage. Click on each of the related articles to read more on managing & upgrading each of these storages types.
A user with Administrative privileges have the access to manage and upgrade Storage.
OS Storage (storage covering the Infince workplace server)
System Storage (includes files shared on Chats, and system level contents like images on Info Tiles etc)
File Storage (includes User storage and Group Folder storage)
To monitor any of your Infince Workplace Servers, click on Administration> Servers tab. Your Infince Workplace server and servers hosting all the business applications that you have purchased are listed here.
Server Listing under Administration
For each server, you can monitor the CPU usage (left), RAM usage (centre) and the OS, File & DB (if present) storages along the right. If OS Storage is close to exceeding the available capacity for the Infince Workplace server, please contact Infince Support. Our team would get in touch with you to understand your needs and do the upgrades necessary for your requirement. For updating the System or File storage for the Infince Workplace server, refer Managing System Storage and File Storage. For updating the storage of your Application servers, refer Manage Application Storage and Servers.
In today’s data-driven business landscape, enterprise cloud computing helps companies cut costs, enhance business flexibility and boost network security. However,…Read More
Infince allows you to control every user’s access to the software assets – files & folders, dashboards, communication channels, mobile apps and business applications. This helps you easily manage scenarios where you need to temporarily or permanently revoke user (employee) access to all IT assets.
An Infince user with User Administration permission can manage user access.
Go to Cloud Console and click on Administration > People > Users list to access the Users page to list all the active and blocked users.
In the Users page, the action items on the right are View, Block/Activate and Delete.
Users List
View User Access and Storage
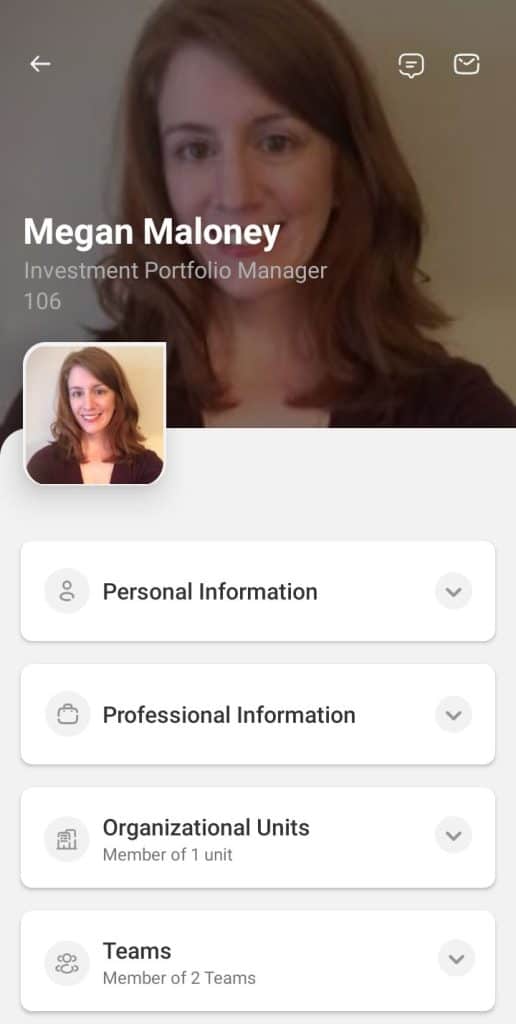
Click on the View icon to see the detailed User profile. This page provides details of the user’s profile on Infince and the business applications to which they have access. It shows the employee’s Infince role, reporting manager, organizational unit, all the teams they are part of, and the list of employees they manage, if any. You can view the organizational units, roles, and user levels. These are critical details to evaluate before you block/activate/delete an employee.
Employee profile
Editing the User details
Click on the Edit icon in the basic information section to edit the basic details of the user.
In the ‘Edit Basic Information’ pop-up, you can edit the first name and last name of the user. The users with access to user registration can change the user access level and title of the user.
Click on the Submit button to save the changes made. It is possible to send a message to the user by clicking on the Send Message option.
You can change the user access level from ‘Basic’ to ‘Standard’ (if required). ‘Standard’ to ‘Basic’ user access level conversion is not supported.
Click on the Change Password button in the ‘Basic Information’ section to change the password.
Personal Information
Click the Edit icon in the Personal Information section to edit the personal information of the user.
In the ‘Edit Personal Information’ pop-up, you can update the date of birth, gender, phone number, and permanent address of the user.
Usage Details
You can edit the file/mail storage of the user. The users with access to user registration and storage allocation can modify the storage allocation.
Click the Edit icon in the Usage Details section to update the storage allocation of the user.
Applications Used
You can view the applications to which the user has access.
Click the ‘Edit’ icon in the ‘Applications Used’ section to edit the applications used. The users with access to user management can provide access to the applications.
Professional Information
Click the Edit icon in the Professional Information section to edit the professional information.
In the ‘Edit Professional Information’ pop-up, you can update the professional information of the user, such as the organizational unit he belongs to, reporting manager, the office location, and the employees he manages.
Organizational Units and Roles
Click on the Edit icon in the Organizational Units and Roles section.
Here you can update the organizational units that the user is associated with and roles assigned. The users with access to user management can edit this section.
Teams
Click on the Edit icon in the Teams section to edit the team details.
In the ‘Edit Teams’ pop-up, you can manage the teams that the user is part of, and the associated roles of the user.
Additional Information
Click on the Edit icon in the Additional Information section to edit the custom field details.
Block/Activate User Access
Click on the Block icon against the user on the Users page to temporarily revoke the user’s access to all assets related to Infince Workplace. The user will remain in the system and will be listed in the Administration > People > Users list, but a blocked user can no longer access Infince Workplace or any related assets, like files/folders, business applications and mobile app(s).
Click on the “block” icon to deactivate and block their access to Infince Workplace.
A blocked user can be “activated” by clicking on the Activate icon, and the user will regain access to all the Infince assets they had access to earlier. For example, this feature allows you to temporarily revoke/grant access when managing seasonal/ contractual employees.
Users who are blocked for the entire month are not billed for the monthly usage. This feature thus allows you to manage your usage and billing on demand dynamically.
Click on the “Activate” icon to activate a blocked user.
On clicking the ‘Activate’ icon, the ‘Activate User’ pop-up appears, where you can set a password or send an activation email to the user.
Delete User
Click on the Delete icon at the far right on the user listing page to delete a user when required, like when an employee leaves the organization. You will receive a prompt to transfer all the files and folders the employee owns. You can choose to transfer the data to their Reporting Manager or to someone who is taking over that role. The ‘transfer files’ feature lets you seamlessly manage data/files hand-over and prevent loss of information when a user is deleted.
The user to whom all the files are transferred will now have a folder in their Files, with the name of the deleted user, that holds all the data that got moved. They will automatically have an increased “File Storage” as per the storage allocated to the deleted user.
Permanent Deletion
You can refer to the list of deleted users (as explained in the section above) by clicking the “Deleted Users” menu from the three dots icon.
Deleted Users List
Deleted Users List
This listing enables you to maintain a record of all employees/users who were on your rolls. Do note that the “email” that was assigned to a deleted user cannot be reassigned to a new user. However, if you had deleted a user by mistake and need to reinstate the user, you could follow these steps:
Permanently delete the user from the database by clicking the delete icon on the “Deleted Users” list. This will clear all the records, making it possible to recreate new records for the user.
Add the user again from the Administration > People > Users menu.
The User Access Control feature in Infince enables administrators to efficiently manage user profiles, access levels, and permissions. With options to edit user details, block or reactivate access, and securely transfer data during user deletion, it ensures both security and continuity across the workplace.
Email Hosting: Managing email accounts, storage and DNS records
One of the earliest needs for a new business is to have an official email address for all business related email communication. There are several email hosting options available. If you are signing up for Infince Workplace, you can avail the Email hosting option provided by Infince, as it enables you to manage all your assets in one place.
Hosting Email in Infince
You can choose to host your email in Infince during your Sign up process (paid plan). Your email server will be up and running when your signup process is complete, without any hassle!
Even if you had already set up email hosting elsewhere, you can choose to move it to Infince for easy administration. Please contact us, so our Consultants can help you through the process.
Once your email hosting is set up/moved to Infince, you can create new email accounts, manage the email storage and manage your DNS records related to email from within Infince Workplace.
Email Accounts
When your Emails are hosted within Infince, every new Infince user automatically gets his email configured.
User creation will automatically create the mail for the user if your Email is hosted within InfinceInfince user profile displaying his email id (hosted in Infince) and Mail Storage usage
In addition, you can also create additional/generic email accounts for business functions like sales, support, marketing etc. These can be created and managed from the Administration > People > Users > ‘Additional Email Accounts’ tab. These additional email accounts can be handled by the concerned members of the department and configured within their email client for monitoring.
Creating an additional email accountListing of additional email accounts. You can add new accounts and manage existing accounts.
Change Password
Click on the ‘Change Password’ icon in the ‘Additional Email Accounts’ tab to change the password of the additional email account.
Changing the password
Convert to Infince User
To convert the additional email account to Infince user, click on the ‘Convert to Infince User’ icon in the ‘Additional Email Accounts’ tab. The user will be redirected to the ‘User Registration’ page, where they can enter the required details and register as an Infince user.
Converting Additional Email Account to Infince user
Managing Email Storage
The default email storage allocated for every account is 5GB. The users with administrative privileges can change this at the individual level depending on the user requirement. Read this article for more details on managing user storage.
Monitoring User Mail Storage
Email Client
Infince Workplace comes pre-packaged with an Email client. The Email client will be automatically set up if your email is hosted within Infince. But if your email is hosted outside Infince and you wish to view the emails within Infince, view this video on mapping your email.
Manage Email DNS Records
When you are hosting your email in Infince, you can view and manage your DNS records related to email under Administration > Settings > DNS page.
How Infince's Online Collaboration Software Facilitates Effective Business Communication Effective communication plays a significant role in business success. Having proper…Read More
Imagine having the contact details of all your colleagues at your fingertips without having to save even a single one of them manually! Infince makes this possible with the “People” feature of the web and mobile apps. This feature helps you to communicate with everyone in the organization (all users, including external users) at any time or place.
Viewing Employees on the Web App
On the Web app, click on the “People’ menu and the ‘Employees’ tab to view the list of all the employees of the organization. You can view the employee ID, name, email id, belongs to, and reporting to. Type-in the person(s) you wish to contact in the Search bar.
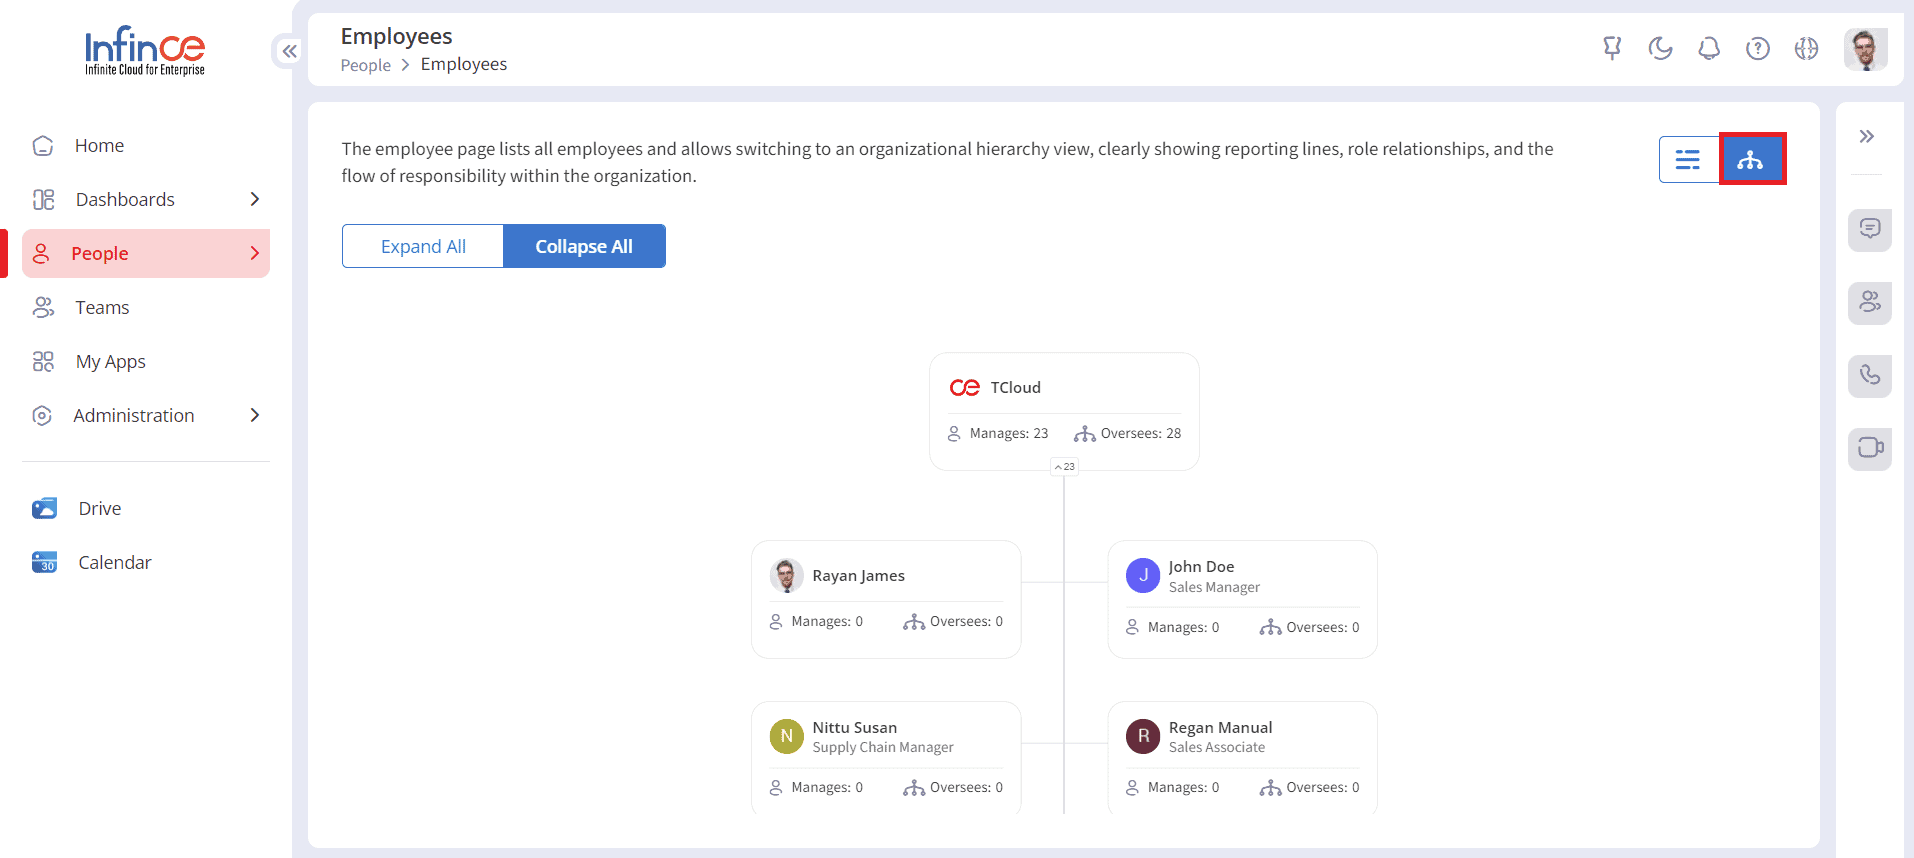
Click on the Hierarchy icon to view the employees in the Reporting order.
Employee hierarchy
Click on the Expand All button to view the reporting line and the flow of responsibilities within the organization.
Click on the ‘Name’ or ‘View’ icon to view the employee’s profile. You have the necessary information to contact the person via phone or email. Other professional information like the organizational units, roles, reporting manager, team(s) he/she is part of, office location etc can be viewed. It is possible to chat with the employee by clicking on the ‘Send Message’ icon.
View Employees on Mobile App
Click on the People menu at the bottom of the Mobile App and select the employees tab to view the list of all colleagues in your organization. Tap on the profile of a person to view his professional contact information. You can initiate calls, message or call the person from here.
Viewing your Employee Directory on the Mobile App
Viewing your Employee Directory and Contact details on the Mobile App
Goals of increased employee productivity and cost savings are a no-brainer in today’s digitally transformed business landscape. As Rodney Zimmel…Read More