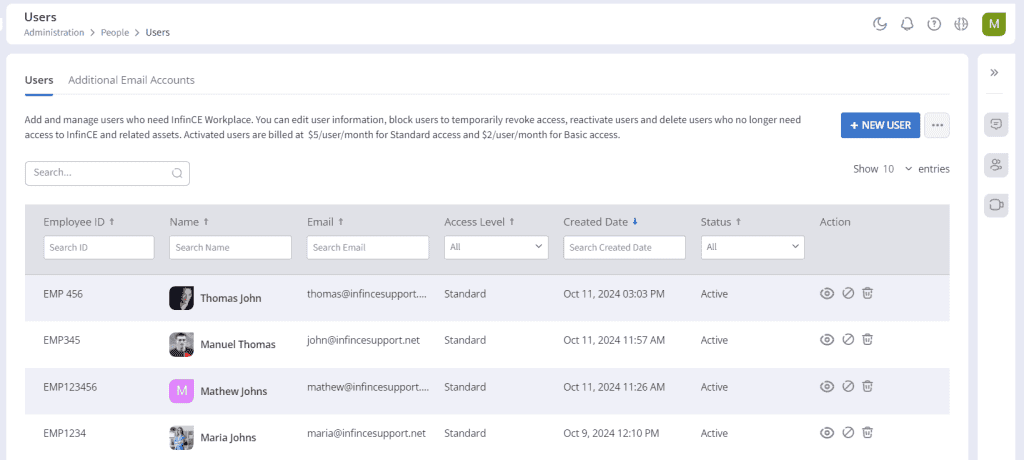
The User Management module lets you create or register new users individually or through import. You can also edit user information, block or reactivate users, and delete them from the Infince Cloud.
Go to Cloud Console and click on Administration > People > Users to open the Users page. This page displays a list of employees already added to the system. You can view details such as employee ID, name, email ID, assigned roles, access level, created date, status, and available actions. From here, you can view a user’s profile, block a user, or delete a user from Infince.
Manage Users
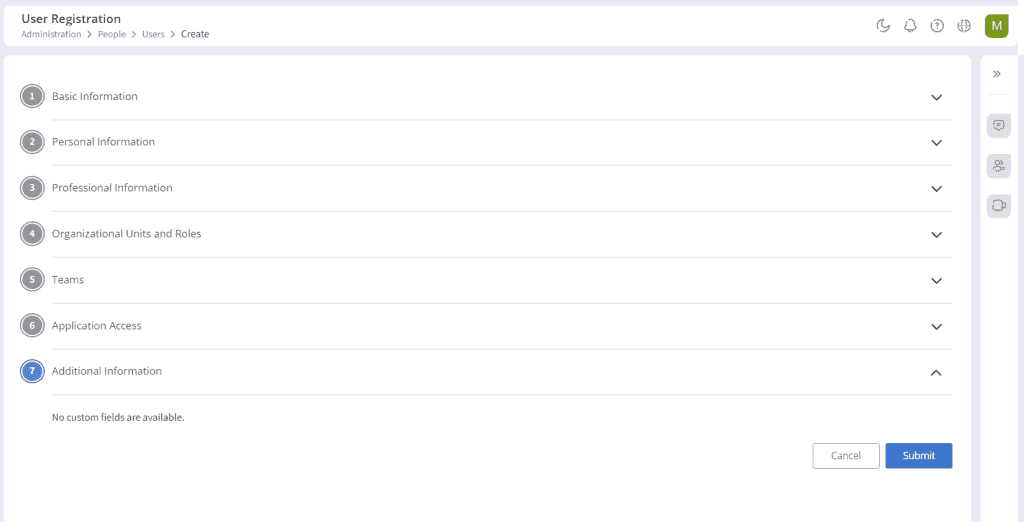
User Registration
Click the New User button in the ‘Users’ tab to register a user in Infince. The User Registration form is divided into logical sections, and mandatory fields are marked with a red asterisk.
Basic Information
In the ‘Basic Information’ section, select the user access level, and enter the employee ID, title, first name, last name, email id and date of joining of the user. You can activate the user by setting a password or by sending an activation email to the user.
Note: For the basic access level, the roles with only basic permissions will be available to choose from, whereas, for the standard access level, roles created from the complete set of permissions are available. Typically employees will need standard access to enjoy all the features of Infince Workplace.
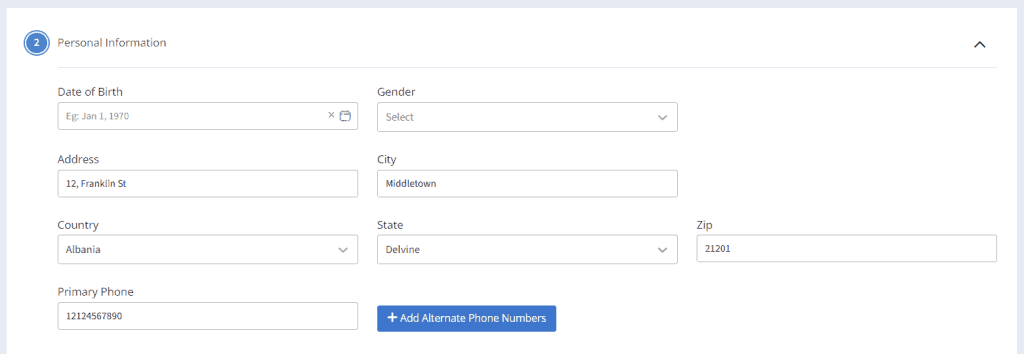
Personal Information
Enter the date of birth, gender, address, city, country, state, zip, and primary phone in the ‘Personal Information’ card.
Personal Information
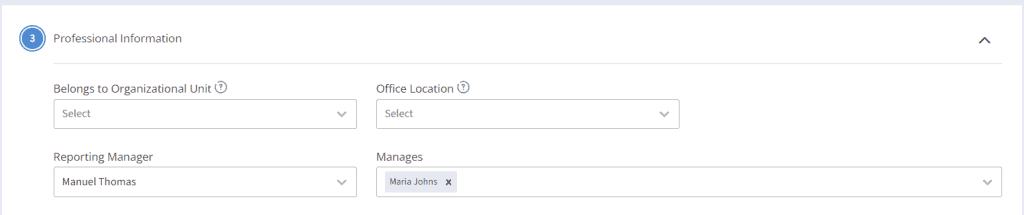
Professional Information
Enter the professional details of the user, such as the organizational unit he belongs to, reporting manager, office location, and employees who this user manages. When the ‘Belongs to Organizational Unit’ is selected, a system default role will also get assigned against the selected value. The “Organizational unit member” role will be assigned to the user for the’ Standard’ access level. For the ‘Basic’ access level, the “’Limited access member” role will be assigned to the user.
Professional Information
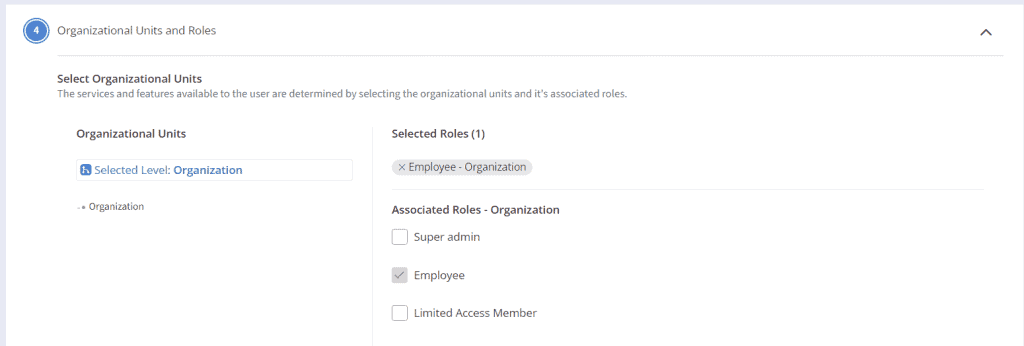
Organizational Units and Roles
Select the organizational units and associated roles from the ‘Organizational Units and Roles’ section based on the user access level chosen. This helps the user to access the features based on the selected roles.
Organizational Unit and Roles
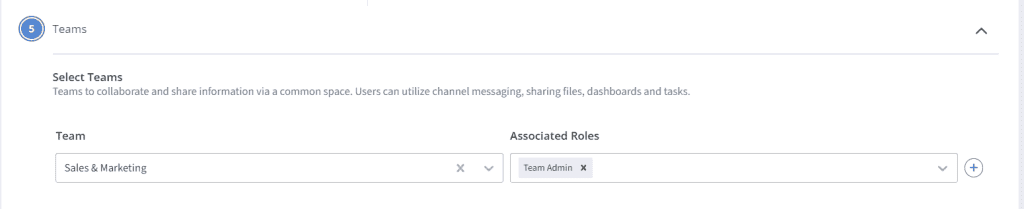
Teams
In the ‘Teams’ card, select the team and the associated roles.
Teams
Application Access
In the ‘Application Access’ card, provision the user to the applications they need access to, and assign the role required for that Application.
Application Access
Additional Information
Custom individual fields that are defined for your Organization under Administration > People > Users > Manage Custom Fields (menu next to New User button) will be listed under the ’Additional information’ section and can be entered here. Click on the Submit button to save the changes made.
Additional Information
The users registered to Infince Workplace will be displayed in the ‘Users’ tab. You can view their user profile and block or delete the user. Refer to the User Access Control article for more details.
Manage Users
Viewing the user details
Click the ‘View’ icon or user name to redirect to the employee profile page. You can view/edit the basic details, personal information, usage details, applications used, professional information, organizational units and roles, and team information of the user.
User profile
The User Management module in Infince helps Administrators efficiently create, manage, and control user accounts, ensuring secure access and smooth collaboration across the workplace.
In today’s world, organizations need tools that ensure streamlined workflow to function effectively and remain productive, successful, and ahead of…Read More
Reinvent Your Legacy IT Operations with Cloud Automation Cloud automation tools are capable of making digital transformation realistic compared to…Read More
In Infince, you can define the structure of an organization using the ‘Manage Organizational Units’ feature (Organizational units referred to as ‘OU’). Go to the Cloud Console and click on Administration > Settings > Organizational Units to access the ‘Manage Organizational Units’ feature.
The default organizational unit levels will be displayed in a tree format on the left side of the page. The default structure consists of a root-level organization and a department sub-level.
You can create as many sub-levels as required for the root level(Organization) and the same level/sub-level for other levels. This allows you to build your organizational unit structure in any required format easily.
You can then add organizational units for each of these levels. E.g., Divisions can be the first sub-level under Organization and Departments can be the sub-level under Divisions. For the Division and Department levels, the actual Divisions and Departments can be added & managed on the right side of the page. Deleting the default root Organization level available in the system is not possible.
Note:
You can rename the OU levels based on your organization’s requirements.
If the default OU structure is not suitable for your organization, you can set it according to your needs. After selecting the OU level on the left, you can create the sub-levels in the tree format and add their values on the right side section. You can add associated users and sub-OUs in each OU as required. Details are covered in the rest of the article.
Setting the Organizational Unit Levels
Editing the root OU level
Click on the menu icon on the root-level organizational unit.
Organizational Unit Levels
Click on the ’Edit’ menu to edit the name and description of the organizational unit.
Adding sub OU Levels
Select the organizational unit and click the ‘Add Sub Level’ menu to add a sub-level under any OU level.
Adding sub OU levels
In the ‘Add Sub Level’ pop-up, enter the name and description for the sub-level
Click on the Submit button to save the changes made.
Similarly, you can continue adding as many sub-levels & same levels as required to complete the required structure.
Adding same level OU
Click on the menu option of any organizational unit level (other than the root level) and choose the ‘Add at Same Level’ option.
Adding same OU levels
In the ‘Add at Same Level’ pop-up, enter the name and description of the OU level.
Editing an OU Level
You can edit the name and description of any OU Level, including the root OU Level.
Click on the ‘Edit’ option on the menu to edit the name and description of the Level.
Deleting an OU level
Click on the ‘Delete’ option in the menu against the OU Level to delete it.
Managing Organizational Units
Click on any OU level to see the OUs created at this level. The OU name and the number of users associated with this OU will be displayed. The actions that can be performed can also be viewed.
Adding OUs
Click on any level (other than the root organizational unit level) on the left panel and click on the Add button to create OUs (E.g., ADD DEPARTMENT to create departments)
Enter the name and description of the OU in the pop-up (E.g., Name as “Facilities And Administration” in the ‘Add Department’ pop-up).
Viewing the OU Info
To view the details related to the OU, click on the ‘Info’ icon against the organizational unit name. The description(if any) and the employee who created the organizational unit will be displayed.
OU Info
Editing the Organizational Unit details
Click on the ‘Edit’ option in the menu to update the name and description of the organizational unit.
Viewing the OU details
Click on the ‘View’ icon or the ‘Name’ of the organizational unit to navigate to the Organizational Unit page (or navigate directly; for e.g., Administration > People > Department) to view the users and sub-level OUs associated with this organizational unit.
Viewing the OU details
Deleting the OU
To remove an OU, click the ‘Delete’ icon next to the OU in the listing. OU can be deleted only when it has no sub-levels or users associated with it.
The Manage Organizational Units feature in Infince allows you to structure your organization with flexible levels and sub-levels. By creating, editing, or deleting OUs, and associating users as needed, you can model your organization’s hierarchy in a way that best fits your business req
Goals of increased employee productivity and cost savings are a no-brainer in today’s digitally transformed business landscape. As Rodney Zimmel…Read More
Organizational Units are groups consisting of a set of users who belong to a specific functional unit. In the Infince Workplace, creating organizational units and associating users with them is possible. Each organizational unit is associated with three system default roles: Organizational Unit Member, Organizational Unit Admin, and Limited Access Member.
The organizational units created under each organizational unit level through the ‘Organizational Unit Setup’ will be available under the People menu. For instance, if your organization has Departments and sub-departments, you can create departments (e.g., Finance) and sub-departments (e.g., Payroll, Procurement) on the Organizational Units page (Administration > Settings > Organizational Units). Then, click on Administration > People > Department to access the Department page. In this page, you can view the list of Departments and the list of Roles associated at the Department level.
Viewing the OU
Within the OU page (e.g., Department), the page with the list of OUs (Sales, Finance, etc.) displays the OU details such as name, number of users associated with the OU, creation details, and the actions that can be performed for the OU. It is possible to edit the OU details, and view the associated users and sub-departments for this OU.
Adding OU
Click on the Add button (e.g., Add Department) to create a new OU.
In the ‘Add’ pop-up, enter the name and description of the OU. E.g., Administration, Sales, etc.
Editing the OU details
Click the ‘Edit’ icon against the OU to edit the details. In the ‘Edit’ pop-up, edit the name and description of the OU.
View the OU details
In the OU details page, the users can view the lists of associated users and sub-level OUs of this OU.
Viewing users associated with the OU
Click on the OU name or on the View icon against the OU to view the users associated with the OU. The user name, email id, the role the user is associated with, association details, and actions that can be performed for this user. Editing the user’s role and removing the user from the OU can be done here.
Adding users to the OU
Click on the Add User button to add a user to the OU.
In the ‘Add User’ pop-up, select a user role, provide user names and click on the Submit button to provide access to the OU.
Note: To add a user as a member of the organizational unit, Belongs to association should be mapped from the user profile.
Editing the user role
Click on the Edit icon to edit the user’s role.
In the ‘Edit Role’ pop-up, you can delete the user role and add a new role.
Click on the Add Role button to assign new roles for the user.
View the user profile
Click on the user name in the ‘Associated Users’ tab to redirect to the user profile page.
Removing the user from OU
To remove a user associated with the OU, click on the ‘Remove’ icon.
Associated Sub Level OUs
Adding sub-level OU
In the Associated sub-level OU tab (e.g.,‘Associated Sub Departments’), click the Add button to create a new sub-level OU.
In the ‘Add’ pop-up, enter the name and description of the sub-level OU. E.g., Housekeeping.
Note: It is possible to edit the sub-level OU, view the OU and add users to the sub-level OU.
Viewing the Associated Roles of an OU Level
The Associated Roles tab within the OU page displays the role name, description, access level, and the number of users associated with this role. Click on the User count to view the users for the role and can also remove the role from the roles list.
Click on the ‘View’ icon to view the users and groups associated with this role.
Delete Associated Role
Click the Remove icon against the custom role in the Associated Roles tab to remove from this OU level. Remove icon will be displayed only for custom roles.
Organizational Units in Infince provide a structured way to represent your organization’s hierarchy. They enable efficient user grouping, role assignment, and access management, ensuring streamlined administration and effective collaboration.
Roles in Infince enable the grouping of module permissions and their assignment to users or user groups, allowing them to be provisioned with the required access to workplace modules. Roles can be customized to meet the specific needs of an organization. There are two types of roles, System Default Roles and Custom Roles. System default roles are predefined roles available in the system by default, while Custom roles can be created as needed.
Based on the access level, roles can be divided into Basic and Standard. During the role creation, if the user selects the role access level as basic, then he can choose from a limited set of permissions available. Conversely, if the user selects the role access level as ‘standard’, they can choose from all the permissions available in the system.
It is important to note that the permissions are applicable to the user based on their Organizational Unit/Team and the roles they possess. For example, suppose the user is a Team Admin of ‘Team A’ (with the permission ‘Manage associated teams’) and a member of Team B. In that case, this user will be able to add/edit users of Team A, but can only view the members of Team B.
System Default Roles
System default roles are the pre-defined roles available in the system. These roles have specific permissions for the various features in Cloud Administration. Users assigned to the roles are granted those permissions. It is possible to edit the permissions of the system default role if needed.
Go to Cloud Console and click on Administration > Settings > Roles & Permissions, to access the Roles and Permissions page.
In the Roles and Permissions page, you can find the list of roles in the system with the name, description, access level of the role, organizational unit level/team that this role can be associated with, the number of users having this role, role created date and the actions that can be performed.
Role details
Click on the role name in the list to view all the role details, such as role type, applicable user access level, associated group level and allowed permissions (selected permissions count). On this page, permissions are set for this role for the various features of the Infince workplace.
To edit the title and description of the role, click on the Edit icon on the top right of the card.
Click on the Edit icon in the Set Permissions section to provide/revoke access to various features of the Infince workplace.
The following are the system default roles that can be assigned to users in Infince.
Super Admin
Super Admin has access to all the modules in the application. They can manage all the Infince features, including administration and billing. This is a standard role associated at the Organization level. By default, the user who signed up for Infince will be granted the Super Admin role.
Employee
This is a default role of an employee who does not have administrative privileges. This is a standard role of the employees of the organization associated at the Organization level. Users in this role will have access to:
Create private dashboards and view organization dashboards
Use standard tiles, create & manage your custom tiles
View list of all employees and manage external contacts
Productivity tools (files and calendar)
Provisioned applications
Chat functionality
Create meetings, and personal meeting rooms
View, join, and record meetings
View profile, change password, update personal information
Download the Mobile application
Support Centre
Organizational Unit Admin
Organizational Unit Admins are users with permission to manage their Organizational Unit(s). This standard role is associated with all the organizational unit levels (e.g., Departments and Sub Departments, etc.). Users in this role have standard access level and have access to:
Create private dashboards
View organization dashboards
View dashboards of parent organizational units
View, Edit, and Share dashboards of associated organizational units
Delete dashboards of associated organizational units
View and Share dashboards with child organizational units
Use standard tiles and create & manage your own custom tiles
Share custom tiles to associated/child organizational units
View list of all employees, manage external contacts
Invite and manage guest users
Create and manage your teams
Productivity tools (files and calendar)
Provisioned applications
Chat functionality
Create chat channels
Create meetings and personal meeting room
View, join. and record meetings
View profile, change password, and update personal information
Download Mobile Application
Support Centre
Organizational Unit Member
Organizational Unit Members are users with permission to view dashboards of associated organizational units. This standard role is associated with all the organizational unit levels. Users in this role have standard access level and have access to:
Create private dashboards and view organization dashboards
View dashboards of associated organizational units
Use standard tiles, create & manage your own custom tiles
View list of all employees and manage external contacts
Productivity tools (files and calendar)
Provisioned applications
Chat functionality
Create chat channels
Create meetings and personal meeting room
View, join, and record meetings
View profile, change password, and update personal information
Download Mobile application
Support Centre
Team Admin
Team Admins have permission to create and manage their teams. This is a standard role and is associated with the Teams. Users in this role have standard access level and have access to:
Create private dashboards
View organization dashboards
View, Edit, Share, and Delete dashboards of associated teams
Use standard tiles and create & manage your own custom tiles
Share custom tiles with associated teams
View list of all employees, manage external contacts
Invite and manage guest users
View all guest users in associated teams
Create and manage your teams
View and manage associated teams
View and manage all teams
Productivity tools (files and calendar)
Other provisioned applications
Chat functionality
Create chat channels
Create meetings and personal meeting room
View, join, and record meetings
View profile, change password, and update personal information
Download Mobile Application
Support Centre
Team Member
Team Members are users with permission to view associated teams. This is a standard role and is associated with the Teams. Users in this role have standard access level and have access to:
Create private dashboards
View organization dashboards and dashboards of associated teams
Standard tiles, create & manage own custom tiles
View list of all employees, manage external contacts
View associated teams and guest users in the associated teams
Productivity tools (files and calendar) and other provisioned applications
Chat access and create chat channels
Create meetings, personal meeting room
View, join, and record meetings
View your profile, change your password and personal information
Allow download of mobile applications
Support Centre
Limited Access Member
The Limited Access Member role is a role, having a minimal set of basic permissions. This is a basic role and is associated with the Organization, Organizational units, and Teams. Users in this role will have access to:
View dashboards of associated organizational units
View the associated teams and their dashboards
Productivity tools (Files and Calendar)
Other provisioned applications
Chats
View profile, change password, and update personal information
View the meeting invite and join them
Custom Roles
The users with relevant permissions can create new roles for the custom requirements of the organization.
Click on Administration > Settings > Roles & Permissions to access the ‘Manage Roles & Permissions’ page.
Manage Roles and Permissions
Click on the Add Role button to create a new custom role.
In the ‘Add Role’ pop-up, enter the role title, description, and choose the access level for the role. Select the level to which this role is to be associated so that the role will be available while provisioning users to the Organizational Units/Teams at that level. Select an existing role from which the permissions can be copied to the newly created role, if required. Click on the Save & Next button to set the permissions for the role.
Setting Permissions
Setting Permissions
The modules will be listed on the left panel of the Set Permissions section. The sub-modules and permissions of the selected module are displayed on the right panel. On clicking the module, you can view the permissions available for the module.
Click on the module and set the permissions for each sub-module. After setting permissions for the required modules and sub-modules, click the Save button.
You will be redirected to the Roles & Permissions page, where they can view the details of the newly created role.
Click on the View icon to view the role details and the permissions set in for the modules and sub-modules for the users in this role. The edit option will be available on the role detailed view page for editing the role details or permission set.
Click on the Delete icon to delete the role. Make sure to remove all the users from the role before deleting it.
Digital transformation is essential to your businesses primarily because it enables effective and efficient management of all your resources, be…Read More
How to Improve Your Intranet for Better Employee Experience Technology advancements and modern communication tools have changed the entire landscape…Read More
Module Permissions in Infince refer to the access rights the users get for the modules based on their designated roles. The users can perform the actions within these modules if they have relevant permissions.
List of Permissions
The Module Permissions available during the role creation are based on the role access levels: Basic and Standard. For the basic access level, only a limited set of permissions are available to choose from, whereas, for the standard access level, users can choose from all the permissions available in the system.
Basic access level permissions
The permissions available for basic access level roles are listed below:
Module
Permissions
Description
Organization Dashboards
View organization dashboards
Users can view all the dashboards shared at the organizational level
Organizational Unit Dashboards
View dashboards of associated organizational units
Users can view the dashboards of the associated organizational units
View dashboards of parent organizational units
Users can view the dashboards of the parent organizational unit of their associated organizational units
View dashboards of child organizational units
Users can view the dashboards of the child organizational units of their associated organizational units
Team Dashboards
View dashboards of associated teams
Users can view the dashboards of the associated teams
Employees
View list of all employees
Users can view the list of all employees in the employee directory
Teams
View associated teams
Users can view the associated teams
Applications
Allow access to productivity tools (Files and Calendar)
Users can access the productivity tools such as Files and Calendar
Allow access to other provisioned applications
Users can access all the applications provisioned to them. (This is a system default permission available to all roles.)
Chat
Allow chat access
Users can chat with others.
Meeting
View and join meetings
Users can view and join the meetings to which they are invited.
Own Profile
View profile
Users have permission to view their profiles. (This is a system default permission available to all roles.)
Change password
Users can change their password
Change all profile information
Users have permission to change the basic and personal information on their profile.
Support Center
Allow access
Users can access the support center to raise tickets and contact the Support team.
Standard access level permissions
All the permissions available in the system are listed below:
Module
Permissions
Description
Basic Permission
Private Dashboards
Create private dashboards
Users can create and manage their dashboards.
Organization Dashboards
View organization dashboards
Users can view all the dashboards shared at the organizational level.
Edit organization dashboards
Users can view/edit the organization’s dashboards.
Delete organization dashboards
Users can view/edit/delete the organization’s dashboards.
Organizational Unit Dashboards
View dashboards of associated organizational units
Users can view the dashboards of the associated organizational units.
View dashboards of parent organizational units
Users can view the dashboards of the parent organizational unit of their associated organizational unit.
View dashboards of child organizational units
Users can view the dashboards of the child organizational units of their associated organizational units.
View all organizational unit dashboards
Users can view the organizational units’ dashboards irrespective of the association.
Edit dashboards of associated organizational units
Users can view/edit the dashboards of the associated organizational units.
Edit dashboards of parent organizational units
Users can view/edit the dashboards of the parent organizational units of their associated organizational units
Edit dashboards of child organizational units
Users can view/edit the dashboards of the child organizational units of their associated organizational units.
Edit all organizational unit dashboards
Users can view/edit all the organizational unit’s dashboards, irrespective of the association.
Delete dashboards of associated organizational units
Users can view/edit/delete the dashboards of the associated organizational units.
Delete dashboards of parent organizational units
Users can view/edit/delete the dashboards of the parent organizational unit of their associated organizational units.
Delete dashboards of child organizational units
Users can view/edit/delete the dashboards of the child organizational unit of their associated organizational units.
Delete all organizational unit dashboards
Users can view/edit/ delete the organizational units’ dashboards irrespective of the association.
Team Dashboards
View dashboards of associated teams
Users can view the dashboards of the associated teams.
View all team dashboards
Users can view the dashboards of all the teams in the organization.
Edit dashboards of associated teams
Users can view/edit the dashboards of their associated teams.
Edit all team dashboards
Users can view/edit the dashboards of all the teams in the organization.
Delete dashboards of associated teams
Users can view/edit/delete the dashboards of their associated teams.
Delete all team dashboards
Users can view/edit/delete the dashboards of all the teams in the organization.
Dashboard Sharing
Share dashboards with associated organizational units
Users can share the dashboards with their associated organizational units.
Share dashboards with parent organizational units
Users can share the dashboards with the parent organizational unit of their associated organizational units.
Share dashboards with child organizational units
Users can share the dashboards with the child organizational unit of their associated organizational units.
Share dashboards with any organizational unit
Users can share the dashboards with any organizational unit.
Share dashboards with associated teams
Users can share the dashboards with the associated teams.
Share dashboards with any team
Users can share the dashboards with any team.
Share dashboards with organization
Users can share the dashboards with the organization.
Standard Tiles
Allow access to standard tiles
Users can use the standard tiles available in the system for their dashboards
Custom Tiles
Create & manage own custom tiles
Users can create and manage custom tiles
Share custom tiles to associated organizational units
Users can share the custom tiles with the associated organizational unit.
Share custom tiles to parent organizational units
Users can share the custom titles with the parent organizational units of their associated organizational units
Share custom tiles to child organizational units
Users can share the custom tiles with the child organizational unit of their associated organizational units
Share custom tiles to any organizational unit
Users can share the custom tiles with any organizational unit
Share custom tiles to associated teams
Users can share the custom tiles with the associated teams.
Share custom tiles to any teams
Users can share the custom tiles with any team, irrespective of their association
Share custom tiles to organization
Users can share the custom tiles with the organization
Employees
View list of all employees
Users can view the list of all employees in the employee directory.
My Contacts
Manage external contacts
Users can add and manage external contacts connected to the phone system
Guests
Invite and manage guest users
Users can invite and manage guest users in the workplace (external users).
View all guest users in associated teams
Users can view the guest users of the associated teams
Teams
Create and manage new teams
Users can create, edit and delete the new teams.
View associated teams
Users can view their associated teams.
View all teams
Users can view all the teams in the system regardless of the association.
Manage associated teams
Users can manage the associated teams.
Manage all teams
Users can manage all the teams irrespective of the association.
Applications
Allow access to productivity tools (Files and Calendar)
Users can access the productivity tools such as Files and Calendar.
Allow access to other provisioned applications
Users can access all the applications provisioned to them. (This is a system default permission available to all roles.)
Chat
Allow chat access
Users can chat with others.
Create chat channels
Users can create chat channels.
Meeting
Create meetings
Users can create meetings and invite other users
Create personal meeting room
Users can create a personal meeting room.
View and join meetings
Users can view and join the meetings to which they are invited.
Record meeting
Users can record the meetings.
Own Profile
View profile
Users have permission to view their profiles. (This is a system default permission available to all roles.)
Change password
Users can change their password
Change personal information
Users have permission to change their basic and personal information
Mobile App
Allow download
Users have permission to download the mobile application
Support Center
Allow access
Users can access the support center to raise tickets and contact the Support team
People Management
Create and manage users (employees)
Users have permission to create and manage employees
Invite and manage guest users
Users have permission to invite and manage guest users
Manage users in all organizational units
Users have permission to add, edit, and remove the users in all the organizational units.
Manage users(employees) belongs to the organizational units associated with this role
Users have permission to edit, block, activate and delete the users belonging to the organizational unit associated with their role.
Manage organizational units associated with this role
Users have permission to manage the users of the organizational unit associated with their role.
Storage Management
Manage File Storage
Users have permission to view and upgrade File Storage.
Manage System Storage
Users have permission to view and upgrade System Storage.
View servers and mange application storage
Users have permission to view the workplace and application server’s utilization and manage application storage.
Manage group folders
Users have permission to create, edit and delete the group folders.
Users have permission to activate, deactivate and delete tiles.
Manage all dashboards
Users have permission to delete dashboards.
Application Management
Manage all applications
Users have permission to view all the applications in the marketplace and can purchase the application.
Manage subscribed applications
Users can view the subscribed applications and provision users to the application
Organization Settings
Manage logo & branding, setup organizational units, roles and permissions, workplace themes, office locations, environment variables, general settings, DNS, domain mapping
Users have permission to create, edit and remove the logo, set up organizational units, roles and permissions, workplace themes, office locations, environment variables, general settings, DNS, and domain mapping
Mobile Apps
Manage mobile app corporate branding and builds
Users have permission to create, edit and remove the mobile app, corporate branding, and builds.
Phone System
Subscribe phone system. Buy, configure, and delete phone numbers and view, export call logs
Users have permission to subscribe to the phone system. They can purchase, configure and delete the phone numbers, view and export the call logs.
Billing
Manage billing
Users have permission to view the billing details and manage the payments.
Activity Logs
View activity logs
Users have permission to view the entire system activity logs.
Domain mapping allows you to take corporate branding of Infince to the next level, by white-labeling your Workplace URLs. For e.g., If your business domain is xyzbiz.com, your default Infince URL would be ”https://xyzbiz.infince.com”. Instead, if you map Infince to your own domain with sub-domain as ”portal”, your new Infince URL would be “https://portal.xyzbiz.com”. You can choose the sub-domain name during the mapping process.
The time taken for domain mapping is typically 5 to 15 minutes, depending on the number of business applications you have subscribed to. If the process takes longer, please clear your cache and start over.
It is a one-time process, and the users with Administrative privileges can initiate the same. During the process, your data would be safe and continues to remain in your secure server and will not be affected by the mapping process. When the domain mapping is completed, the URLs for Infince Workplace, Applications and File share links will change and will be redirected to the new, custom URLs. However, it is recommended to update all your bookmarked URLs to reflect the domain change.
Steps to map Infince to your domain
In your Cloud Console, click on Administration > Settings > Domain Mapping. To initiate the process, click on Proceed button.
Note:
Please ensure you have a valid domain and credentials to access your domain management portal.
Infince will not be available while the domain mapping is in progress. Please initiate the process when the usage is minimal.
Domain Mapping
You will be directed to the Authenticate/Reauthenticate page, where you need to enter your Infince credentials, and click Authenticate/Reauthenticate button.
Reauthentication
Note: You can also click on the email notification to access/ browse the domain mapper application.
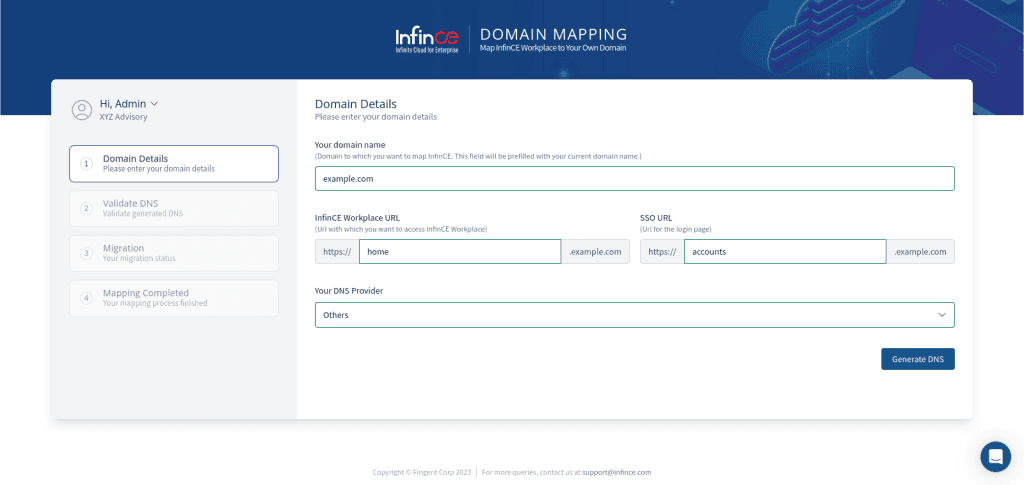
After successful authentication, you will be redirected to the Domain Mapping page. Domain Mapping is a step-by-step process where you need to provide the necessary details in each step. It involves three steps: Domain Details, Validate DNS, and Domain Migration. In the Domain Details tab, enter your:
Domain name – The domain to which you want to move to. The domain name will be pre-filled from your Infince Workplace.
Infince workplace URL– Enter the sub-domain that should be mapped to Infince. E.g:-portal, workplace
SSO URL – Enter the sub-domain that can be assigned to the Infince login page. E.g:-account, auth.
DNS Provider – Select Cloudflare if your DNS Provider is Cloudflare. Select Others if your DNS Provider is not Cloudflare.
Domain Details
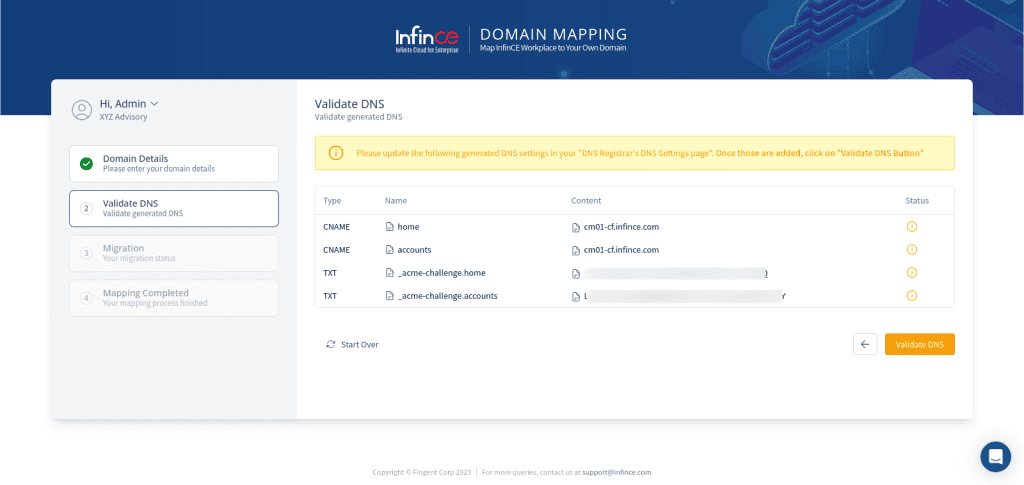
Once you have provided the details in the ‘Domain Details’ tab, click on the Generate DNS button. You will be directed to the ‘Validate DNS’ section when the DNS is successfully generated.
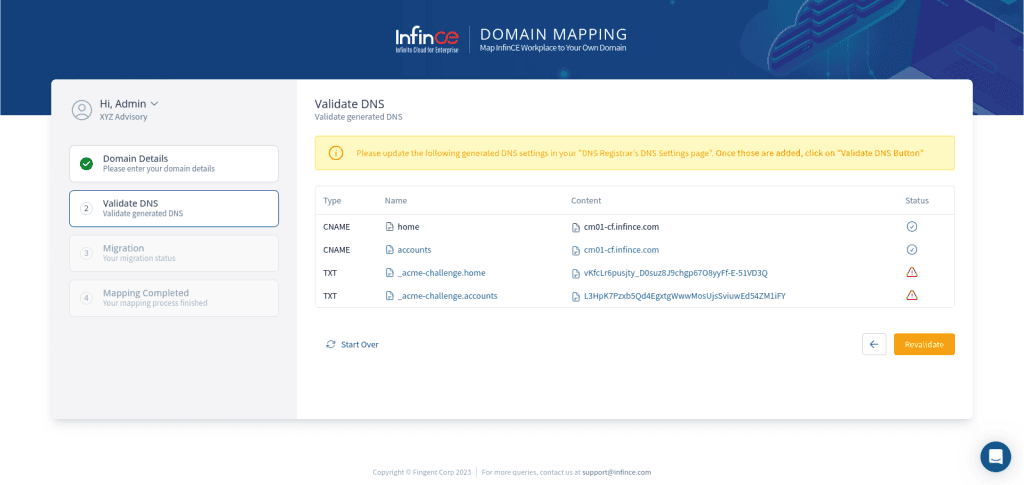
Validating DNS
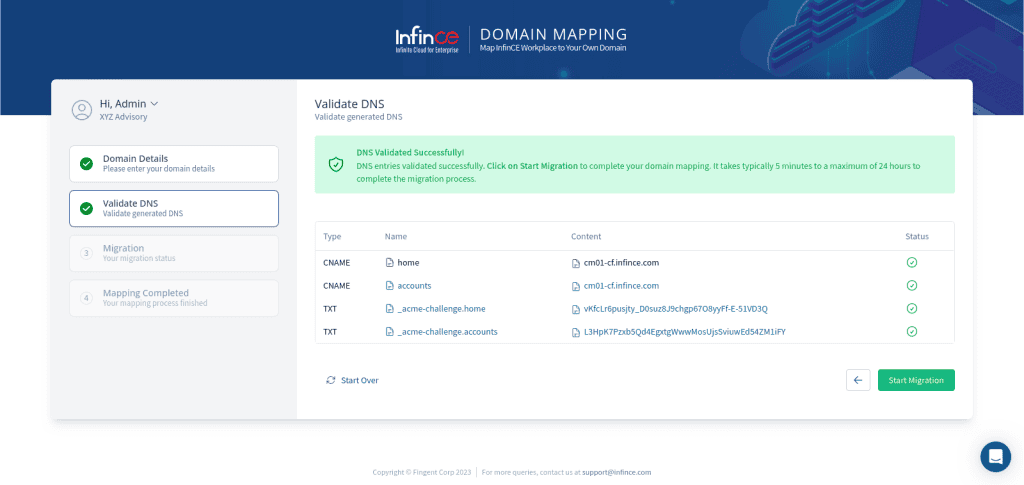
Add the generated DNS records to your DNS Registrar’s DNS Settings page and click on the Validate DNS button to validate the mapped DNS. You will get the ‘DNS Validated Successfully’ message if the DNS has been validated successfully. It may take some time to reflect the changes in DNS Registrar, so if any DNS entry mapping shows pending/failed, then click on the Revalidate button.
Revalidate
Click on the Start Migration button to complete your domain mapping.
Start Migration
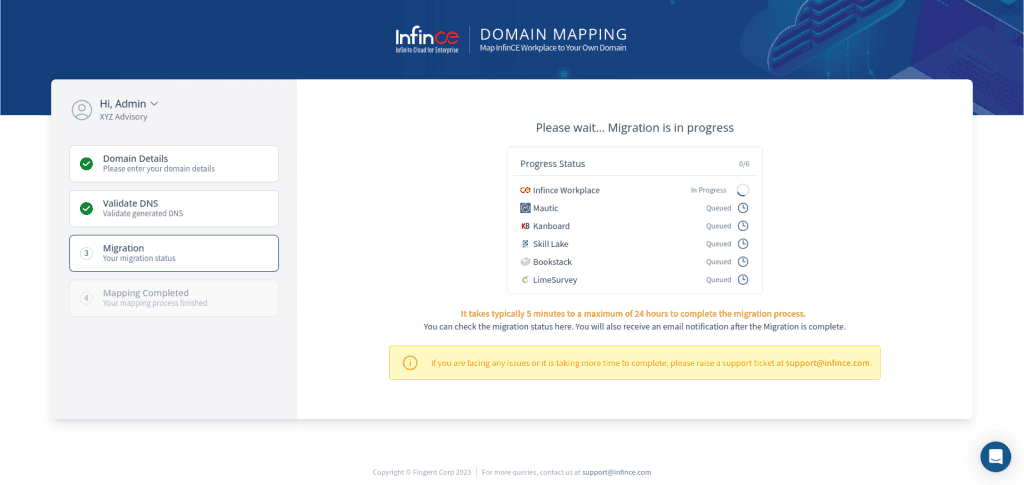
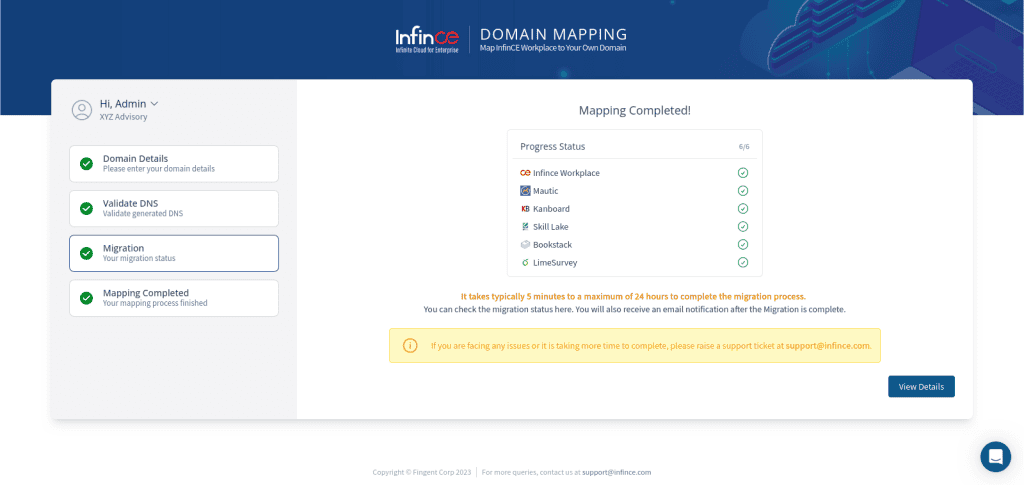
Once the migration has started, you will be directed to the ‘Domain Migration’ page, where you can view the migration status of the Workplace and all the subscribed applications.
Migration under progressMigration Completed
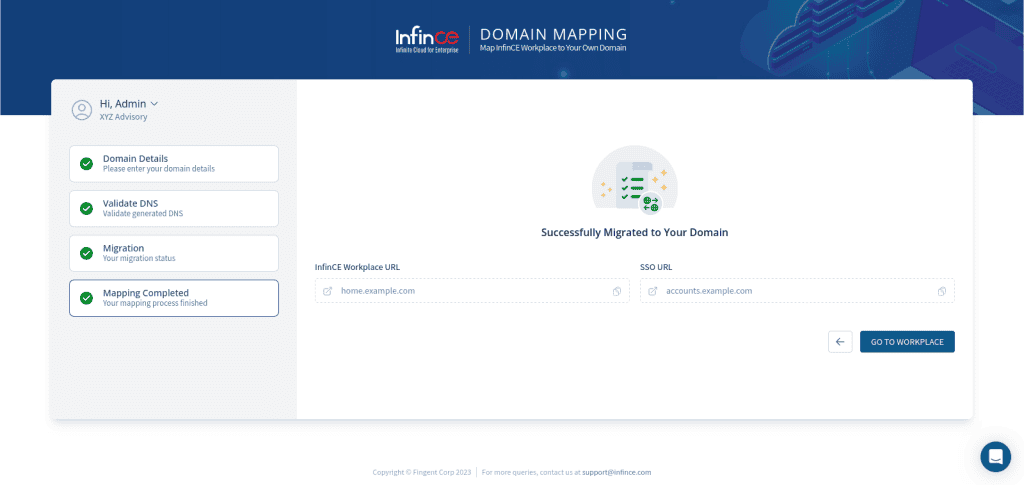
When the Migration process gets completed, you can view the Infince workplace URL and SSO URL in the ‘Mapping Completed’ section.
Migration Successful
You will also receive an email notification when the domain migration is complete. Click on the Go To Workplace button to navigate to the workplace.
Note:
If you face any issues during the migration process or if the mapping is failed, please email the Infince support teamat the earliest.
Only the user who has initiated domain mapping can complete the process.
After successful migration, you can view the domain mapping details (Administration > Settings > Domain Mapping) in the Infince workplace.
Digital marketplaces have been growing extensively since 2020 to help organizations lower friction and increase employee engagement. Since they bring…Read More
To add your Infince Email account in your iPhone, please follow the steps given below:-
Steps
Go to Settings > Mail and tap Accounts
Tap Add Account, tap Other and then Add Mail Account
Enter your name, Infince Email address, corresponding password, and a description for your account.
Tap Next.
Now you need to enter the email settings manually. Choose IMAP for your new account. Enter the information for Incoming Mail Server and Outgoing Mail Server as given below:
5.1 Incoming Mail Server:
a. Host Name is imap.infince.com b. Username is your full Infince email address, including ‘@<yourdomain>.com’ c. Password is the corresponding email password
5.2 Outgoing Mail Server:
a. Host Name is smtp.infince.com b. Username is your full Infince email address, including ‘@<yourdomain>.com’ c. Password is the corresponding email password
Tap Next. If your email settings are correct tap Save to finish. If your email settings are successfully synced up, the new email account will now be ready to use.
If the account fails to connect using SSL at Step 6, you would need to set it up manually. Choose “No” to continue with SSL and proceed to save the Account. Advanced settings for IMAP and SMTP should then be corrected (See step 8).
7a. Choose “No” to set up the account manually using SSL
7b. Tap on “Save” to save the Account
Manually confirm/correct the advance settings for IMAP and SMTP. Go to Settings > Mail > Accounts > [the new Account you created; look for the description given in Step 3] > Account
8.1 To verify/set the SMTP settings, tap on “SMTP” option under ‘OUTGOING MAIL SERVER” > Tap on PRIMARY SERVER (smtp.infince.com). Verify that the settings are as given below:
Use SSL: ON Authentication: Password Server Port: 465
8.2 To verify/set the SMTP settings, tap on Advanced at the bottom of the Account page and verify that the INCOMING SETTINGS are as below:
Use SSL: ON Authentication: password Server Port: 993
Your account should now be fully set up and functioning. If you are still facing any issue, please contact [email protected]
Reference: Summary of your Mail Server Details
Incoming mail(IMAP) server
Imap.infince.com Require SSL : Yes Port for IMAP : 993
Outgoing mail(SMTP ) Server
smtp.infince.com Requires SSL: Yes Requires TLS: Yes (if available) Requires Authentication: Yes Port for SSL: 465
A digital workspace is the virtual equivalent of your individual workstation. It is an integrated technology framework that leverages evolving…Read More
Digital marketplaces have been growing extensively since 2020 to help organizations lower friction and increase employee engagement. Since they bring…Read More
Infince Guest User feature facilitates easy collaboration between your employees, customers/business partners. Guest Users are external users for whom you can provide limited access on Infince, such as view permissions on Dashboards and Files (zero individual file storage), Chat with connected Infince users and, access to join Meetings and provisioned Applications. Infince users with relevant permissions can invite Guest Users by providing their email id.
Here is a quick walk-through of the Infince Guest User feature:
Inviting Guests
Infince users with required permissions can invite Guests to collaborate on the Infince Workplace. The guest users can be invited through Administration > People > Guest Users or People > Guest Users.
The steps for inviting Guest Users are given below:
Click on the ‘Invite Guest User’ button.
Inviting guest user
The ‘Invite Guest User’ pop-up appears, where you can enter the email id of the Guest and select the team and role (not mandatory) to which you are inviting the Guest.
Note: Only basic roles can be assigned to the guest user.
Click the ‘+’ button to add the guest user to other teams and roles.
Click on the ‘Submit’ button.
Inviting Guest User
The Guest will receive an email notification, where they can click to register with Infince.
The Guests will be listed in the ‘Guest Users’ page.
The status of the Guest will be ‘Pending’ until they register to Infince Workplace.
Manage Guest Users
Click the ‘Settings’ icon against the Guest user listing to view the invitation details. You can also cancel the invitation or resend the invitation while it is in pending status.
Cancel invitation
Guest User Profile
The Infince users can add and manage guest users with limited access to Infince Workplace. Guest users can only have view permissions on associated team dashboards and limited permissions on files, chats, and meetings.
Manage Guest User
Once the Guest has activated their account, click on the guest user name or on the ‘View’ icon to redirect to the guest’s profile page, where you can view the basic information, personal information, user details, applications used and team information of the guest user. You can edit the basic information, personal information and team details of the guest user. Click on the ‘Send Message’ button to send a message to the guest user. You can click the ‘Change Password’ button to change the guest user password.
Guest User Profile
Remove the guest userfrom the team
Click on the ‘Settings’ icon on the ‘Guest Users’ tab to view the user who has invited the guest user to the team.
Click the ‘Remove’ icon to remove the guest user from the team.
Guest Registration & Login
When the Guest is invited, an email is sent out to their email ID with the URL to register and create their Guest account on Infince. Details of how the Guest can access Infince are covered in the article “Guest Access to Infince“
Collaborating with Guest User
Sharing Files
The Infince user can share files with their Guest.
Click on the ‘Home’ menu on the top and click on the ‘Files’ menu on the top left.
File Sharing
Click on the ‘+’ icon to upload the file.
Uploading the file
Once the file is uploaded, click on the file and the ‘Share’ icon to type in the Guest User email id for sharing the file.
Sharing the file with Guest User
Sharing Folders
Infince users can provide the create and edit rights for the shared folders, so that the guest users can create and edit the files in that folder.
From the Infince Dashboard, click on the ‘Files’ menu and the folder you want to share. Click on the three dots and the ‘Details’ icon. In the right side, click on the ‘Sharing’ tab and type in the Guest User email id for sharing the folder with them.
Sharing the folder to the guest user
Provide the create/edit permissions for the shared folder. Then the guest user can create and edit files in the shared folder.
Setting permissions for the shared folder
Sharing Dashboards
Infince users can create a team and add Guest Users to it. In the ‘Home’ menu, click on the ‘Dashboard Settings’ icon on the top right. Click on the ‘Teams’ option, select the team from the drop-down and click on the ‘Submit’ button to share the Dashboard within the team. Now the Dashboard will be visible to all members of the selected team (including the Guest User) and can be editable by the users having Administrative privilege on this team.
Chat with Guests
The Infince user who invited the Guest can directly chat with them.
Chat with Guest Users
Click on the ‘Guest Users’ icon on the right navigation panel to view the list of Guests you have invited to Infince.
List of Guest Users
Invite Guest to Meetings
Infince users can invite their Guests as participants to meetings.
Adding Guest Users to the meeting
The Guest Users can view the meeting details in the ‘Meeting’ section of their Infince Dashboard.
Provision Applications to Guests
The users with Administrative privilege can provision applications to the Guest using the following steps:
Click on the Administration > Applications > Installed Applications.
Click on the ‘Manage’ button of the required application.
Installed ApplicationsProvisioning Guest User to the Application
Click the ‘Add User’ button.
Adding Guest User
In the Add User pop-up, select the user’s role, choose the ‘User’ option, select the Guest and click the ‘Submit’ button.
Managing Guest Users
As a user with Administrative privilege, you can view all the guest users by navigating through Administration > People > Guest Users. Click on the View button against the User to view the guest user details.
Previewing Guest User details
You can view the basic info, personal information, usage details, applications used, and team information of the Guest User.
Guest User Profile
Click on the ‘Settings’ icon to view the user who has invited the Guest to Infince.
Guest User Settings
You can view the Infince users connected to the Guest, the Teams they are part of, and when the invitations were sent out.
Guest User Invited by
Click on the ‘Remove’ icon to remove the Guest User from the team.
Click on the ‘Delete’ icon to permanently delete the Guest from Infince Workplace.
Organizations typically use several tools for their everyday work. Constantly switching back and forth between apps, managing subscriptions, and dealing…Read More
Infince Guest User feature facilitates easy collaboration between your employees and customers/business partners. Guest Users in Infince are the external users to whom we can provide limited access to select Infince features, such as Dashboards, Files, Meetings, Chat and Applications. Infince users with relevant permissions can invite the Guest Users by providing their email id.
Here is a quick walk-through of how Guests invited to Infince can register, access and collaborate on Infince:
Guest Registration
As a Guest, you need to follow the steps given below to register to Infince Workplace.
You will receive an invitation email from the Infince user who wishes to collaborate with you. Click on the link provided in the invite email.
Registering Guest User
You can enter the first name, last name and set a password for your Guest account.
Your email id will be pre-filled.
Successful registration
After successful registration as a Guest User, you can click on the ‘Login Now’ button to log in as a Guest to Infince.
Guest Login
You can log in to Infince using the email id and password set while registering to the system.
Guest User login
Once you have logged in, you will be redirected to the Home page.
Infince tour pop-up
Dashboards shared through teams will be displayed by default. The default Dashboard (What is Infince) will be the landing page if no team Dashboard has been shared with you.
The software applications provisioned to you will be listed under the “My Apps” menu.
View and chat your contacts, view meeting invitations, and attend meetings online with the Infince users by clicking on the corresponding icons on the right menu bar.
Use the menu icons on the top right to:
Change your themes and view the help articles.
Change the profile picture, password, and update other information.
Infince Meeting features facilitate easy collaboration & communication between your employees, customers or business associates over a seamless virtual platform. You can record your meetings, live stream it, share video/audio/screens, invite more people to join, conduct polls, have public/private chats, and control the participants. Here is a quick walkthrough of the features available in Infince meetings:
Joining the Meeting
Joining the meeting
Infince users can click on the meeting icon on the right side of the dashboard to view the scheduled meetings. Click on the meeting to open the meeting panel which displays the meeting name, meeting duration, organizer, and list of participants invited to the meeting.
Here are the ways by which an Infince participant can join a meeting:
Click on the link within the email
Open the Calendar event and click on the meeting link
Click on “Join Meeting” from the meeting details panel in Infince
Join the meeting from the Mobile App.
Essential Meeting Controls
All meeting participants have the following controls available for them for participating effectively in this discussion.
Mute/Unmute: Click on this icon to mute/unmute your speaker
Start/Stop camera: Click on this icon to enable/disable your video camera
Raise Hand: Click on this icon to raise your hand to notify the meeting organizer that you want to speak to the participants. You can use the emoticons to express the reactions and convey emotions.
Toggle Tiled view: Click on this icon to view the participants as tile view. If you have not enabled the tile view, the participants will be displayed in the speaker view.
Essential Meeting Controls
Inviting more users to the meeting
Meeting participants are usually invited while scheduling the meeting, but if you need to invite someone (Infince users or guest users) to join an ongoing discussion, you can invite them on the fly. The steps for inviting more users to the meeting are given below:
Click on the three dots or ‘More Actions’ icon
Invite people
2. The ‘Invite more people’ pop-up appears.
Inviting people
3. You can now copy the meeting url and share it with your users over email or chat.
Share screen
During Infince meetings, any participant can share their screen to other participants. The screen can be shared as a tab, window or entire screen.
Screen share
Click on the ‘Share screen’ icon to share the screen.
Sharing the screen
Grant moderator rights
You can assign one of your meeting participant as a moderator for the meeting.
From the participant list, mouse hover on the participant you want to grant moderator rights and click on the three dots icon.
Grant moderator rights
2. The Grant moderator rights pop-up appears. Click on the ‘Yes’ button to grant moderator rights to the selected participant.
Setting moderator rights
Security options
To increase the security of a scheduled meeting, the organizer can set a password for the meeting. The participants of the meeting need to enter the configured password to join the meeting.
Click on the three dots or ‘More Actions’ icon and click on the ‘Security options’
Security Options
2. The ‘Security Options’ pop-up appears, where you can enable the lobby mode. In the lobby mode, the organizer/moderator needs to formally approve the participants to join the meeting.
Enable Lobby mode
3. Click on the ‘Add password’ icon to create a password for the meeting
Adding password
Click on the ‘Add’ link to add the password.
To copy the password, click on the ‘Copy’ link
Removing password
Whiteboard
During Infince meetings, you can use Whiteboards to collaborate with your participants and share ideas/thoughts in a virtual background. They are used in the brainstorming, training, team meetings, etc. Only the meeting organizer or moderator will have permission to show the whiteboard. All participants can use the whiteboard once it is active. You can save the whiteboard as an image using PNG or SVG format.
Click on the three dots or ‘More Actions’ icon and click on the ‘Show Whiteboard’ option.
Show Whiteboard
The Whiteboard appears, where you can draw diagrams, type text, etc. You can use the shape formats and text editor tools while using the whiteboard.
Using the shape formats and text editor tools in Whiteboard
You can draw workflows using the whiteboards and share ideas with your participants.
Collaborating with people
Noise Suppression
During Infince Meetings, you can use the Noise Suppression feature to reduce the background noises. This helps to remove the unwanted noises around you and focuses only on your microphone sound.
Click on the three dots or ‘More Actions’ icon and click on the ‘Noise Suppression’ option
Noise Suppression
Record the meeting
The meeting organizer can record the meeting with video and audio clarity. Click on the More actions (three dots) and ‘Start recording’ option.
Record the meetingStart recordingStarted the recording
The meeting will be recorded in Cloud and saved to the organizer’s Files app in Infince at the end of the meeting, and the link will be shared via Infince email.
At the end of the meeting, you can rate your meeting experience.
Rate your experience
Share video
This feature helps to share a video with the participants during the meeting. During the video sharing, all other participants will be muted automatically.
Click on the three dots or ‘More Actions’ icon and click on the ‘Share video’ option
Share video
2. The ‘Share video’ pop-up appears where you can enter the video url and click on the ‘Share’ button to share the video to the meeting participants
Sharing the video link
Share audio
This feature helps to share a video to the participants during the meeting. During the video sharing, all other participants will be unmuted automatically.
Click on the three dots or ‘More Actions’ icon and click on the ‘Share audio’ option
Share audio
2. The ‘How to share audio’ pop-up appears where you can click on the ‘Continue’ button
Share audio settings
3. Select the screen and click on the ‘Share’ button to share the audio to the meeting participants
Start live stream
You can live stream the meeting to YouTube by entering the live stream key so that people can view the meeting on YouTube instead of joining the meeting in Infince.
Click on the three dots or ‘More Actions’ icon and click on the ‘Start live stream’ option
Starting Live Stream
2. Enter the live stream url and click on the ‘Start live stream’ button to start live streaming in Youtube.
Enter the live stream url
Public/Private Chat
The Public Chat functionality is for chatting with all the meeting participants, whereas the private chat functionality is to chat privately to the participant during the meeting. Organizer cannot see the private chats between participants. Given below are the steps for chatting with your meeting participants: Public Chat
Click on the ‘Open Chat’ icon to chat with the meeting participants publicly.
Open Chat
2. The ‘Chat and Polls’ window opens up where you can chat with your meeting participants.
Public Chat
Private Chat
Click on the three dots menu icon on the top right of the desired participant profile. Now click on the ‘Send private message’ icon to start chatting with your meeting participant privately.
Sending private message
2. The chat can be seen by the participant in the ‘Chat’ tab.
Private chat
Add to break room
Breakout rooms allow meeting organizers to create sub-meetings within their Infince meeting for smaller groups of participants to collaborate and have discussions. Meeting organizers can create breakout rooms during scheduled meetings.
Click on the ‘Participants’ icon to display the meeting participants list on the right side.
Meeting Participants
2. Click on the ‘Add break room’ button to add a breakout room during the meeting.
Adding a break room
3. Click on the ‘Join’ button in the Breakout Room panel to join the breakout room. The person joining the breakout room will switch from the main meeting area to the breakout space.
Joining the break room
4. Click on the ‘Leave breakout room’ to leave the breakout room.
Leaving the break room
Poll
You can create polls during the meeting, to gather insights and collect opinions of your meeting participants.
For creating a poll, click on the ‘Open Chat’ icon and the ‘Chat and Polls’ window opens up.
Poll
In the ‘Polls’ tab, click on the ‘Create a Poll’ button
Enter the question for the poll and the possible answer options.
Creating a poll
To add more answer options, click on the ‘Add option’ button and enter the answer options.
Click on the ‘Send’ button to create the poll
The poll will be launched during the meeting by the organizer
The participants can click on the ‘Vote’ icon to respond to the poll
Responding to the Poll
8. The participants can click on the ‘Submit’ button to submit the poll.
Submitting your response
9. If the participant wants to change the vote, click on the ‘Change vote’ icon.
Changing your vote
10. The organizer can click on the ‘Show details’ icon to view the poll details.
View details of the poll
Mute everyone
To avoid any unexpected or accidental noise from your meeting participants during a presentation, the organizer/moderator can select the mute everyone option. This feature helps to control the audio of all the participants.
Click on the three dots or ‘More Actions’ icon and click on the ‘Mute everyone’ option
Mute everyone
2. The ‘Mute everyone except yourself?’ pop-up appears where you can click on the ‘Mute’ button to mute the meeting participants.
Mute everyone except yourself
Disable everyone’s camera
If you want to control the video feature of the meeting participants, you can easily stop all incoming videos. You can disable the video of all the participants.
Click on the three dots or ‘More Actions’ icon and click on the ‘Disable everyone’s camera’ option
Stop everyone’s video
2. The ‘Stop everyone’s video except yourself?’ pop-up appears where you can click on the ‘Stop video’ button to disable the camera of the meeting participants.
Stop everyone’s video except yourself
Remove a person from the meeting
The organizer/moderator can remove the participants from the meeting.
From the participant list, mouse hover on the participant you want to remove from the meeting. Click on the three dots icon and the ‘Kick out’ option.
Remove a participant from the meeting
2. The ‘Kick this participant?’ pop-up appears, where you need to click on the ‘Kick’ button.
Removing the participant
Performance settings
This option helps you to manually adjust the audio/video quality for the Infince meetings. To configure the performance settings, follow the steps given below:
Click on the three dots or ‘More Actions’ icon and click on the ‘Performance settings’ option
Performance Settings
2. The ‘Performance settings’ pop-up appears, where you can adjust the quality of your video/audio.